
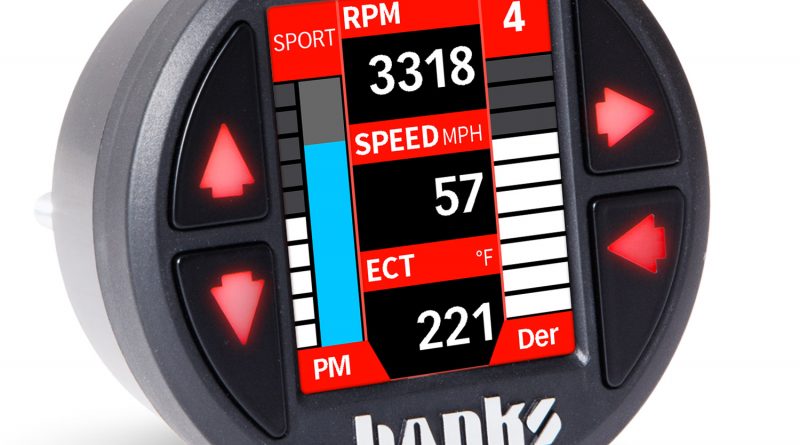
97654 iDash 1.8 DataMonster and Super Gauge: Section 5 Gauge Selection
Section 5 Gauge Selection Parameter Selection To change iDash’s displayed parameters: Go to “Menu“and select “Gauge Selection.” See Step A, B. Select a “Field #” to change
The Leader in Diesel Performance

Section 5 Gauge Selection Parameter Selection To change iDash’s displayed parameters: Go to “Menu“and select “Gauge Selection.” See Step A, B. Select a “Field #” to change

Section 4: Layout The “Layout” menu allows you to select various gauge layouts for the Gauge Screen. Some special layouts become available when connected to a module.

Section 3: Software Introduction and Interface NOTE: It is recommended that you periodically check for software updates for your iDash here. Register your iDash to receive important

Table of Contents Disclaimer of Liability and Warranty End User License Agreement (EULA) Section 1: SAFETY PRECAUTIONS Section 2: Mounting and Connection iDash Section 3: Software Introduction

Section 2: Mounting and Connection iDash If installing into vehicle with OBDII communication (standard): 1. Locate the OBDII port in your vehicle. The OBDII port is located

Section 1: Safety Precautions Always observe safety precautions! Gale Banks Engineering urges you to always follow safety precautions. Be sure to carefully read and understand each precaution

Important! Please READ! This End-User License Agreement (“EULA”) is a legal agreement between you (either an individual or a single entity) later referred to as “LICENSEE” and

Disclaimer of Liability and Warranty Gale Banks Engineering Inc., and its distributors, employees, and dealers (hereafter “SELLER”) shall in no way be responsible for the product’s proper

Monster-Ram w/Intake Plate Install Video Note: The billet heater plate, Item #22, is transitioning to a cast design (42731) with integrated fuel rail spacers. If your kit

FITMENT ALERT: Dana M275 General Installation Practices 1. Before starting work, familiarize yourself with the installation procedure by reading all of the instructions. 2. Disconnect the negative