Banks 6.0L Power Stroke Airflow Upgrades
Blue Collar Garage chronicles the rebuilding and upgrading of his 6.0L power Stroke in a 7-part series. He chose the Banks Intercooler, High-Ram, and Upgraded Boost Tubes for a major airflow upgrade.
Why they’re better:
- Improves power, durability, and fuel economy
- Reduces boost pressure loss
- Dramatically increases air density to manifold

Full Video Transcript
00:00 And if you guys want to, you can go ahead and throw this old shield on. This is off of the old turbo. You got three 8 mm bolts holding it on. So if you guys want to put that back on, you can—just got to remove it from the old turbo. Go ahead and screw in your three 8 mm bolts.
00:21 It came with a new clip for holding the pigtail on, which would go kind of like this right here, holding it into place. There’s no screw hole there now, so I’m not too sure yet if I need to put it off on one of these. I’ll wait until we get the turbo all plugged in and see where to bolt that bracket.
01:23 I did find this little brown ring that goes in the center here—it was inside that Power Stroke Products upper gasket set. So I’m going to replace this guy. Pull it out, stick the new one in, just like that.
01:56 Next, let’s get our oil filter return on. Pull out your Torx T27 screw, grab your return tube, and set it in here. Give it a turn and it kind of locks into place. Start the screw, tighten it up. Torque spec: 27 in-lbs for a reused tube, 53 in-lbs for a new one.
03:04 Now, the EGR valve. I had it soaking in carb cleaner for a few days, then brushed it out. Moves freely now and snaps back into place. Don’t get carb cleaner in the electronic portion. In your gasket set, they include orange O-rings and a silver paper gasket. Place the gasket, lube up the O-rings, and get them on.
05:28 Install the EGR valve back in place. It may be tight, but tightening the two bolts evenly will pull it down snug. Plug it back in.
06:42 Next, the oil filter housing. Since I’m doing the regulated return with a fuel bowl delete, I’ll be cutting off the unused portion. Clamp it in a vise, use a reciprocating saw at an angle, smooth it with a grinder, then clean out all aluminum shavings.
08:21 Drop the oil filter housing back in place with the new O-ring. Use three Torx T45 screws and a stud for the fuel bowl delete. Torque to 11 ft-lbs. Install the long stud finger tight.
11:09 Install the oil filter into the housing cap. Always use Motorcraft filters. Replace the O-ring, lube it, snap the filter in, and torque the cap to 25 Nm (25 Newton meters).
13:30 Now the fuel bowl delete block. Add spacers on the stud to set the correct height. Position it so the lines aren’t stressed. Add the nylon lock nut finger tight for now.
15:32 Route the driver’s side fuel line behind the thermostat housing and into the head with a banjo bolt and copper washers. Don’t tighten yet. Do the same on the passenger side.
18:30 Route the crossover line behind the EGR cooler pipe. It’s tight but it fits. Keep everything finger tight until adjusted.
24:29 Tighten the nylon lock nut while pulling the block slightly forward. Torque the banjo bolts to 20 ft-lbs. Snug up the lines, holding the fittings with a wrench to avoid bending.
28:16 Install the alternator. Since mine is aftermarket, I had to mount the regulator differently—only one bolt holds it, but it clears the hood. Connect the small hose from the fuel line to the regulator, bend fittings as needed, and snug everything up.
36:32 Leave the bottom return line and pump feed for later. Focus now on sensors and front assembly. Plug in the alternator, VGT solenoid, and other harnesses. Mount the bracket for the clip on the shield.
42:16 Install the thermostat with a new Motorcraft one. Torque to 17 ft-lbs.
44:06 Install the exhaust back pressure sensor. Align it carefully, torque the bracket nuts to 23 ft-lbs, and plug it in.
46:36 Mount the FICM (fuel injection control module) on the bracket. Carefully seat all three plugs until they click. Verify the lock tabs are engaged. Torque the brackets snug.
52:39 Install the new belt tensioner, torque to 18 ft-lbs. Install the new idler pulleys, torque to 35 ft-lbs.
55:04 Install the serpentine belt. Route it around all pulleys, release tension with a ratchet, and make sure it’s seated in the grooves.
58:23 Install the degas (coolant reservoir) bottle. Hook up lower and upper hoses, tighten clamps, and ensure clearance with the belt.
63:19 Install the lower radiator hose to the front cover. Snug the clamp.
64:04 Install the EGR throttle position sensor (only on ’03–’04 models). Use a new gasket, bolt it on with 5 mm Allens.
65:08 Install the Banks Technic intercooler kit. My ’05 Excursion has an ’04 engine, so the first intake elbow they sent didn’t fit. Contacted Banks—customer service sent the correct elbow in two days.
70:30 Install the fan and shroud. Thread the fan clutch on, tighten with a pneumatic tool, torque bolts to 30 ft-lbs.
73:43 Install the radiator, intercooler, and transmission cooler. Reuse rubber mounts, install brackets, snap in transmission cooler lines until they click.
82:06 Install the power steering cooler, tighten with 7/16.
82:28 Install the cross member and hood latch, aligning with Sharpie marks.
84:21 Reinstall the front clip, rubber flaps, condenser, brackets, and AC lines. Replace O-rings if needed.
92:16 Install intercooler studs and coolant filter bracket. Replace coolant filter.
93:32 Install upper trim panel, push pins, and radiator brackets. Reconnect upper radiator hose and degas bottle hoses.
97:03 Trim the battery tray bracket (on ’03–’04) for intercooler pipe clearance. Grind edges smooth. Install hot side intercooler pipe—it’s a very tight fit with the aftermarket turbo. Removed alternator to get it seated, then reinstalled.
100:01 Tight clearance around alternator and oil fill neck. Relocated oil fill cap directly to valve cover—just need a funnel to add oil now.
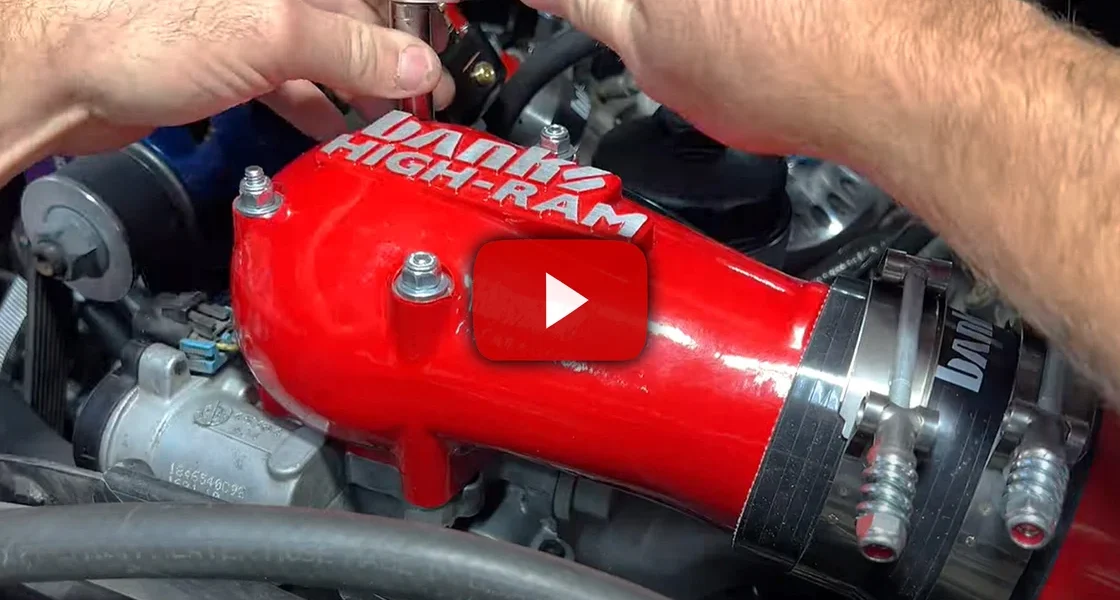
105:23 Install the correct Banks intake elbow (03–04 version). Apply blue Loctite to studs, torque lightly. Use O-rings and sealing washers on driver’s side studs. Torque lock nuts to ~9 ft-lbs (careful not to break studs). Tighten hose clamps.
112:50 Trim the fan shroud for elbow and intercooler pipe clearance. Snap it back in.
114:13 Install the battery tray, tighten bolts.
115:08 All that’s left: install batteries, air intake, fill coolant and oil, mount the Mishimoto catch can, run the fuel bowl delete lines, and install the FASS pump. Reinstall headlights, grille, and bumper. Roll the truck forward for fuel pump installation.