97710 Boost Tube System for 2017 thru 2019 L5P
INSTALL INSTRUCTIONS
Part #s
25999
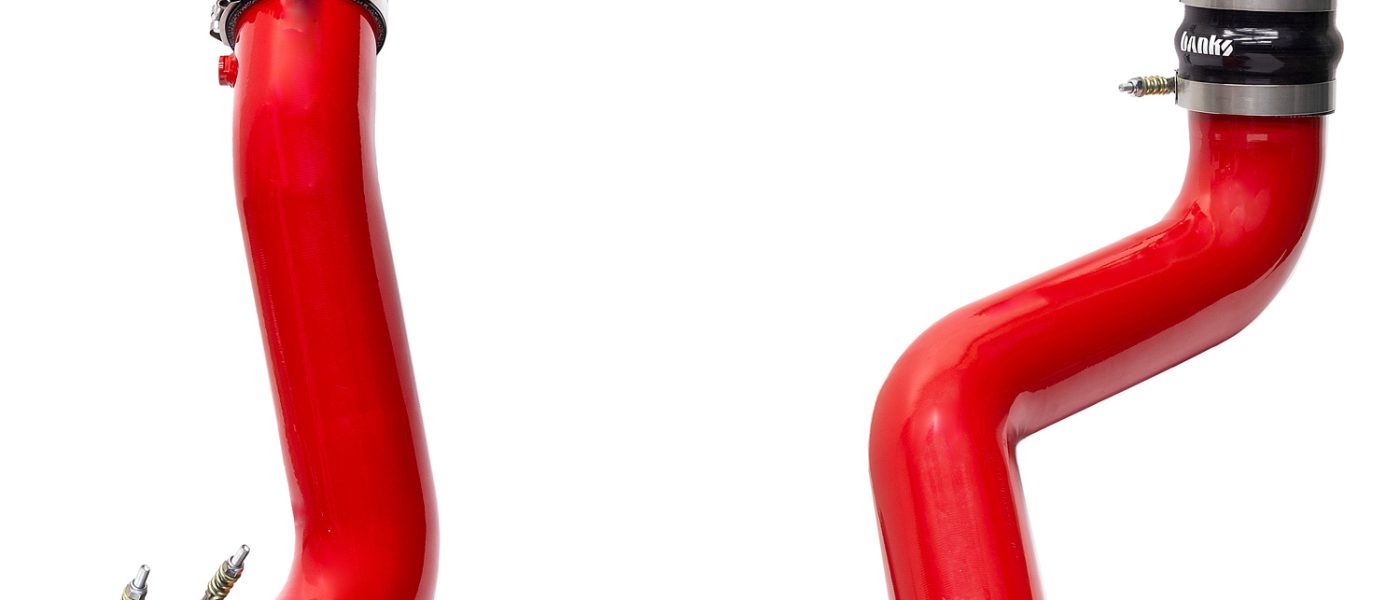
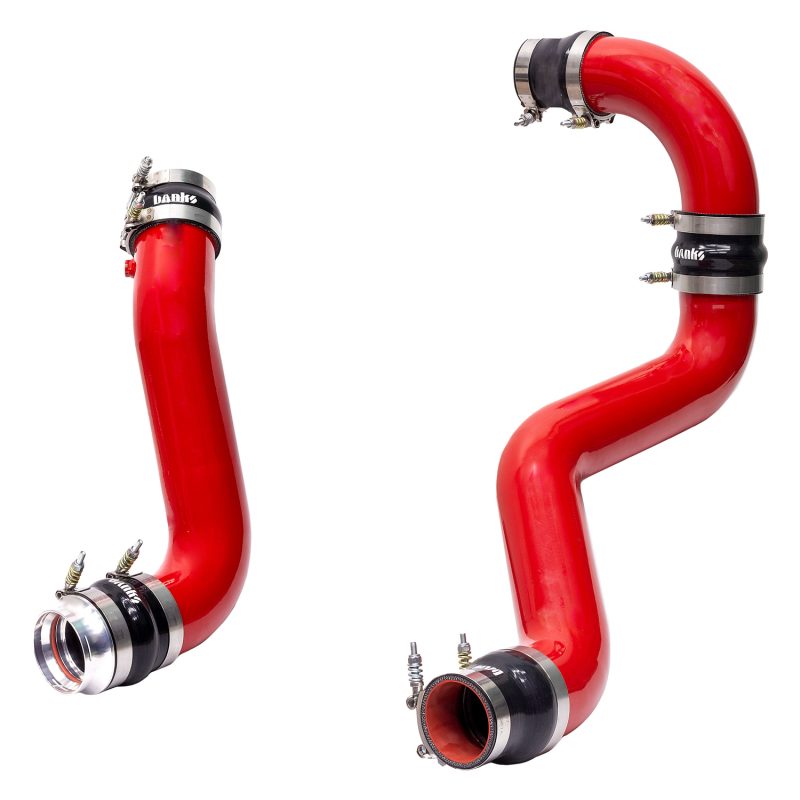
Banks High-Flow Boost Tubes 2017-2019 Chevy/GMC 2500/3500 6.6L Duramax, L5P
Please read through the following instructions thoroughly before starting your installation. If you have any questions please visit our Support Page.
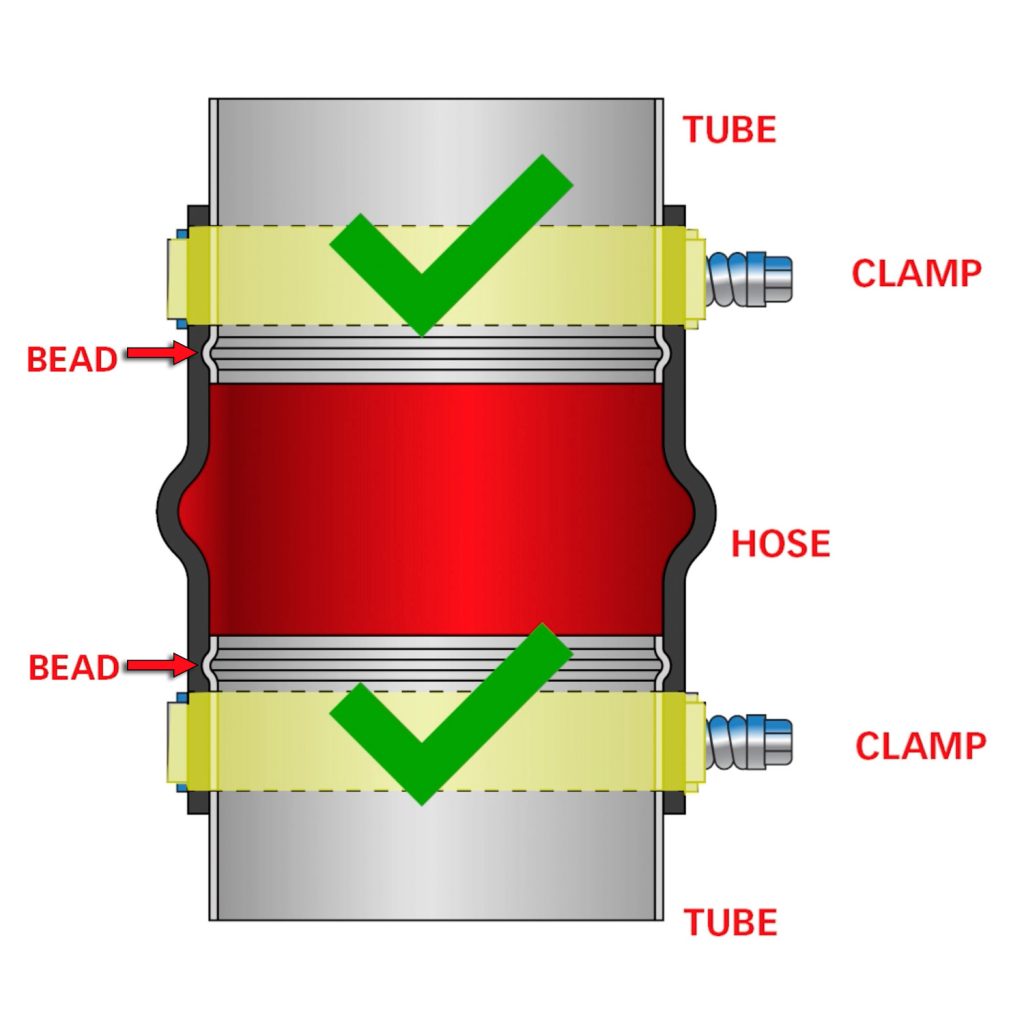
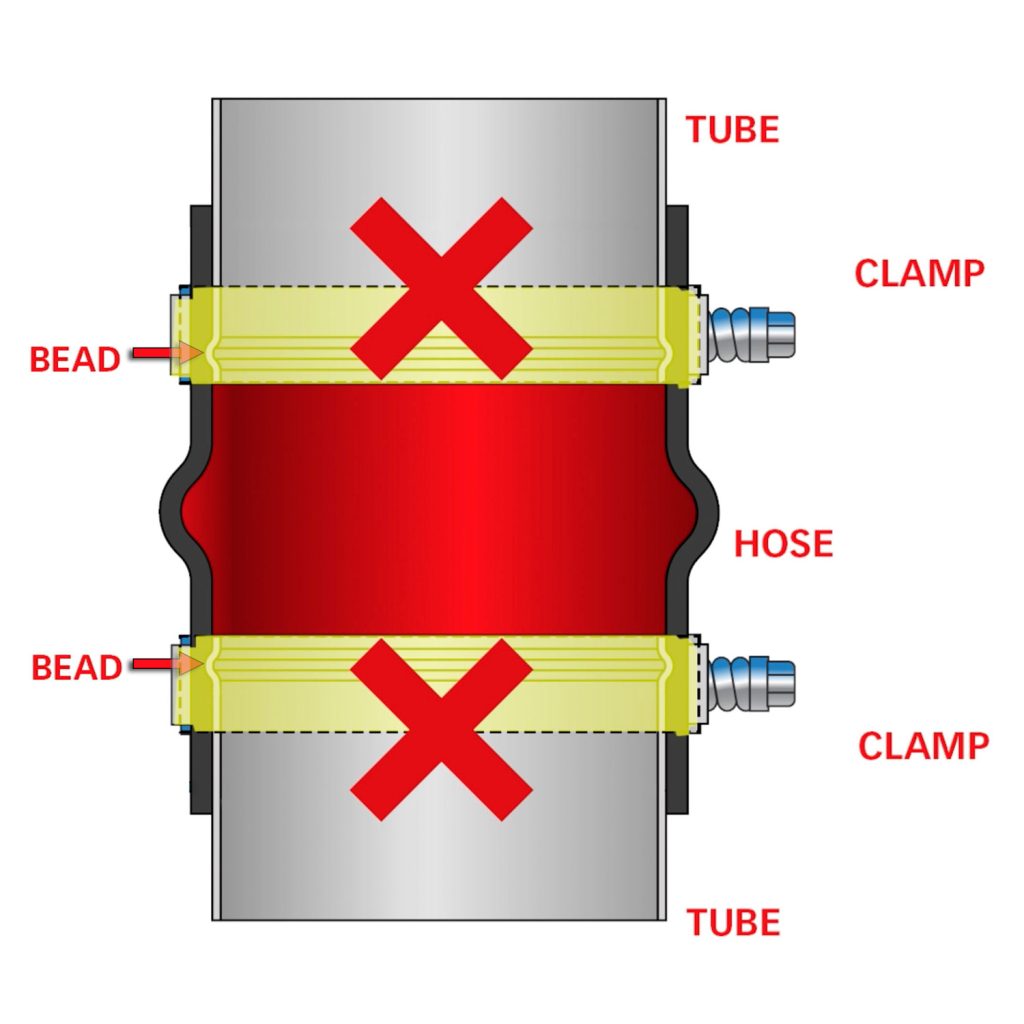
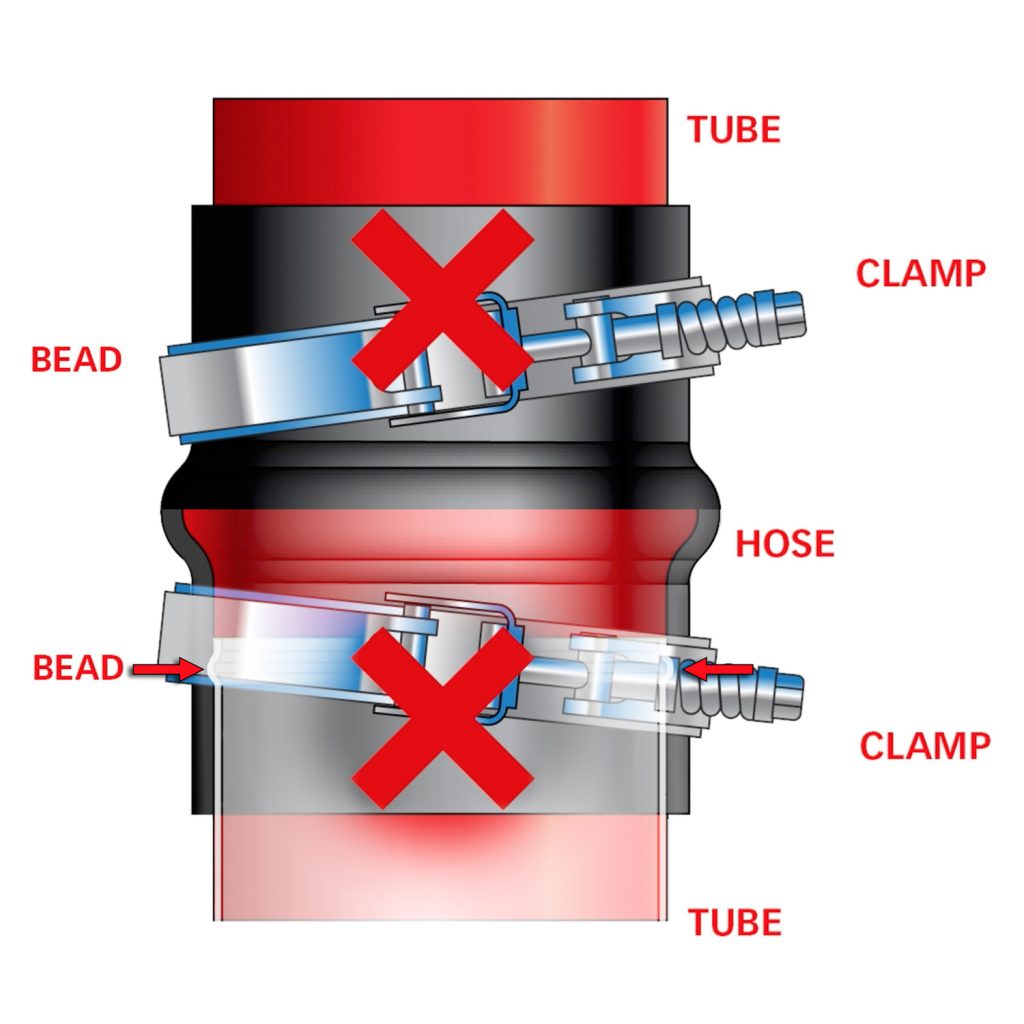
ATTENTION: Boost-Tube Clamps
When Installing the clamps, be sure the hose and clamps go on far enough to clear the bead on each end.
An improper installation, such as a clamp sitting directly on a bead or crossed diagonally, will result in a boost leak.

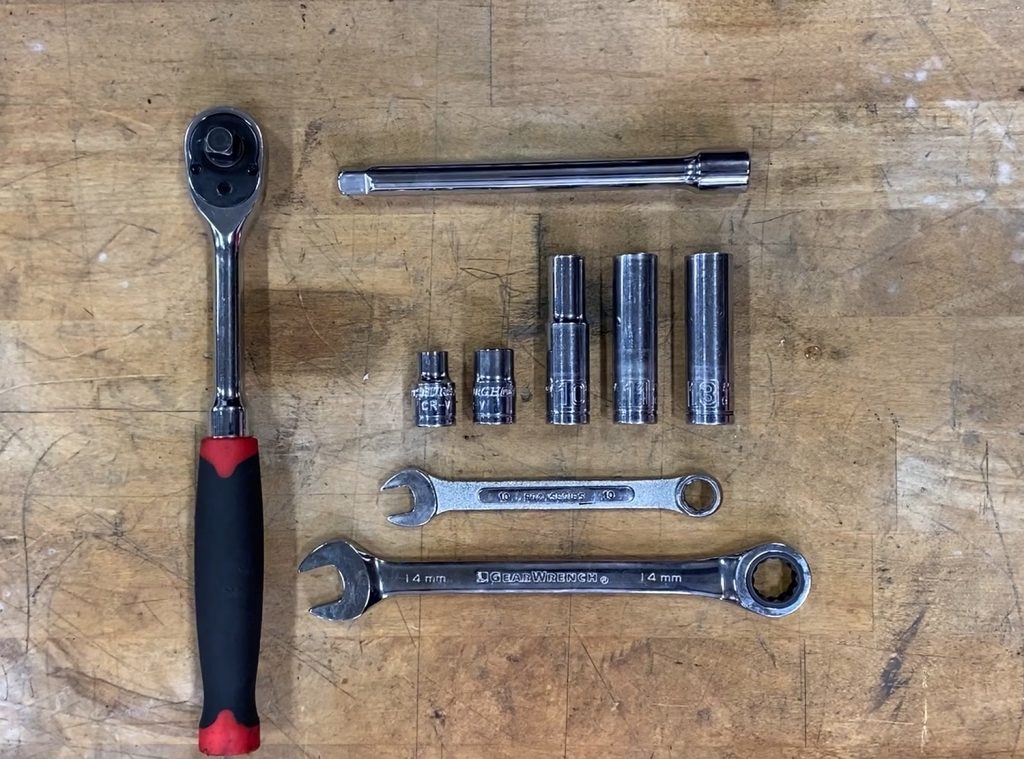
Required Tools
Socket Driver
Socket Extension
8mm Socket
10mm Socket
10mm Deep Socket
11mm Deep Socket
13mm Deep Socket
10mm Wrench
14mm Wrench
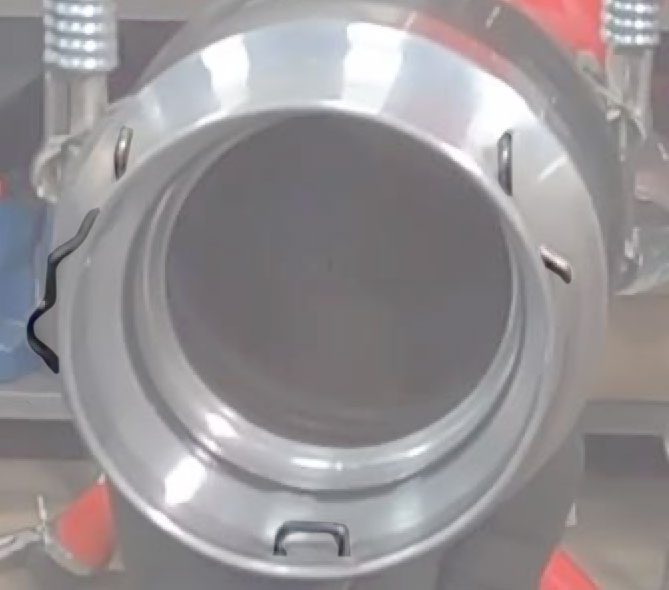
Bill of Materials

General Installation Practices
Removal of the Stock Tubes

1. Begin by putting the truck on a flat surface and remove the fender well.

2. Disconnect the mass air sensor, by sliding the red locking mechanism back until you hear a click.
Then, use your thumb to depress the tab and push the connector back off the housing.

3. Remove the factory intake using an 8mm socket to loosen the clamp on the factory duct.

4. Remove the two bolts on the cover assembly using an 8mm socket.

5. Lift the assembly out to expose the air filter.

6. Remove the factory air filter by pulling upward until you hear the retaining clips pop.

7. Disconnect the inlet throttle temperature sensor.

8. Remove the 10mm bolt holding the upper boost tube in place.

9. Remove the lower end of the factory tube by unclipping the retaining clip with a flathead screwdriver.

10. Remove the factory tube from the engine compartment.

11. Using a 10mm wrench remove one bolt from the fan shroud to allow for flexibility.

12. Disconnect the other factory tube by using an 11mm deep socket on the upper clamp.
NOTE: The lower clamp is behind the support mount and is difficult to reach.

13. Locate the lower clamp and carefully feel for the correct tool placement. Use a socket extension.

14. Once the clamps have been loosened, gently pull the tube from the intercooler.
Installing Banks Boost Tubes

1. Prepare for the installation by removing the sensor from the factory tube and install it on the Banks tube.
2. Remove the retaining clip from the factory tube charge air cooler end and install it on the Banks boost tube adapter.

3. Pre-install the rubber boots and loosely tighten the hose clamps in place.
Please note the orientation of the tubes shown in the photo is the correct orientation for installation.

4. Install the cold tube through the top of the engine.
NOTE: Take care not to accidentally rotate any of the clamps you pre-installed.

5. Slide the upper portion of the tube over the throttle body.

6. Slide the lower portion and push until you hear the retaining clip pop into place.

7. Fasten the clamps on the top portion of the tube with an 11mm deep socket.

8. Reconnect the throttle valve inlet temp sensor.
Installing the Hot Tubes

1. Install the boot with a clamp onto the intercooler flange.
NOTE: It’s important to orient the lower clamp with the drive nut in the vertical position because tool access is limited.

2. Use an 11mm deep socket with an extension to secure the clamp.

3. Install the lower tube by feeding it through the wheel well and up into the engine bay.

4. Loosely install the second clamp onto the lower boot and gently slide the lower portion of the tube into the boot.

5. Prepare the upper section of the tube by installing the boots and clamps.
Be sure to leave the clamps slightly loose to allow for flexibility.

6. Place the upper tube into position, and slide the upper portion of the tube onto the turbo flange.

7. Join the two tubes together using the mid-boot and a clamp.

8. Double check the fit of the tube by pulling on it and making sure all clamps are in place.

9. With everything in place, lockdown the upper tube by tightening the clamp.

10. Secure the mid-boot by tightening the clamps.

11. Tighten the clamps on the bottom tube.

12. Reinstall the fender covers on both sides of your truck.

13. Reinsert the airbox and filter. Simply press the airbox down until you hear it snap into place.

14. Place the intake back into position by reconnecting the duct.

15. Lock the airbox down by reinstalling the bolts.

16. Reinstall the MAP sensor by pushing together until you hear the click.

17. Secure the intake duct back into place by tightening the clamp.

18. Congrats! You have successfully installed your Banks boost tube kit!