Keep Your MAP Sensors Clean

Full Video Transcript
00:13 all right what is up guys welcome back to the channel and today got another install for you and that is the banks dual map sensor relocation kit so a little more about the map sensors and why you would want to buy this kit so uh if you have a Duramax then you got uh
00:30 what’s called called map sensors that’s located on your intake tube and if you have a 2023 or newer durx you got two map sensors and not just one so one of the map sensors is for reading pressure and then the other map sensor reads the temperature basically that information
00:48 relats back to your ECM that tells the ECM you know exactly what the air fuel ratio needs to be how much fuel to give your truck and the reason why it’s important to keep these things clean and why you would want this kit is uh all that affects your fuel mileage and and
01:10 even your engine power if these things get built up and they can’t read right and when it goes to send that information to the ECM that could really mess up your air fuel ratio and then in return hurt your fuel mileage and your power of your truck so that’s kind of
01:25 where this kit comes in handy this kit is actual relocation kit from Banks and just want to say that I’m not sponsored by Banks or anything like that I just bought this with my own money and uh we’ll leave the link down below for this kit but this kit basically what it does
01:42 is you have your map sensors that is down inside your intake tube and I’ll kind of show a diagram on the screen here so basically your map sensors are inside your intake tube and what this kit does is it brings them out of the intake tube so basically out of the direct air flow and I’ll show you
02:01 another diagram here of how it kind of lifts those up out of there and basically it just uh moves them to a better location so they don’t get as dirty as fast now I’ve have seen a lot of posts and things on the internet that you know these don’t work or you don’t
02:17 really need these but I think a lot of people get confused that these completely eliminate the need to clean these and it doesn’t it just eliminates the need to clean them so often and some of the research that I’ve done really should be cleaning them probably every
02:33 oil change but I have it in mine I’ll be honest and I got 39,000 miles on it and I’m kind of curious to see you know exactly how Caked Up these things are because I have noticed a difference in my fuel economy since I bought the truck new I’m kind of thinking that the map
02:50 sensors is probably got something to do with it we’ll take them off later in a video I’ll show you how to clean them uh show you how to install the Kit but if you already purchased your kit we’ll go ahead and get to the install if you haven’t purchased your kit maybe watch
03:03 the video watch when I take my sensors out see how dirty they are and see if it’s something that you may want to purchase for your truck but all that being said guys I’ll go ahead and show you what comes in the kit and then I’ll show you what tools you’ll need and what
03:15 steps to take to get the kit installed all right guys so when you get your kit this is what you’re going to get if you get the dual map sensor relocation kit like I said for the 23 models and up you do have two and not just one if you do purchase the single one then you’ll just
03:32 receive this one and it goes right on the top of the intake but the duel has one on top and then one they call it the bottom but it’s kind of like the side but you’ll get your T20 torch bit here uh four bolts and you get your two uh Billet aluminum match sensors uh kind of
03:53 has like Banks engraved on the top of it which I think looks pretty cool but that’s what you’ll get in the kit and now I’ll show you what tool you’ll need to get these installed all right guys so only thing you’re going to need to install this if you can find it is a 10
04:08 mm uh ratchet socket I did use a smaller uh ratchet uh because you got to unhook the battery ternal and it’s kind of hard to get to so this uh smaller one works a little better and also if you want to grab you a uh just a small uh one-way screwdriver it probably wouldn’t hurt to
04:28 help get your Clips off but but you should be able to get them off with your fingers by just sliding them back but if you want to grab one of those you can should be all you need to get these took off and we’ll go ahead and start with our first step be disconnecting the
04:42 batteries you do have two batteries in durax you got one here and then you got one over here on the passenger side so uh we’ll go ahead and start with disconnecting those to prevent any kind of thing happening to your map sensors or anything but they are located right here on your passenger side
05:07 and uh so this is the top map sensor and this is the bottom map sensor so it’s uh here’s your air filter so straight back top bottom but first we’ll go ahead and disconnect the batteries all right guys so we going to go ahead and disconnect the first battery loosen up the negative
05:36 here then we go over to the passenger side and get the other battery all right guys here on the passenger side and you see the battery cable is back in here so that’s why I used this smaller ratchet all right guys so go ahead and take our uh map sensors out and your top one here
05:57 you’re GNA have this little gray pen and what you want to do is you can pull it back with your finger it goes back about eighth of an inch take your screwdriver here one way and just pull it push it all the way back there we go and it should slide all the way out all right
06:19 guys once you get that little pen pushed out try to give you better view here there’s a little clip right here basically you just push down on that and should come right off now we’ll go ahead and unplug the bottom and the bottom has a little red pin here all right got that one
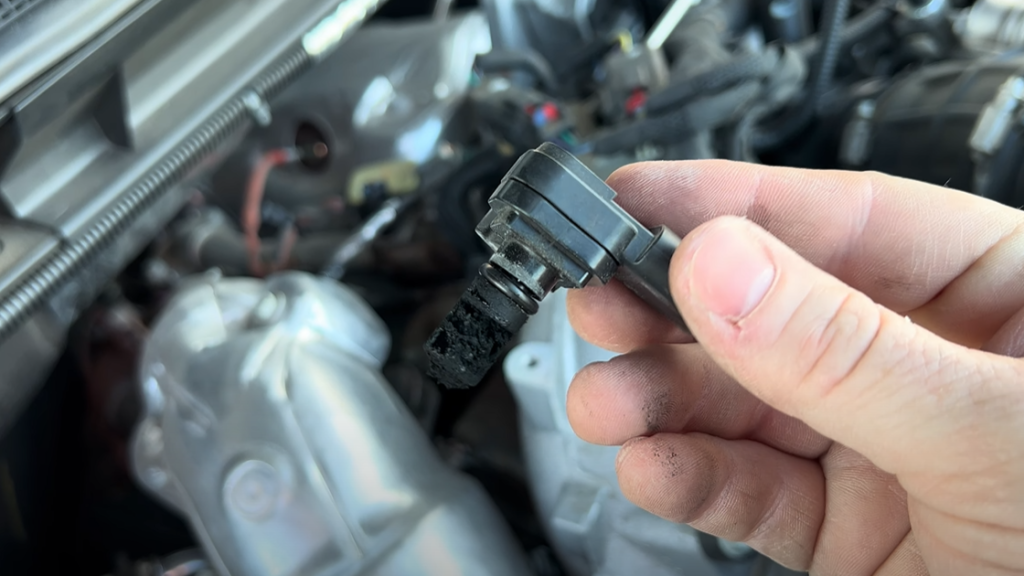
06:50 off go ahead get a 10 mm and take out the top one definitely kind of curious to see how dirty these things are to get this out you just wiggle around a little bit wiggle it here and it should come out and man check that thing out that thing is Caked Up I don’t even
07:25 know the focus here I don’t even know how it was reading uh and I’m sure the bottom is just as bad since I haven’t been cleaning these uh I want to go ahead and clean them now but I actually might buy some new map sensors cuz you can buy them for like 40 bucks a piece and get a brand new set
07:49 but I’m going to clean these for right now just for the video and I am going to go ahead and take the bottom one off and I’m sure the bottom one is probably just as bad and like I said this truck’s got 39,000 Mi on it so if you’re having problems with fuel economy or power or anything like that
08:16 then I’m most definitely going to say it this could have something to do with it bottom one here a little more difficult to get out because of the uh wires but there’s the bottom man it’s cake Plum up too so we will go ahead and get those clean and I’ll show you the proper cleaner to
08:47 use and we’ll get them put back in with the new spacer all right guys so just laid them out on some cardboard here and this is the type of cleaner that you want to use this is a smaller can but they do make big cans of it this is just all I could find at Walmart and uh you won’t find
09:07 map sensor cleaner uh you only find mass airflow sensor cleaner so this here is a good brand the CRC also very important do not use brake cleaner or anything like that on these because it will mess them up so make sure that you use the mass air flow cleaner I’m sure there’s
09:27 some other brands out there as well also I seen where you could take a toothbrush to them if need be so we might spray them here and then get us a toothbrush and slightly go over them so going to give those just a second to set and then I’m going to get a small toothbrush and go over these a
09:56 little bit all right guys so I let those set for about a minute or so but I found this and it’s just a little soft brush this came with something my wife bought she probably kill me for doing this but just take and brush those off you see it just you don’t have to
10:17 put a lot of pressure on it or anything it comes right off and then can already see how much cleaner it is we’ll go ahead and spray it some more all right guys so we got that one pretty well cleaned up see uh so we’ll go ahead and get our bottom sensor cleaned up and uh you do want to give that time
10:53 to uh dry out and make sure that you kind of stand it upright that way anything that got up inside of it will drain out got our other one here go ahead and so we will go ahead and open our box up here and install our new spacers and I was actually surprised that this
11:22 little can is only 4 o but it cleaned both sensors but we’ll go ahead and uh put our spacers on MX sensors and then uh go ahead and install them all right guys so this will be your top sensor here and it is I’ll show you the part number on it so 436 29d and then this one is 436
11:51 38b so this one’s your bottom one uh I’m not sure if they got the B on there because it is for the bottom but uh just kind of show you that way you don’t get them mixed up but we’ll start with the top one first and I say grab your top sensor don’t forget your top sensor has the bigger plug on it what
12:13 you want to do is align this bolt hole up with this one and you just put it straight back in there like that and it comes with this uh T20 torch bit you’re going to put that right in there go ahead and tighten it down it just has to be snugged up it don’t have to be super tight or anything
12:54 so that one’s ready to go now grab your bottom sensor and same thing just line your bolt hole up and that will slide right back in there again get one of the provided screws and they already have lock tide on them and everything so that’s really nice all right got that in ready and then
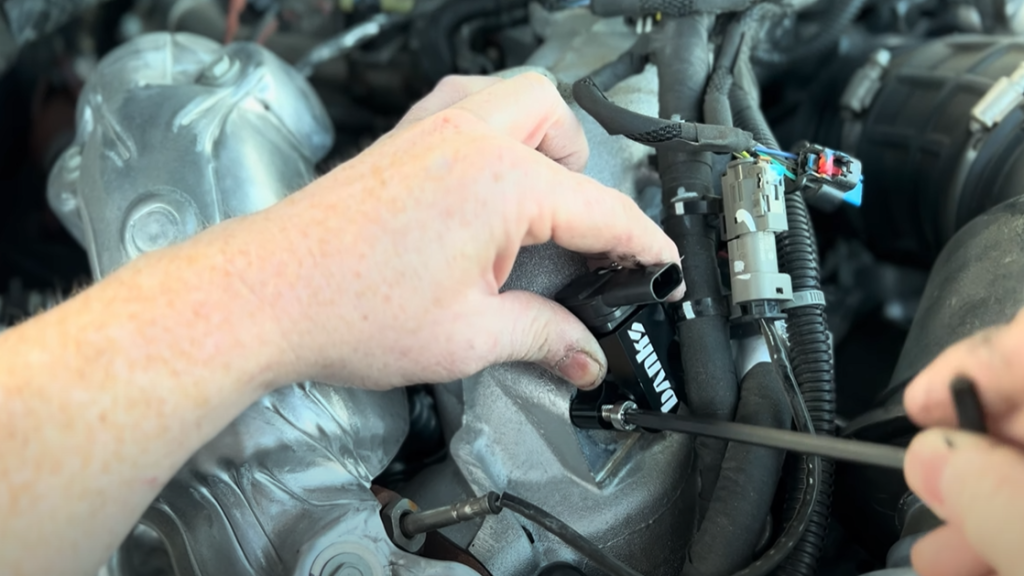
13:34 you’ll have two more torch bits that goes back into the intake manifold let’s grab our sensors and we’ll go back over to the intake all right guys so go ahead and install the bottom one first as far as tightening these guys I mean they don’t have to be like super Tor down or anything just pretty
14:08 snug and I really like where it relocated the bottom one too because the stock one was kind of hard to get to with these cables any the way but we’ll go ahead and clip our plug in and make sure you push your little red tab in get a locked in go over to the top tighten this one down
14:42 and snug it up like I say don’t have to be super tight or anything and then let’s go ahead and get our plug back in you probably really didn’t have to take that little gray clip all the way out but kind kind of get your clip started back in there and that way when you plug it in you can
15:05 just push it back in there now overview of how they look and I really like uh the look it get to the intake with these black uh anodized aluminum I think looks really good and we’ll go ahead and plug our battery terminals back up and turn the truck on make sure everything works good all
15:39 right guys so hope that video helped you get these installed and kind of help you decide if you want to buy some of these spacers for your truck in my opinion I think regardless of whether you buy the spacers or you don’t I think that these things need to be took out and cleaned
15:52 at least uh every 5,000 miles or so I heard a lot of people that does it every oil change which is probably a good thing as you seen in the video mine was super Caked Up and that probably was affecting my gas mileage and things like that so but if you have any questions or
16:07 anything about the video or about these sensors uh you can leave those down in the comments and I always try to get back to everybody kind of let me know in the comments too if you plan on purchasing this for your vehicle and what your thoughts are on it another
16:22 thing too uh make sure you’re subscribed to the channel and what I’ll do is we’ll run this for another 20,000 miles or so and then we’ll take them back out and kind of Judge and see you know if these spacers are worth it or not so but I really appreciate you guys watching
16:36 taking the time out to support the channel and we’ll catch you in the next one peace
“The earlier GM Duramax trucks only have one sensor,” explains Cameron Normal in the latest YouTube video about this 2024 Silverado. “But if you have a 2023 or newer Duramax L5P, then you have two of them. One reads temperature, and the other reads pressure. Those readings go back to your ECM and let it know what the air/fuel ratio is and how much fuel needs to be given to the engine. It’s really important to keep these sensors clean, and why you’ll want the Banks MAP Sensor Relocation Kit because how all those readings affect your fuel mileage and engine power. These sensors can get buildup on them, and then they can’t read right. When these dirty sensors send information to the ECM that could really hurt your performance and mileage.”
That’s where the Banks MAP Sensor Relocation Kit comes in. It moves the sensors out of the intake tube and out of the intake air’s stream. The intake’s air is mixed with exhaust for emissions purposes, forcing the engine to swallow dirty exhaust and sticky oily buildup. “It moves them to a position where they don’t get as dirty, as fast. I haven’t cleaned mine for 39,000 miles, and I’m curious to see how they look, especially since I have noticed a reduction in fuel economy.”
After a short tutorial on how to remove the two sensors and taking a look at his own, reality sunk in. “Oh, man… that thing is caked up! I don’t even know how it was reading?” Cameron goes over the proper way to clean the sensors, and the visual difference before and after is mind-blowing. Installing the cleaned sensors in the MAP Sensor Relocation Kit is simple and one of the easiest ways to ensure that your truck performs its best mile after mile. MAP Sensor Relocation kits are available for GM, Ford, and RAM.