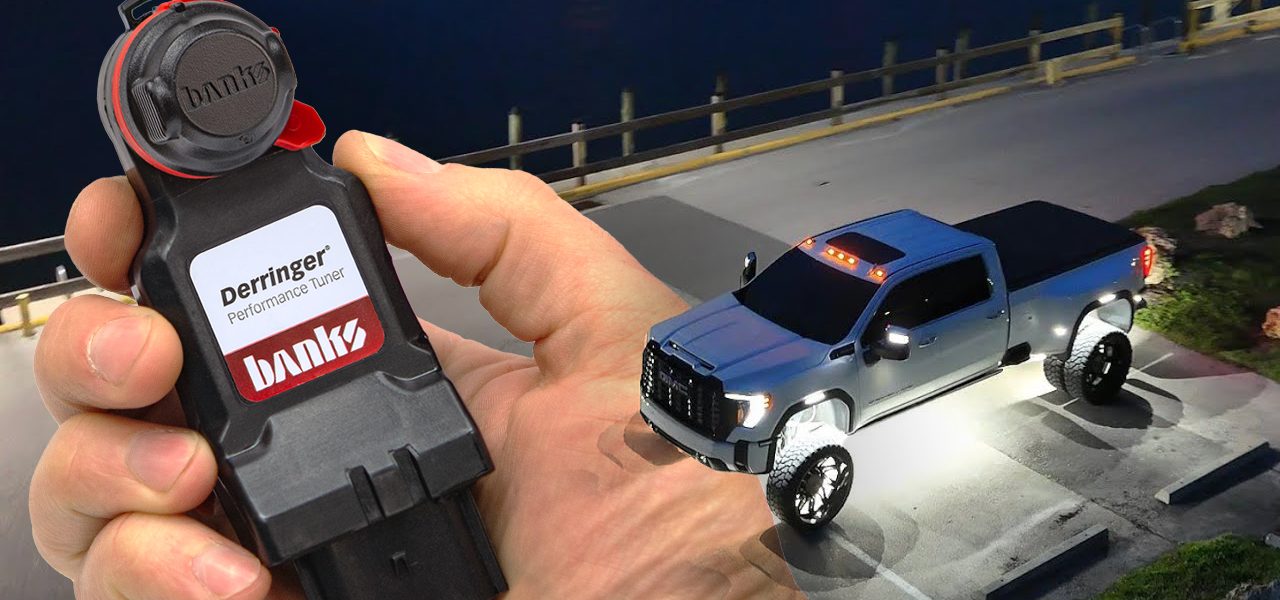
Derringer for 2025 L5P Duramax: Plug-and-Play Power
Oliver from Cool Dad Stuff loaded up his 2025 GMC Dually with some goodies from Banks. “The long-awaited” Banks Derringer for 2024–25 L5P Duramax is here and it’s plug-and-play power you can feel.”
Why Banks Is Better:
- Real-world quicker: +86 hp / +178 lb-ft to the wheels
- Stacks with Pedal Monster & iDash: Cleaner control, on-the-fly tweaks
- Leaves no fingerprints: Easy to remove for dealer service
- Smart integration: Intercepts MAF/MAP/FRP & injector for precise fueling

FULL VIDEO TRANSCRIPT
00:01 [Music] What’s up, guys? Welcome back to another video. Today is the day. It is finally here. The long-awaited Banks Daringer for the 2024–2025 L5P Duramax. Now, they’re claiming an additional 86 horsepower and 178 pound-feet of torque to the wheels above and beyond a stock L5P Duramax. We
00:52 did also purchase a Draggy Pro. Stay tuned till the end of the video. We’re going to see how those numbers translate into the real world. Now, the DY does already have both the I Dash Pro and a Pedal Monster installed in it, but today we’ll also be installing a set of Banks
01:07 MAP sensor spacers or the Banks MAP sensor relocation kit, both upper and lower. The link for all three of these items will be in the description. Without further ado, let’s get right into it. So, what we’ve got in the box, first Daringer high output system. We do have the Daringer device itself. And
01:25 then Banks does include this little bypass plug used for diagnostics. Store it in the glove box. They’re very, very adamant about swapping these out when you go to the dealer. So, if you go in for an oil change or something, you’re going to want to remove the tuner, the Daringer, and install this
01:41 little bypass plug, which will give you the ability to read some extra diagnostic stuff up on the Dash Pro. And then quick preface before we get into the rest of the stuff. I am not gonna pretend to be an expert. To be real, I have no idea what most of this stuff is,
01:56 but that’s what YouTube’s for. We’re gonna figure this stuff out together. Looks like this is going to be the main harness that connects to the Daringer itself. This will probably come through the firewall, get hooked up to either the Pedal Monster or the Dash Pro. And
02:11 then this is going to be the main harness for the Daringer. So, one side’s going to get hooked up to the Daringer, and then these are all going to go and bypass some of the other sensors. So, this is going to be one of the injectors, it looks like. We’ve also got
02:29 the MAP as well as the MAF in here somewhere. MAF right here. And then last but not least, FRP—whatever that is. Fuel rail pressure sensor. Maybe just a guess. I will throw some text up over the screen if I am wrong. That’s going to be installed in conjunction with the Banks MAP sensor
02:52 relocation kit, also known as the MAP sensor spacer kit. We do have both the upper and lower, maybe the upper and lower, not sure which is which, as well as some included bolts. And they gave us a little Allen wrench, which is nice. Last but not least, is the Draggy.
03:08 Never actually seen one of these in person. I was pretty shocked by how small it is. This is the Pro. So, it did come with the included windshield suction cup mount. It’s in that little box there. All right, guys. Let’s get into it. All right, one of the first things we’re
03:25 going to do is disconnect the negative battery terminals. Passenger side’s going to be an 11 mil and the fat one on the driver’s side is going to be a ½ inch. Now that we’ve got both of the batteries disconnected, the next thing we’re going to be doing is disconnecting
03:41 the harness for the upper sensor and then removing the upper sensor altogether. Uh so yeah, we’re going to start by removing this upper harness. You’re going to pull back on this little gray clip. Press down on the clip as you remove the harness from the sensor
03:56 itself. Next thing we’re going to do is take a 10 millie, remove this baby here, and then to get the sensor loose, give it a little jiggle, pull it out. It’s only 5,000 miles on this truck, and it is filthy. I’m not sure if you guys saw all that soot, but yeah, we’re going to spray this
04:23 thing off and clean it out. So, they don’t actually make MAP sensor cleaner, so we’re going to be using MAF sensor cleaner. You do not want to use brake cleaner or any other type of weird solvent on these. And what you’re going to want to do is spray this bad Larry until the sensor itself as well as
04:48 the little plastic cage around it is pretty much set free. Actually cleaned off pretty easy. Probably torching my grass right here, but nice clean sensor. Next thing we’re going to be doing is taking the sensor and sliding it into the relocation kit—the little spacer here.
05:26 Then we’re going to be taking one of these included bolts. T30 I believe. Slide it into the little hole. We’ll get it hand-tight first. Then we’ll take the included little tool and crank that baby down. Sensor is going back into the little hole. The O-ring was pre-installed.
05:59 I did not have to install the O-ring into this bad Larry. Just making sure there’s no dust sitting up there. Take our included T30 bolt, slide it in, get it finger-tight. Tough to do with the rubber gloves for me at least. I’m obviously not a professional mechanic, but this stuff can be done yourself.
06:31 No crazy tools. We’re in the driveway. At first that felt pretty loose, but it feels nice and snug now. Don’t want to over-torque it. Then we’re going to go ahead and plug the sensor back in. Hear a little click. Push that tab back down. It’s locked in. Now, this is the
06:58 next one we’re going to be replacing. Going to be a quick rinse and repeat. All right, guys. So, that’s it for the sensor relocation kit. One and two installed. On to the next part of the Daringer install. All right. So, first sensor we’re going to intercept is going to be
07:15 the MAF (mass air flow). We’re going to pull up on that little red button, push down on the little black lever behind it, and pull that out. Then whatever side this is is going to go in to intercept. And then we’ll plug this one in. Got to plug it in properly. Get a little click on both those.
07:54 Sensor to intercept number two is going to be the MAP sensor. If your truck is a ’23 or newer, like mine, you’re going to have two. We’re going to be intercepting the bottom one. If your truck is a ’22 or older, I guess you’re only going to have one—it’s the
08:11 top one, so replace that one. Again, if you’ve got two, replace the bottom one. Same process as before. Pull up on this little red tab, push down on the lever, and wiggle this little thing out. Both ends click in. Didn’t have that little red thing pulled up all the way—there we go.
08:40 Little click. Push down. Slight click. Push down. Sensor number three: fuel rail pressure. Pull up on that little red tab. The lever for this one’s kind of in the middle. Push down the lever, disconnect. Rinse and repeat, baby. Same process as the last few.
09:20 All right, so now that we’ve got sensors one, two, and three, we’re going to do the injector connector, which is way the hell down there. I’m going to start by kind of draping the harness over towards the driver’s side of the cab. Whoa—totally just fell off my gosh darn
09:49 step. Almost busted a swore and got demonetized right there. YouTube, talk about restraint. Having a baby will help you control your swears. Gosh darn it. All right. Anyway, so yeah, this is going to go over towards the driver’s side of the cab. This is eventually going to get plugged into
10:08 said Daringer. And then this bad Larry is our injector connector. Inspector Gadget, injector connector—I don’t know why that’s so much fun to say. The injector connector is going to be down there to the left of the dipstick. Let’s see if this will focus.
10:31 Only got 4x zoom, but I think you can see that little red tab. People have been complaining about how hard this specific connector is, so I’m going to try and get a good little view and see if we can make this look easy. Let’s get it.