Banks PowerPack on an Ford F-150. “The idea is to build a performance truck that can be used as a daily driver and as a weekend camping/exploring/desert running truck.”
We decided the vehicle of choice would be a Ford F-150. So, much like what a lot of our readers might own and be in a position to modify and upgrade. As such, we purchased a clean 2006 XLT Supercab with 6.5-foot bed. We went with the reliable three-valve 5.4L Triton V-8 backed with the 4R75E four -speed auto tranny.
We’ve got some plans to turn this truck into a fun dirt romper but keep it practical as well. The idea is to build a performance truck that can be used as a daily driver and as a weekend camping/exploring/desert running truck. We’d like to leave the bed mostly intact to retain cargo area for hauling building materials, camping gear, and dirt bikes. The project emphasis will also be towards a good bit of DIY work using readily available vendor products. Most of the work could be done in an average home garage, but might require some fabrication tools. We also know that a lot of you can work on your trucks on the weekend, but can’t have the truck down for a long time. So, we’re looking to try to complete each build phase over a weekend or less so the truck is ready to drive to work again on Monday.
One of the first upgrades we wanted to tackle was engine performance. We were pretty pleased with our engine power, but know we’ll yearn for a little more power and torque as we upgrade to bigger tires later. We went in search of more power first.
Most truck enthusiasts are well aware of the prowess of Banks Power when it comes to making big diesel power. But not everyone knows that Banks also offers some kits for gasoline engines as well. We turned to them when we wanted to add some ponies and pulling power to our Triton V-8.
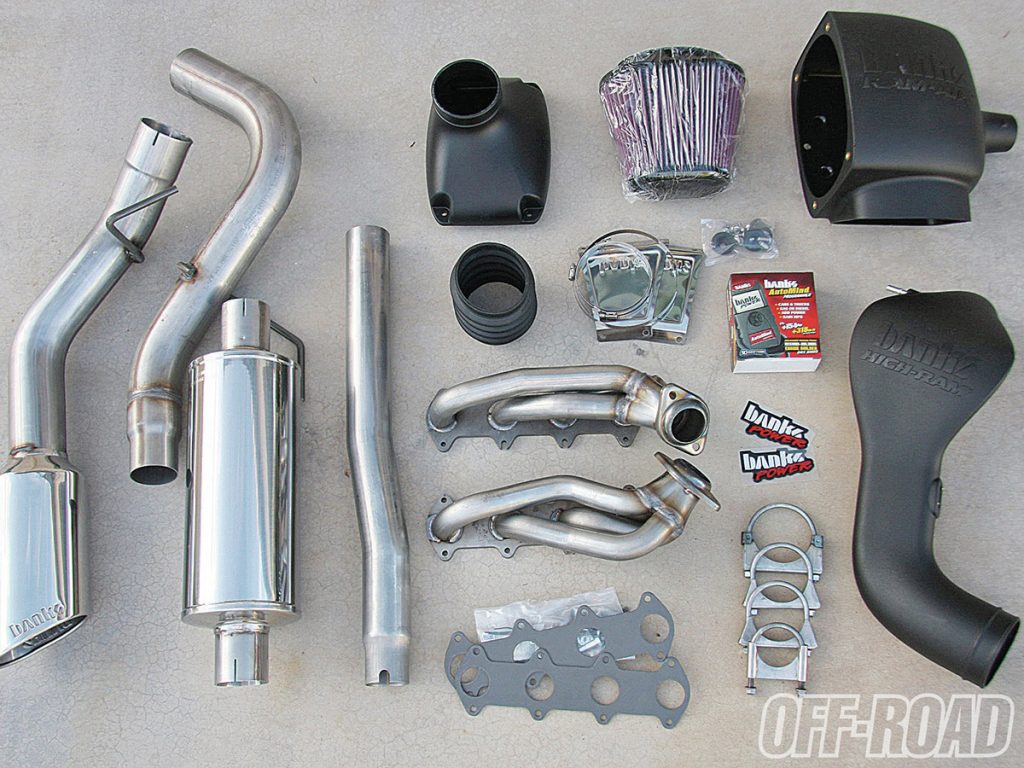
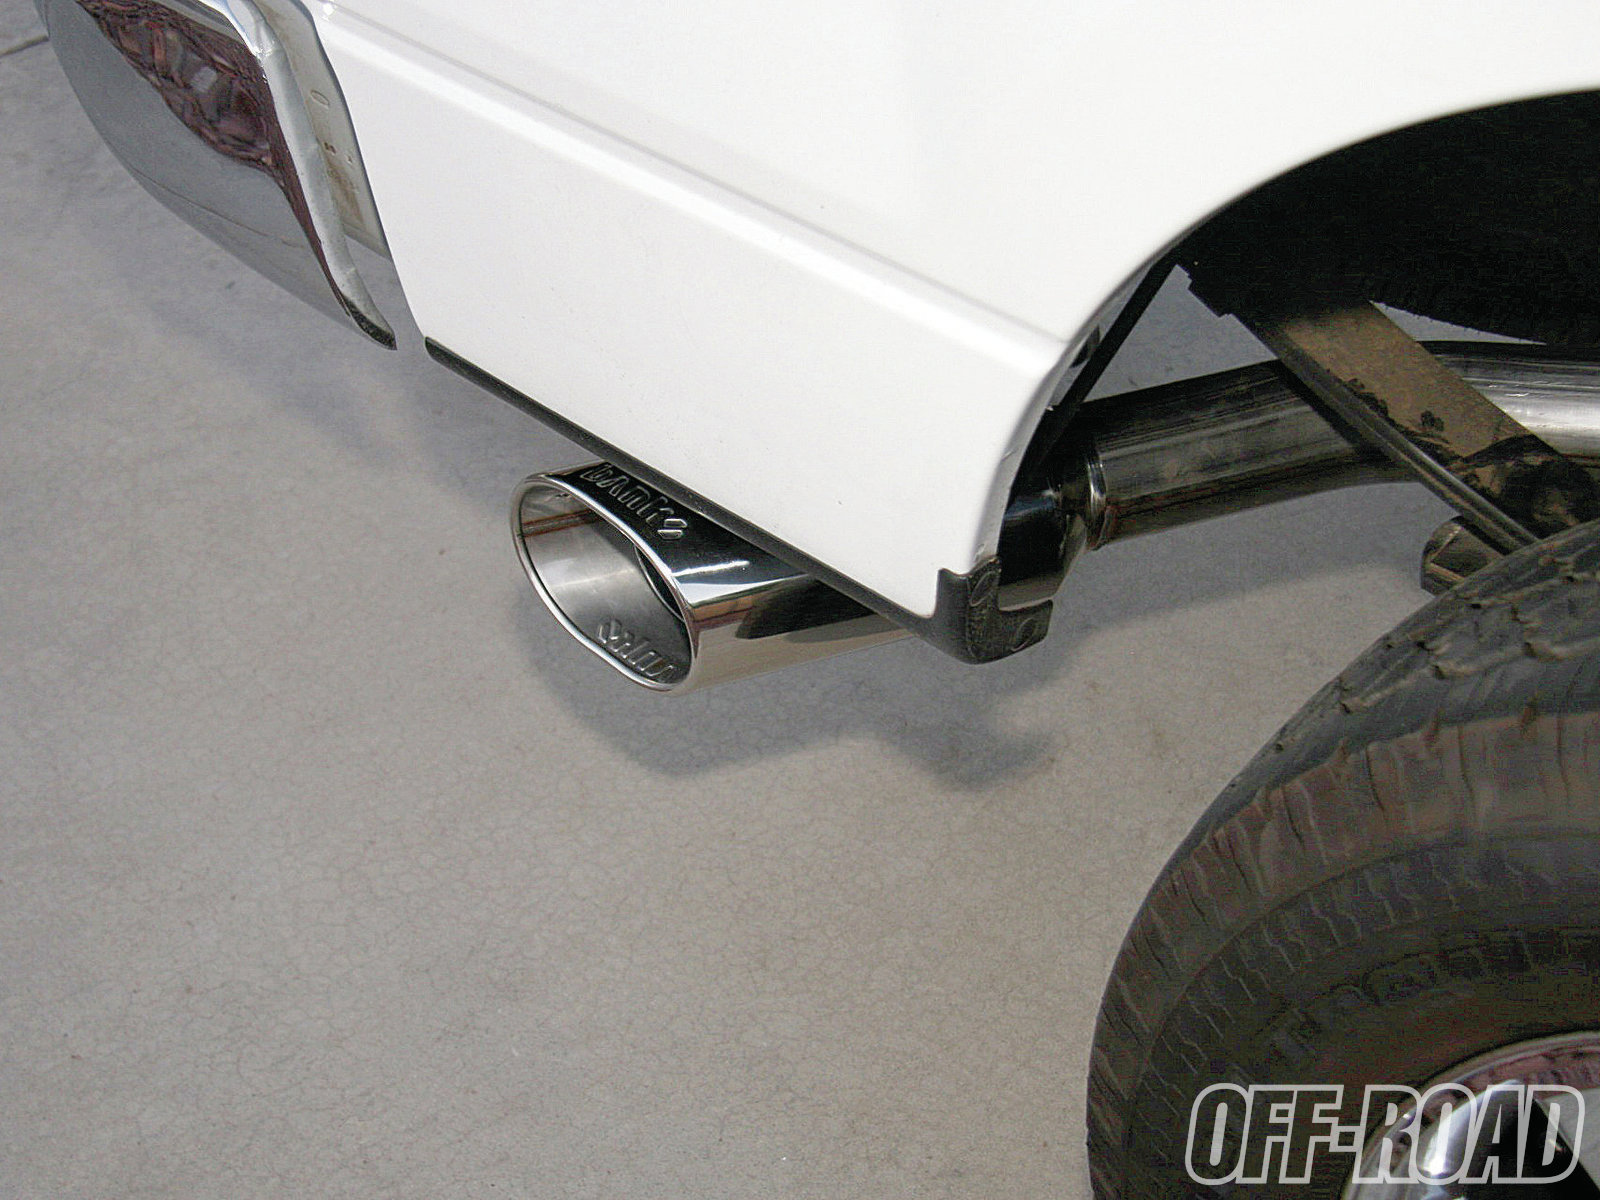
We opted to install the Banks PowerPack kit on our truck. It consists of their Ram-Air Intake System, TorqueTubes (headers), Monster Exhaust, and AutoMind Programmer to address the intake and exhaust sides, plus retune the factory engine control module to take advantage of the free-flowing components. Banks also offers their Stinger kit without the header option, if you so choose.
We installed all the components in about 10 hours. The instructions were pretty much spot-on accurate and easy to follow. Literally, everything we needed was included except for common hand tools. There was no running to the store to pick up any little installation items.
We were curious how much weight difference there was between the stock and Banks components. The intake weights were close. However, the new exhaust parts were quite a bit lighter, allowing us to shed about 21 pounds off our truck.
With all the components installed, we loaded up the Sport 87 octane engine tune program using the AutoMind Programmer and fired up the truck. The exhaust note was pleasantly deeper. Under medium to heavy throttle, there was more exhaust noise than stock, but at light throttle cruise the exhaust was fairly quiet, without any cabin drone.
We didn’t get the chance to run our truck on the dyno rollers, but the difference in performance is notable, just using the 87-octane tune. Throttle response was quicker and the modified shift points made transmission gear changes crisper. Banks testing shows gains up to 45hp and 47lb-ft of torque at 5,000 rpm. We’re quite pleased with the increase in power and are looking forward to trying out some of the more aggressive, higher octane tune.
Stay tuned as we build up this project in a number of following OFF-ROAD issues. We’ll take you along as we turn wrenches and then turn tires building this truck from a stocker to a fun dirt runner. OR
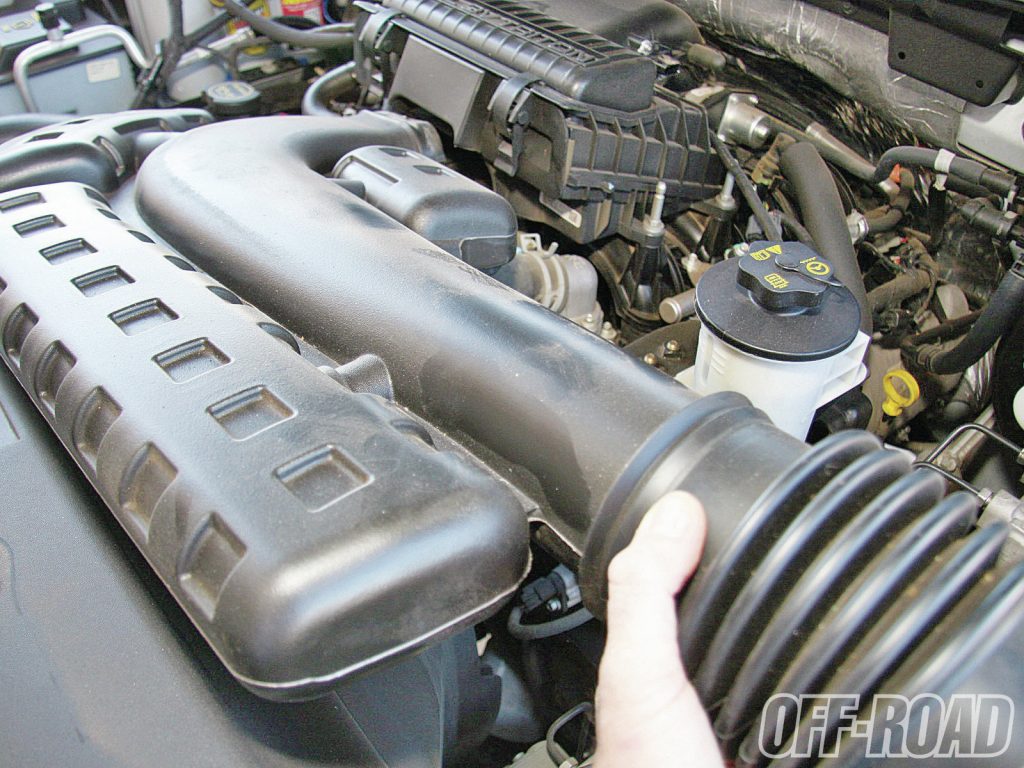
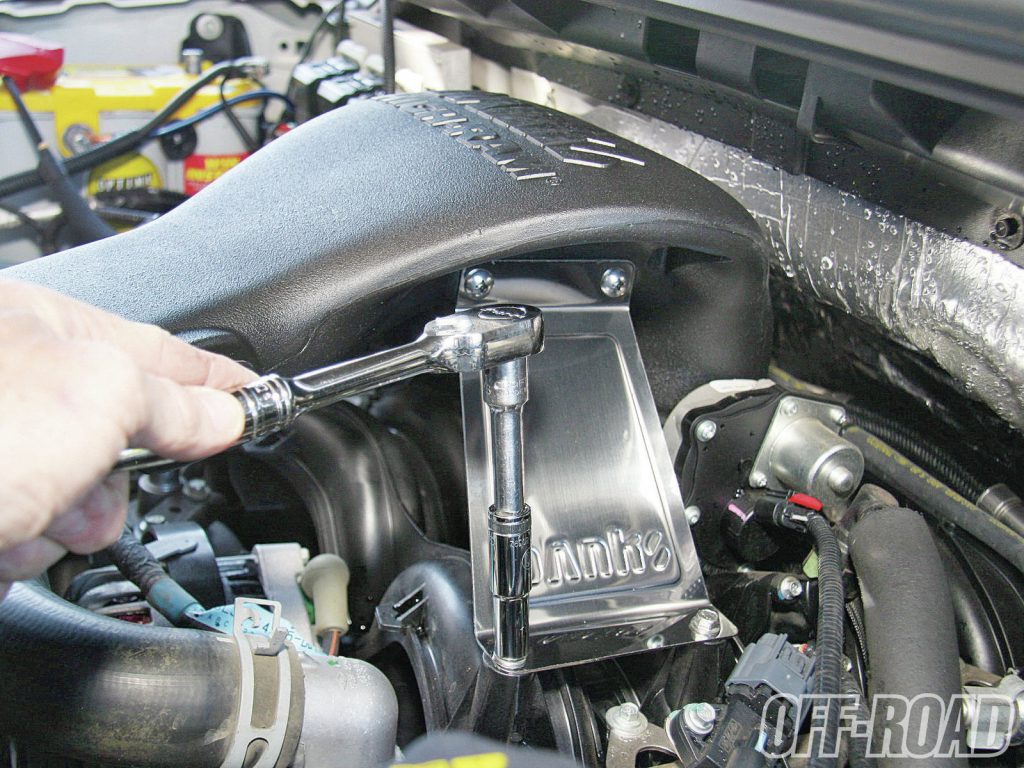
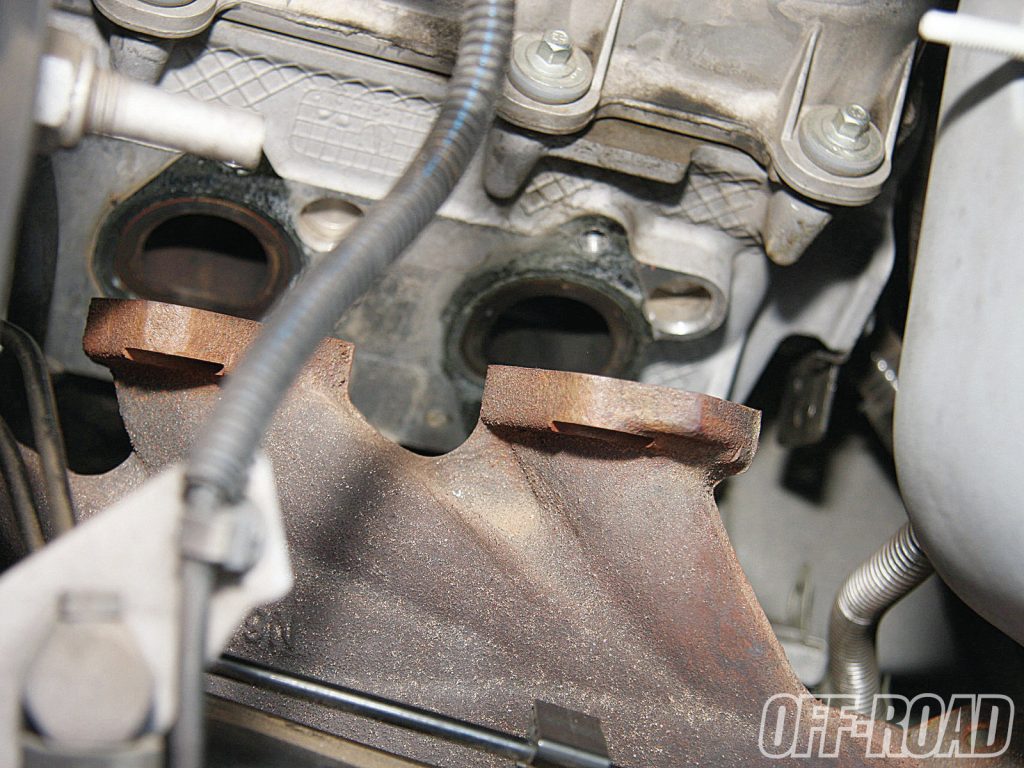
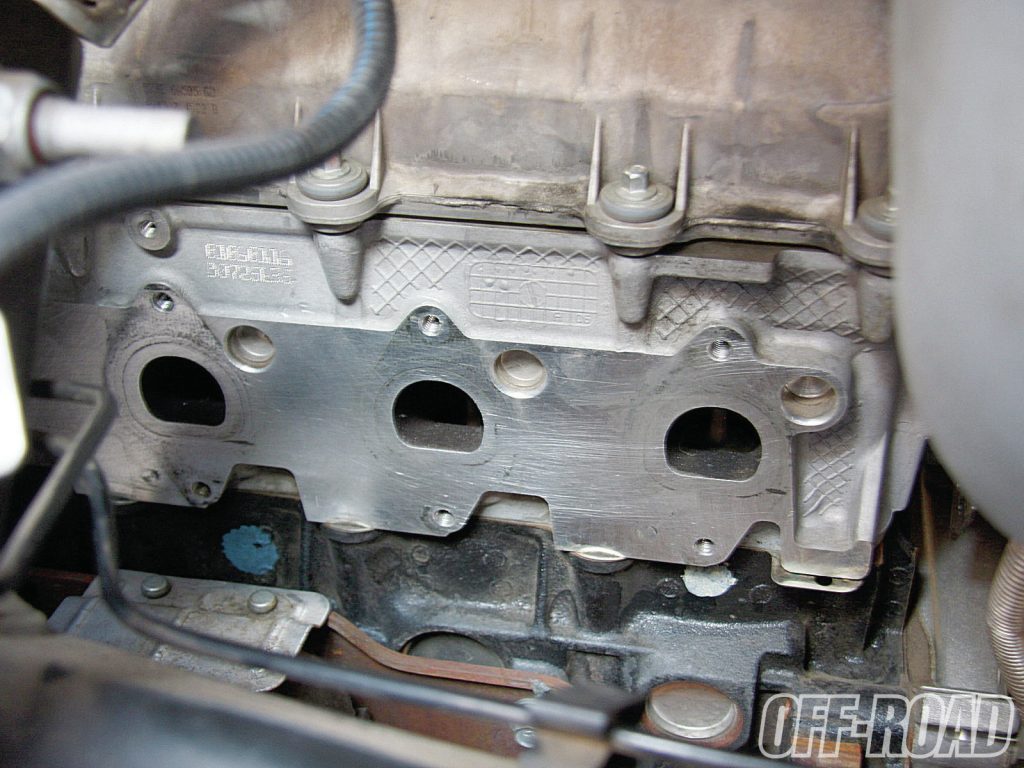
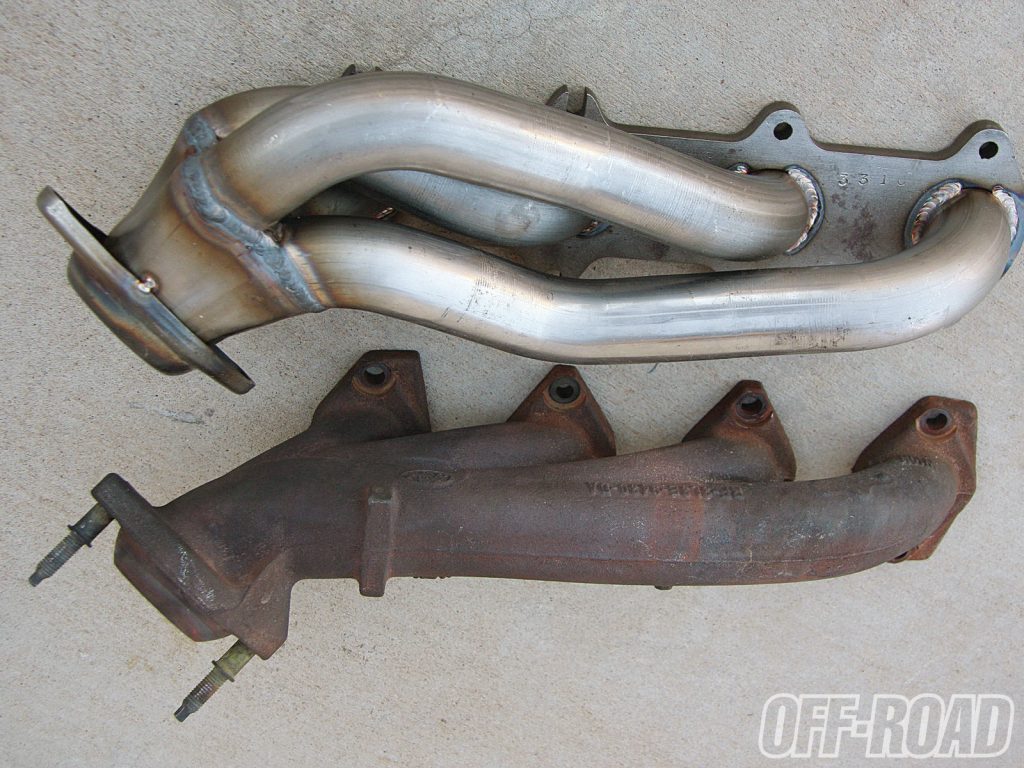
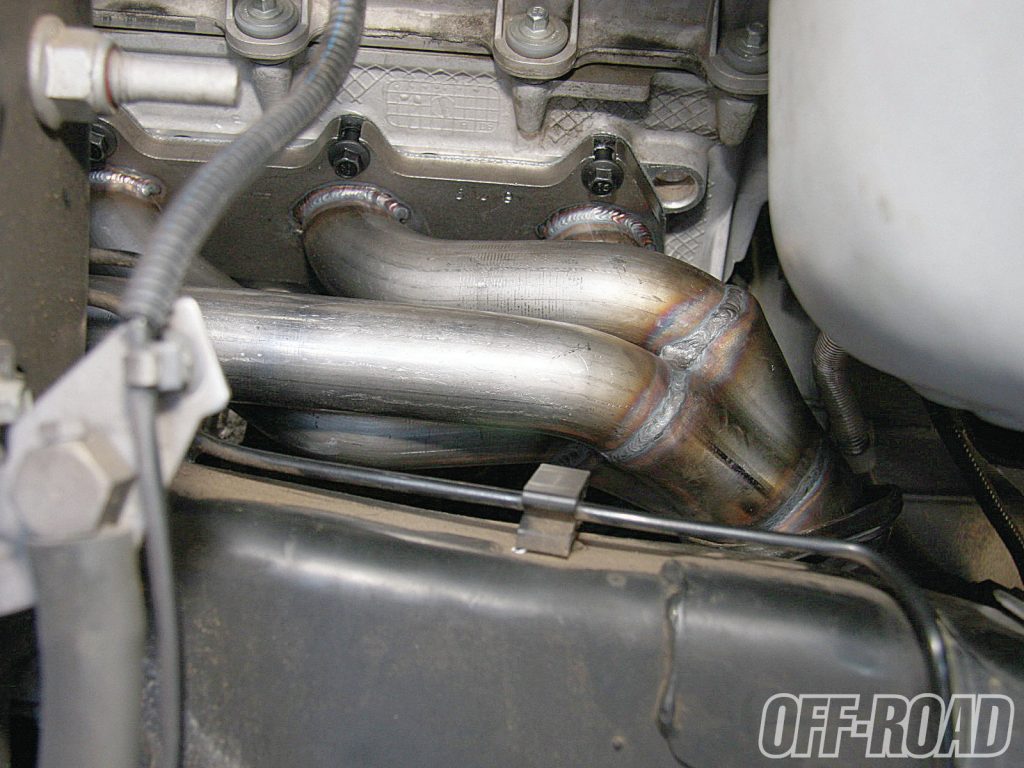
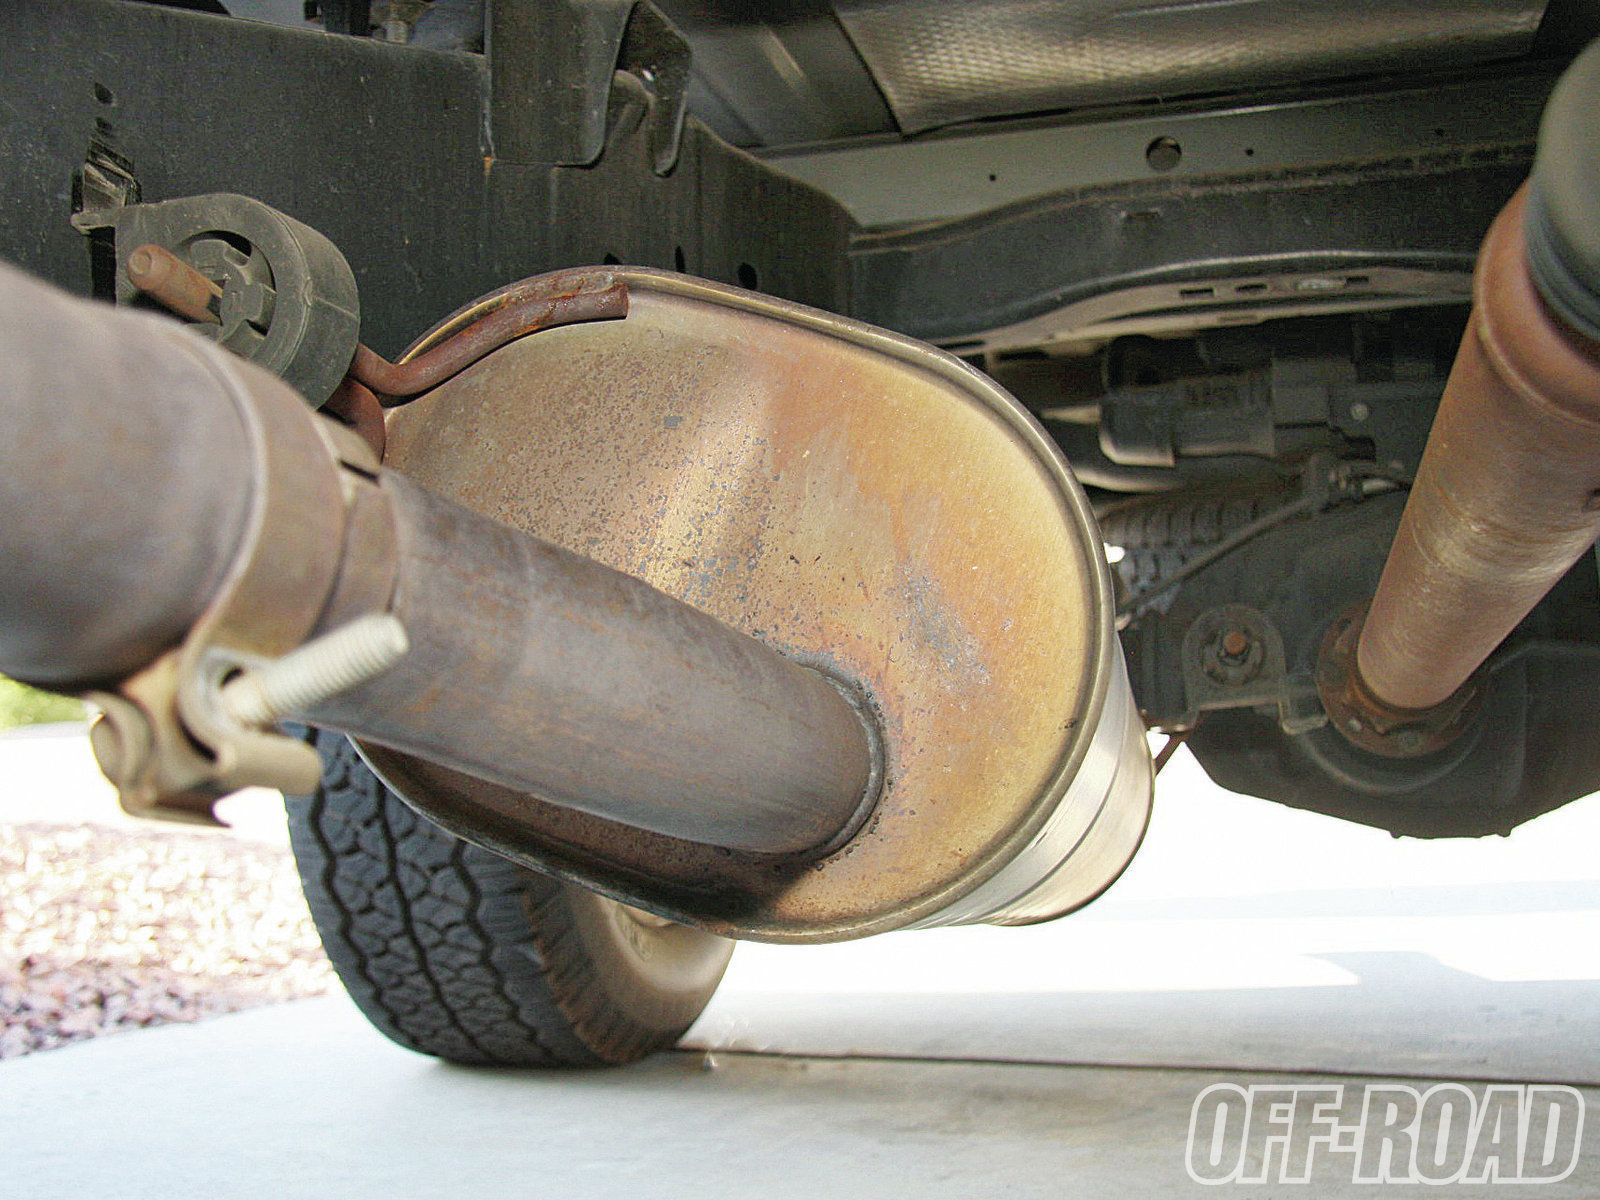
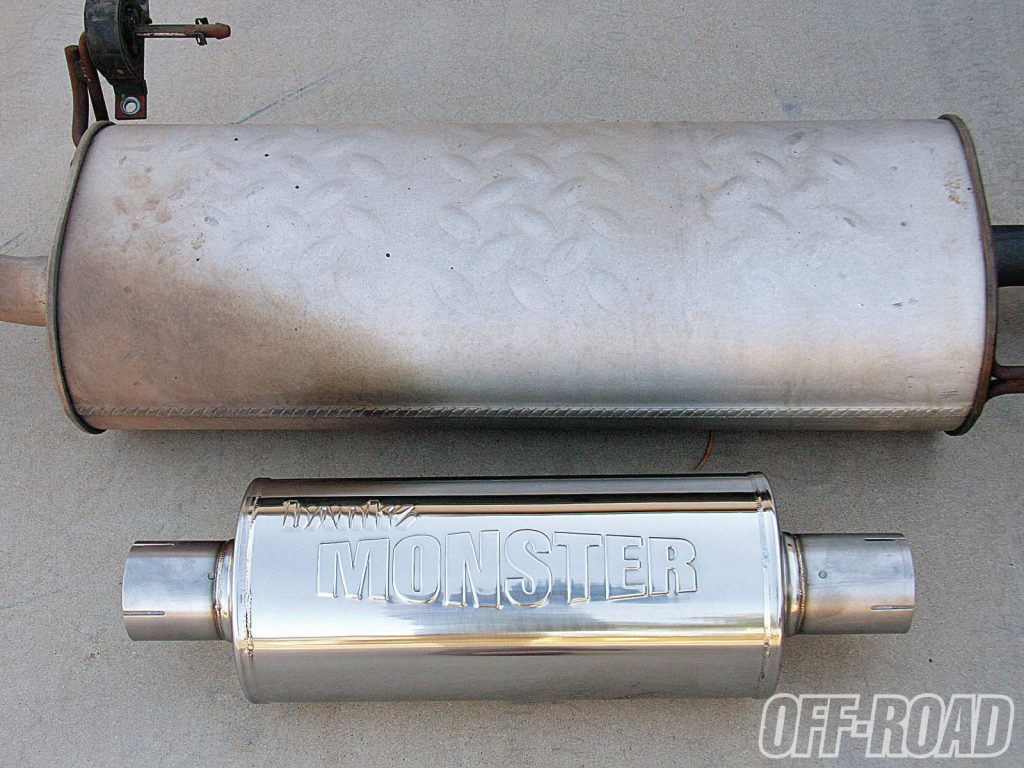
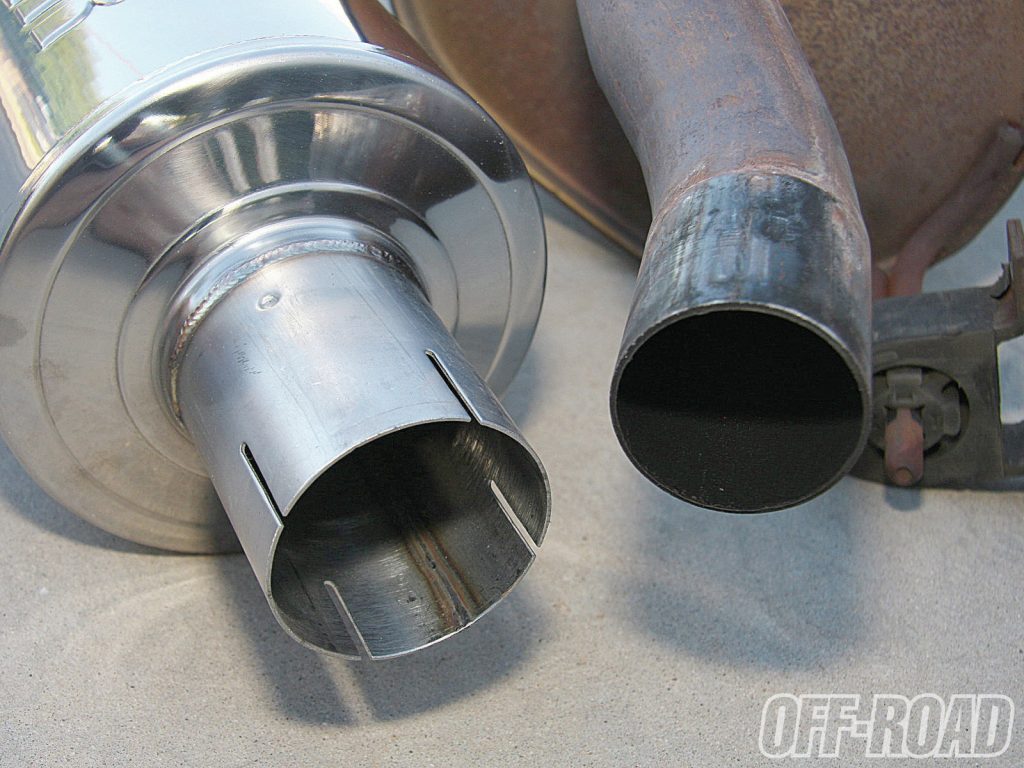
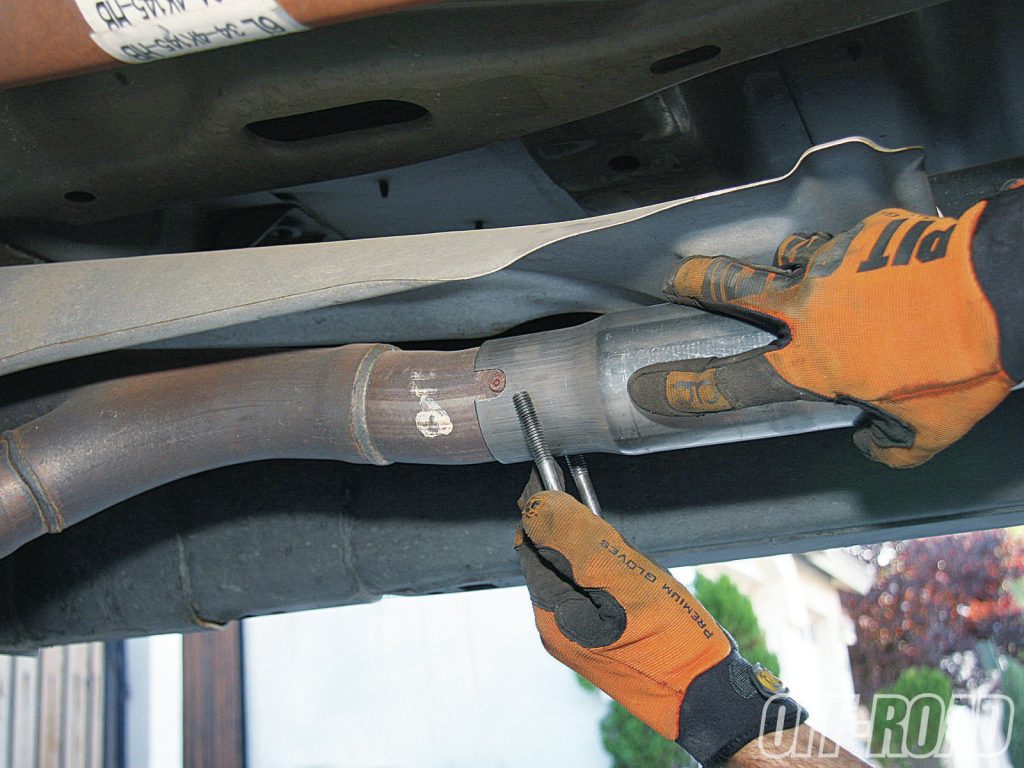
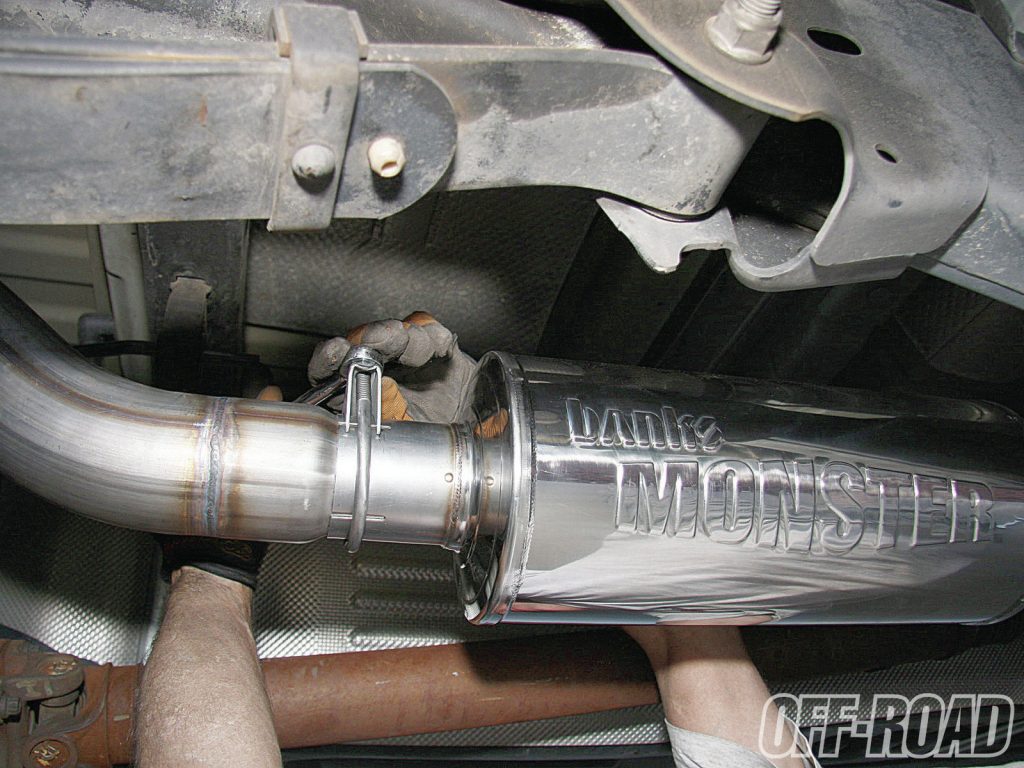
1. We started the installation of the air intake kit by unplugging and removing the MAF sensor in the stock intake tract, and removing the stock plastic intake tube and air filter housing. The Banks kit reuses a few small stock parts but the majority (of pieces) are replaced with upgraded components.2. With the MAF sensor transferred to the Banks intake tube, it was installed using the factory throttle body gasket. The kit comes with attractive stainless bracketry to hold the intake in place.3. The new Banks filter element is a large, oiled type which is mounted into a new filter housing. The filter housing is attached to the new intake tube with a supplied rubber boot. The housing still draws air from the original hole in the inner fender, but also intakes air in the large opening shown here that resides behind the driver side headlight. The housing rides snuggly on two large grommets and the intake installation was complete.4. Next, we turned our attention to the installation of the headers. We followed the Banks instructions which are well detailed. We unbolted the Y-pipe and removed the stock manifolds from the engine. Accessing the manifold bolts is the hardest part of this installation. It’s helpful to have a good variety of wrenches, sockets, extensions, and swivel attachments to access them all.5. We were careful not to scratch or gouge the aluminum heads. After removing our stock manifolds, we found the heads had a slight carbon residue around the ports. We used some abrasive pads and carburetor cleaner to clean the surfaces for the new gaskets.6. The Banks TorqueTubes are manufactllled from 409 high-ductile stainless steel. The alloy is specially suited to handle repeated thermal cycling found in automotive exhaust applications. We measured the beefy flanges to be almost a half-inch thick, so warping at the head should not be an issue. Here you can compare the stock passenger side manifold to the Banks part. The runners on the Banks part all converge at a common 4-into-1 collector. The passenger side installation is considerably more difficult than the driver side. It requires the removal of the starter and lifting of the A/C dryer to allow removal and installation. After struggling with the passenger side trying to get the header to slip into place alongside the head, we finally decided to loosen these two lower motor mount bolts so we could jack the engine up just a bit. We heard a satisfying ‘clink’ as the tubular header dropped down near the head.7. Here’s a photo showing the driver side installation complete. The stainless headers add to the look of the engine. The rear collector meets up in the same location as stock to mate to the stock V-pipe with the catalytic converters.8. Moving downstream, we crawled under the truck and started loosening the factory tube clamps to pull the muffler and tailpipe off. The Banks Monster Exhaust replaces the tubing behind the V-pipe with mandrel-bent stainless steel.9. Ironically, the Monster muffler is dwarfed by the huge factory muffler. The Banks unit is a compact muffler with a polished stainless body.10. Here’s where the monster part shows. The stock tubing is 2.5-inch diameter, whereas the Banks system bumps it up to 3.5-inch tubing aft of the V-pipe. The muffler is a straight flow type with a perforated core.11. The kit includes all the tubing to complete the installation along with exhaust clamps to hold it all together. Several of the factory barbed exhaust hangers are reused and the Banks components have hanger rods for support. We found it easiest to unbolt the hangers from the truck, then remove them from the loose exhaust, before bolting them back on the truck for the Banks installation.12. The Banks muffler is much more compact than the factory muffler and opens up a good bit of space under the bed. Our only comment on the muffler position is that we’d like to see it tucked up just a bit higher for off-road clearance.13. The fat tailpipe tip is polished stainless and terminates the exhaust with a unique, finished look.14. The Banks Power Pack kit comes with the AutoMind scanner/programmer. With it, the user can choose from six program options based on gas octane in use and the expected use of the truck. Custom settings allow the user to specify the speed limiter, rev limiter, tire size, transmission shift points, shift pressure, axle gear ratio, and engine fan activation temperature. The unit can also read and clear OBD diagnostic trouble codes, and can perform some data logging of sensor data.