
97654 iDash 1.8 DataMonster and Super Gauge: Section 9: Alerts
INSTALL INSTRUCTIONS
Part #s
66560, 66561, 66562, 66563, 61410, 66760
iDash 1.8 DataMonster® & Super Gauge Stand alone instrument for ALL 2008+ OBDII CAN bus vehicles
Please read through the following instructions thoroughly before starting your installation. If you have any questions please visit our Support Page.

Section 9: Alerts
You can configure alerts to get notifications if a parameter has exceeded its set limit.
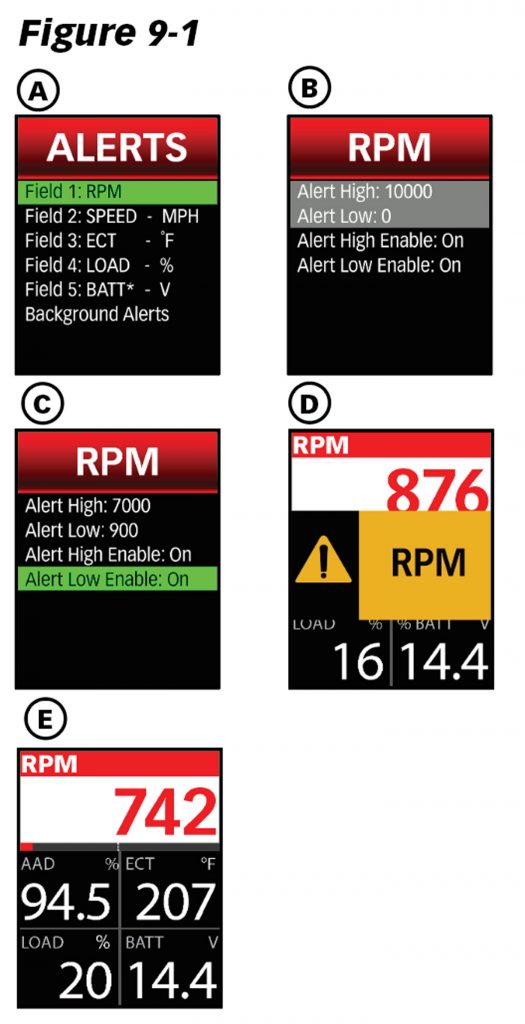
After an alert limit is reached, a banner will appear, displaying a large banner with the parameter alert name for three seconds.
If the alert limit continues, the gauge will blink red. If the alert limit continues for background alerts, a small banner in the top left corner will appear and will cycle through each alert.
NOTE: All alerts must be configured for each individual iDash.
In the Displayed “Alerts” menu, the parameter list will be the same as the Gauge Selection menu. To change the parameters of the displayed “Alerts,” the parameters must be changed from the Gauge Selection menu.
If a parameter is already enabled and set up as a background alert, its settings will transfer to a displayed gauge alert.
To enable and configure gauge alerts:
- Select “Alerts” from the main “MENU.”
- Select a “Field #” with the parameter of interest. See Figure 9-1, A.
- Select “Alert High Enable” and/or “Alert Low Enable” to turn “On” or “Off” the alert. See Figure 9-1, B & C.
- Select “Alert High” and/or “Alert Low” to adjust the alert activation point value. See Figure 9-1, C.
- Scroll UP or DOWN to adjust the activation point.
- Hold SELECT to save the value and return to the Gauge Screen or return to the Displayed “Alerts” menu to configure other alerts.
9.2 Background Alerts
Background alerts are for a list of user-selected parameters that are constantly being monitored by the iDash, even when they are not being displayed on a gauge.
These are selected in the Background Alerts menu.
To change a background alert parameter:
NOTE: The alerts list in the “Min/Max Values” menu are linked to the “Background Alerts” parameter list. Adding, removing, or changing these alerts in one menu will change the alerts in the other.
- Select “Alerts” from the main “MENU.”
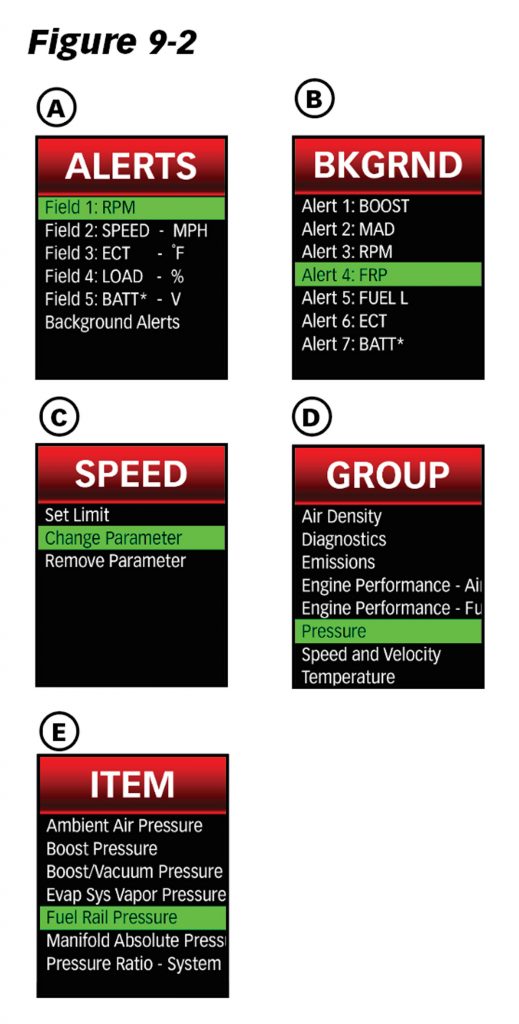
- Select “Background Alerts.” See Figure 9-2, A.
- Select any “Alert #:” to change. See Figure 9-2, B. NOTE: If the alert is empty, it will be skipped to step 5.
- Select “Change Parameter.” See Figure 9-2, C.
- Select a “GROUP” parameter. See Figure 9-2, D.
- Select an “ITEM” parameter to change the background alert to (see Figure 9-2, E) . You will be returned to the parameter’s alert options.
To enable and configure background alerts:
- Select “Alerts” from the main “MENU.”
- Select “Background Alerts.” See Figure 9-2, A.
- Select the “Alert #:” of interest. See Figure 9-2, B.
- Select “Set Limit.” See Figure 9-2, C.
- Select “Alert High Enable” and/or “Alert Low Enable” to turn “On” or “Off” the alert. See Figure 9-1, B.
- Scroll UP or DOWN to adjust the activation point value.
- Hold SELECT to save the value and return to the Gauge Screen or return to the “Background Alerts” menu to configure other alerts.