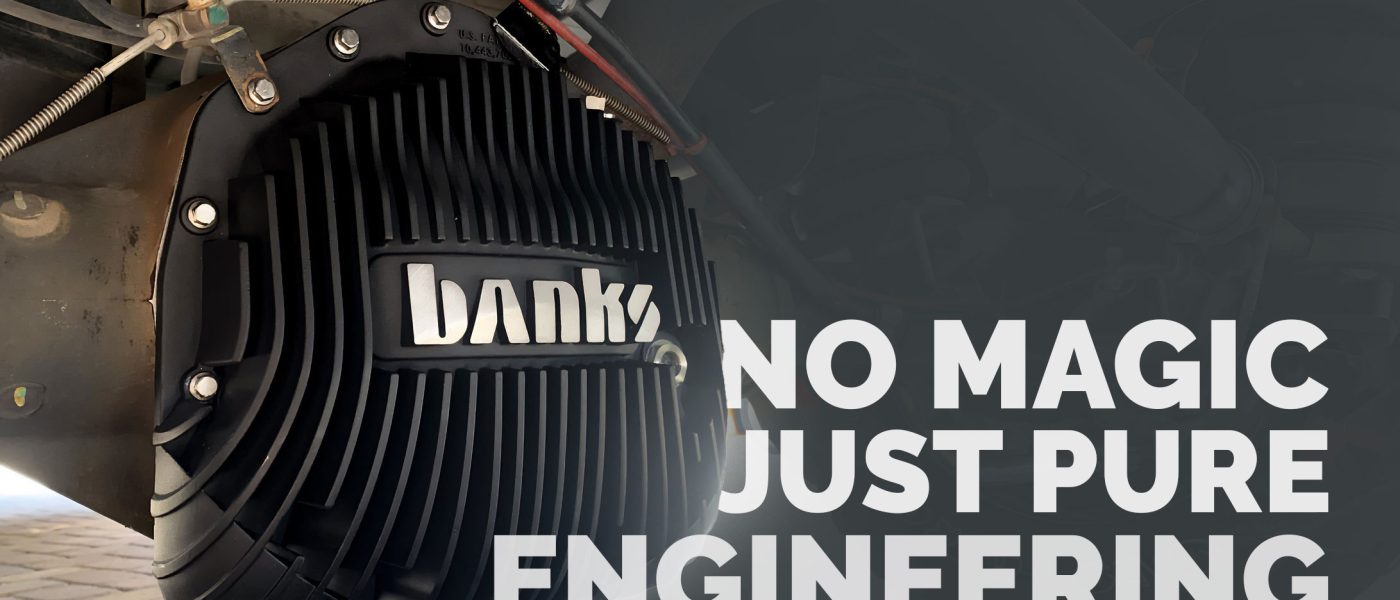
Banks Differential Cover: Real Cooling, Real Engineering
“This cover isn’t just cooler—it lubricates better. It’s details you can see, and engineering that will keep your diff cool and protected up long grades.” – YZDIMICK with TrukStuf
The Banks Diff-erence:
- Engineered lubrication: Internal directional fins push oil back to the bearings—fixing what smooth factory/aftermarket covers miss.
- Real cooling: Internal fins align directly with external fins for a straight heat path—faster heat rejection under tow.
- Ram-Air design: Breakaway “air grabbers” pull airflow across the fins at highway speed; designed to snap off in a hit without compromising the seal.
- No foaming, no myths: Optimized flow path over “just add capacity”—reduces aeration and keeps lube where it matters.

FULL VIDEO TRANSCRIPT
00:00 We’re gonna have to cut some of this off. So, I’m here with Truck Stuff. You guys have probably seen his stuff on all of the Cumins and everything else. I mean, you’ve probably seen him on Insane Diesel’s channel as well, doing the install on the L5P and a bunch of other things. So, today we’re going to be installing the Banks rear differential cover on a This is on a 2017. We’ll get this installed and then we’ll kind of show you guys exactly how to install it. And some people are having issues with installing the O-ring and and other pieces on this that we’ll we’ll key into.
00:16 Yeah, there’s no need to cut the O-ring. It is engineered to be exactly as long as we need it to be for the application. So, yep. Yeah. First, we want to talk about some of the key features of the the Banks rear differential oil pan. And some of you have seen the Banks videos and he talks about it. He actually engineered a clear differential cover. so he could watch what the gear loop was doing in the rear differential when it was under rotation. And he designed these to combat the issues that we have with the smooth inside factory rear differential covers and some of the aftermarket end of rear differential covers that don’t handle the lubrication properties that we need the cover to do.
00:34 Let’s start off with on the inside. On the inside, these aren’t all just cooling fins. Some of these redirect the oil back into the bearings where the lubrication of course is needed. And he went through a lot of R&D for the size and placement of these fins to move that oil around in that differential where it’s needed. Now, we’ll also talk about the cooling fins. And this is something really special and it’s going to take a little bit of an explanation. So, when we’re talking about conducting heat away from the oil, we have to maximize the surface area of whatever we’re trying to use as the conductor. So that’s why those fins stick out as much as they do and they won’t interfere with the carrier. They won’t interfere with the ring and pinion but they give maximum amount of surface area on the inside for that oil to radiate its heat through dissipate it through to dissipate out the atmosphere. Now the external fins on here are in direct relation to the internal fins. So the conduction of heat goes from the internal fin to the external fin directly. Now some other covers those fins are offset a little bit. So the heat actually has to go through the internal across the face of the cover and into the external fin and it doesn’t give as good of a conduction path from internal to atmosphere. So that’s why those fins on a banks are directly related internal to external rather than a little bit off. And some of the companies actually do it quite a bit off so that it’s not dissipating the heat correctly. Another concern that
00:55 people have had, and we’ll show you after it’s installed, are these two dog ears right here that they could get broke. And it is true, they could get broke because they do stick out from the sides of the pumpkin a little bit, but they’re made to break off. If you look right here, you have a weak point engineered into it to where if you’re in a very bad situation, these will pop off and leave the cover still intact. But what these do do for you while you’re driving down the road, they’re called air grabbers. So, as you’re driving down the road, you’re towing, you’re pulling up a pass or whatever, they actually pull the air in and redirect that air up over all of these cooling fins. And that’s pretty important, especially when you’re pulling, you know, a 14,000lb trailer up a 6% grade. Yeah. It’s important to have your air directing the correct way cuz if like other companies that have this, they’re not actually directing the air to use it correctly. you’re using your air incorrectly in in sense. Well, in a lot of those other companies out there, they’re just making a cover that gives you quite a bit more
01:13 capacity. In some situations, that extra capacity actually hurts you because of the fluid direction not actually being pulled to the bearings. So, it doesn’t matter if you have an extra two quarts in there or not. If the lubricant isn’t getting to the bearings, then you’re not doing your differential any good by adding extra capacity. Yeah. Yeah. Plus, they also seen a lot of irration in the fluid from those extra covers. Having the extra capacity and of course air in your differential fluid is never a good thing. Yeah. So, we have that. Now, let’s talk about
01:30 the cover. Here’s another cool little feature about the Banks cover. This is a sight glass. There’s your sight glass right there. It’ll tell you how full your differential is. Once that fluid gets into the middle of that sight glass, you’re full. Don’t overfill it.
01:45 Right here at the bottom, we’re going to put a pipe plug into that because we don’t have a rear differential temperature sensor. But that right there is for any kind of an accessory that you’re going to add onto your vehicle, whether it’s a temp sensor or which is awesome. What Banks always does
01:59 is they always give you the option to have an external thing on on the oil pans, the transmission pans. They build these things to where if you’re going to run it on the track, you have the ability to measure the temperature. If you’re going to run it, you know, Baja style, again, you’ll be able to have the ability to measure that temperature. When you’re talking about with the eye dash setup and all of the different probes and stuff that you can get with it, you can measure temperature of everything on the vehicle. Having that option, pretty cool, especially
02:13 when you don’t need it, but want to have it maybe later on down the road. Yeah, their drain plug that goes in the bottom of the pan is a magnetic drain plug, which is another cool feature because, of course, we want to have all those little tiny metal particles not be
02:32 floating around through the oil. And then another cool feature is an extra overlarge fill plug. Goes right in the top. it it makes it a no-brainer when you’re adding fluid back into it. Now, on the install of these, they do give you complete hardware kit, all new fasteners. If anyone’s doing one of
02:52 these at home, please make sure you’re using the blue Loctite. We do not want these fasteners walking themselves out, making a mess all over your driveway. Yep. Or down the road. Yeah. Or down the road. We don’t We don’t need you having a failure because you lost all your fluid. Yep.
03:05 So, now that we’ve talked about that, we do want to also talk about the correct way to put the O-ring in. All right. So, you have your cover, you have your O-ring. When you start putting this thing in, pick a nice straight spot, of course, press it and hold it, and then
03:20 as you walk around, push back to it because we don’t want to stretch the O-ring. What we see a lot of people complaining about is that the O-ring is too big and they end up having to cut a piece out. Well, the O-ring is not too big. And if you get to the end of this
03:37 and you have too much O-ring, that means you’ve stretched your O-ring. And when you stretch them, you make them smaller in diameter and you end up with less protrusion off of the face of the cover. Therefore, it’s not going to have the correct sealing properties as it should.
03:54 So, what I like to do is start at close to the bottom and I walk this thing around until I get above where my final level line is and then walk over to the other side and again push it back into itself while you seat it down into the groove. And when you do this properly,
04:09 you’re going to get to the end and not have any leftover O-ring material. Because if you cut it and then try and glue it back together or use any kind of a RTV or silicone, it’s just not good practice. It definitely doesn’t show that you’re a professional in what
04:24 you’re doing. Actually kind of shows a lot of incompetence. Now, what you can see here is that we have done such a good job that we do not have a whole bunch of leftover O-ring. In fact, I’m having to work it a little bit to make sure it’s not going to buckle up on us.
04:36 We’re going to have to cut some of this off. Not the O-ring, the video. So, what we’ve done is correctly installed the O-ring. It’s got plenty of protrusion from the face all the way around. We didn’t have to cut any of it. That’s the correct way to put in the O-ring. So,
04:50 now we’re going to actually get under the truck. We’re going to unbolt the sway bar, get the sway bar up out of our way, and then we’ll take the cover off, get the fluid drained, get the surfaces cleaned up, and get prepared to install cover. Okay, guys. Step number one, get your drain pan.
05:06 Step number two, we need to get the uh sway bar out of the way. So, 15 mm. Get you a bungee cord and find any old place you can to get this thing tied up out of the way. Okay, step number three. Let’s start getting the brake lines off the supporting brackets anyway.
05:30 Sometimes that little retainer can be not so fun to deal with, but we’re not going to reuse it. So, let’s just pop that up off of there. Get you a little trim tool and get it off that. Now, you’ve also got two 13 mm nuts up there. The top two are not as easy to get to
05:43 when the truck suspension is down. So, get you a ratchet wrench. Okay. Once you get that out, then you can just pop this whole bracket off. Tuck it up out of the way. Now, they do use a Loctite on these from the factory, so you have to fight through that. Now, you might be asking why I left
06:01 those, too. find out in just a second. I don’t like having oil all over the place, all over my fasteners, all over my tools. So, we leave the two that are above the oil level tight so that when we get the rest of them out, we can come through loosen these up and then drain our oil.
06:13 Boy, this one needed to be done, too. I love the smell of gear lube in the morning. Okay, once you get the majority of that fluid out, then we can take the other fasteners off and then pop the cover off. Make sure that gasket comes with you. If anybody hasn’t seen a differential
06:31 before, that’s what it looks like. Yeah, it’s a planetary style differential. No spider gears in there. It is a planetary gear set. Now, we want to make sure we get any and all debris off of the ceiling face. You can see where we get a little bit from that rubber gasket stuck
06:48 to it there. Doesn’t take a lot to get that stuff off. Somebody’s almost butchered that thing up. Holy cow. So, really quick, while we’re in here doing this, do not spray this out with brake clean or any other chemical to try and get all of the oil out. You’re going
07:06 to take the lubrication off of the the bearing surfaces and the planetary surfaces that needs to be there. If you spray all that off and then fill it up with differential fluid, you’re going to have a period of time where you’re essentially running dry until that gear
07:22 lube splashes up on everything else. This gear lube is not super nasty. So, we don’t have to worry about trying to get any water out of it or anything like that. So, we’re just going to straight go from here to putting the new cover on. All right. So, while we were up
07:37 there, we put the plugs in the pan. Need to be put in before we go to putting this thing on. Now, I’m going to get me two two of the bolts ready with the Loctite before I stick that up there and try and hold it cuz it’s kind of a pain in the butt to put Loctite on bolts and
07:52 hold the cover up all at the same time. Make sure your O-ring is still in place. Yes. [Music] Okay, we get those started. Notice how he’s not putting them in all the way. Yeah, you don’t want to smash your gasket on one side and then have to undo it to because you bound up and [Music]
08:08 and you guys also notice that every one of them I’m putting Loctite on. So, in the Banks kit, you get a different bracket for that right there. Different retainer. I’m going to show you why you don’t want to use the factory one because it’s plastic and when you tighten down the fastener on
08:23 that, you’ll just collapse and tear up that plastic. So, this one’s metal and it has a rubber coating, so it’s not going to damage the the brake line at all. Make sure you put that all the way around the line. Collapse it down and then put your final fastener in.
08:39 Now, when you’re tightening these down, don’t just jump right into the sides or the top. tighten your bottom ones first. That’s of course where all your fluid is going to be retained at. So, we want to make sure we get maximum compression on that O-ring down here first.
09:05 So, those are all tight. Now, all we have to do is fill her up. So, we’re going to take a brief pause for some commercials and we’ll be right back in a minute. All right. So, we’ve got the fluid into it. Now, I’m going to clean up a little bit of mess under there. We’ll get the sway bar connected
09:20 back up again and then this job will be done. Put the plug back in the top. But that’s it, guys. Uh, pretty straightforward. Not rocket science, but that rear diff cover right there will save your differential, especially if you do a lot of towing. And if you want a discount on it,
09:37 you can head over to the Banks website. I’m going to include the link in the description. Highly recommend getting the the fluid package that you can get from Banks for this job. And I’m also going to include a bunch of other discount codes in there, too. We’ve got
09:52 uh the uh insane diesel discount that we’re going to put in there as well because we really believe in those products. Let us know down in the comments if you like this kind of stuff and if you want more of