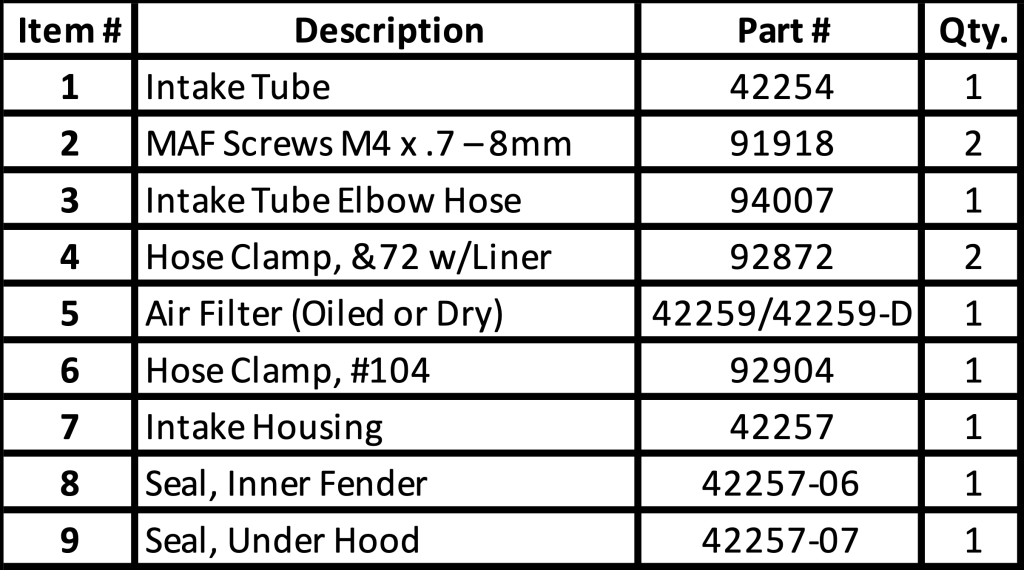
97667 Banks Ram-Air® Intake System for 2017-2019 Chevrolet 6.6L Duramax
INSTALL INSTRUCTIONS
Part #s
42249, 42249-D
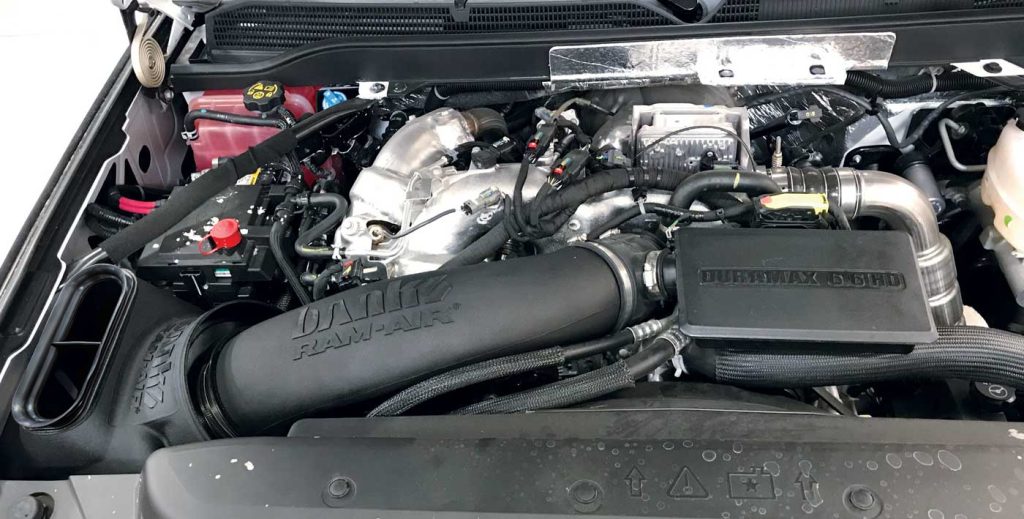
Banks Ram-Air® Intake System 2017-2019 Chevrolet 6.6L Duramax Turbo-Diesel Pickups
Please read through the following instructions thoroughly before starting your installation. If you have any questions please visit our Support Page.

General Installation Practices
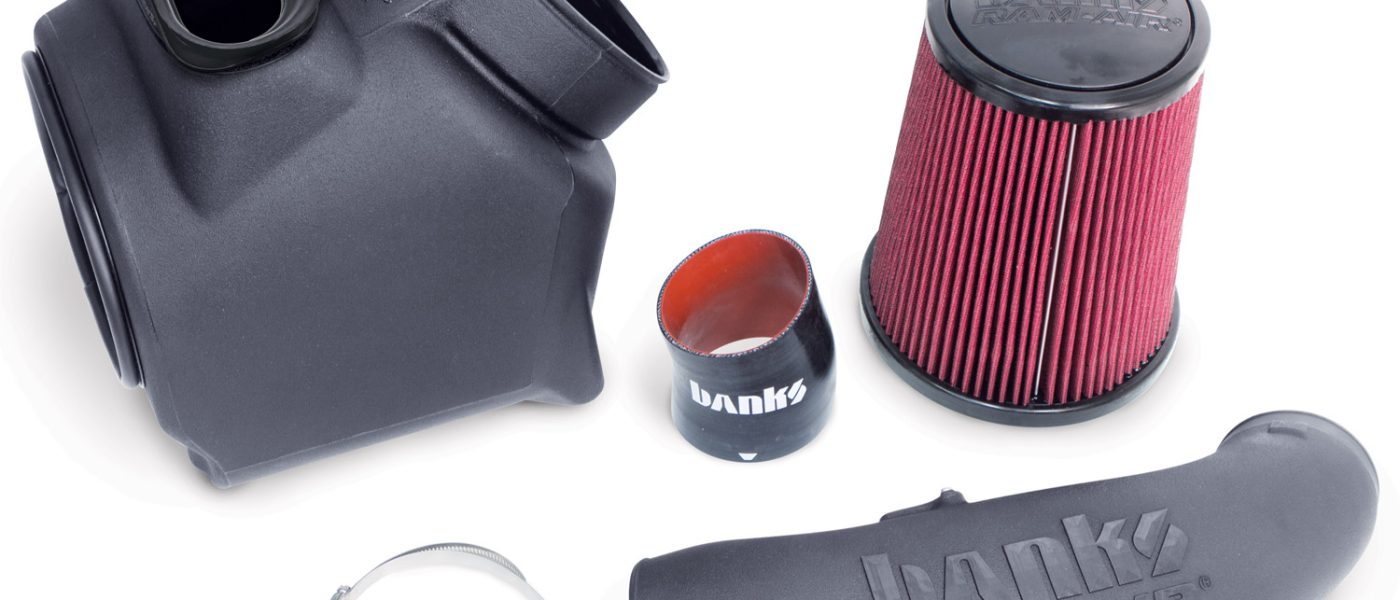
Bill of Materials
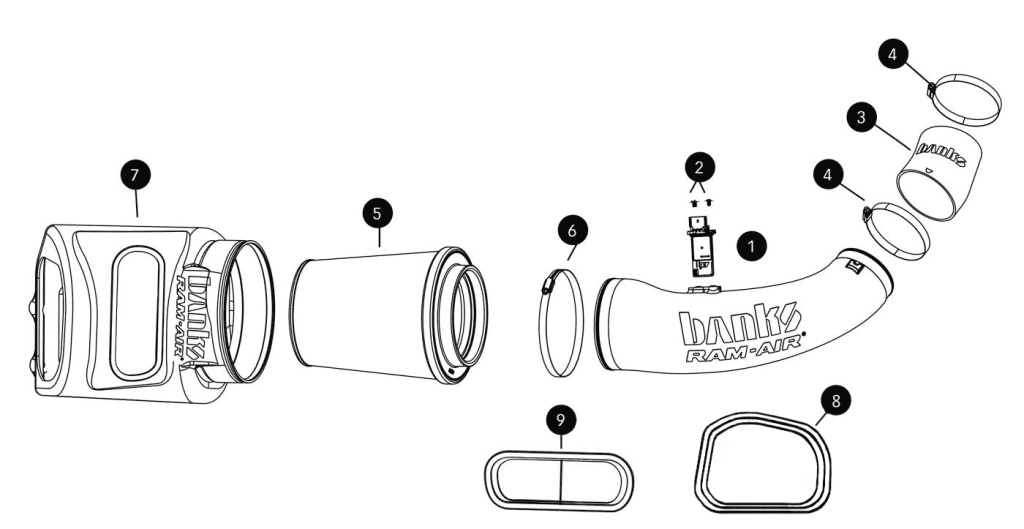
General Assembly
Section 1: Stock Intake Removal
Read and follow all steps before working on the vehicle. Some components from the stock air intake system will remain in service. Take care when removing stock air intake components to not damage them.
Use the Bill of Materials Chart and the General Assembly Drawing to reference component nomenclature and location. Use caution when working in the engine compartment. Make sure the engine has been OFF for several hours and cool.

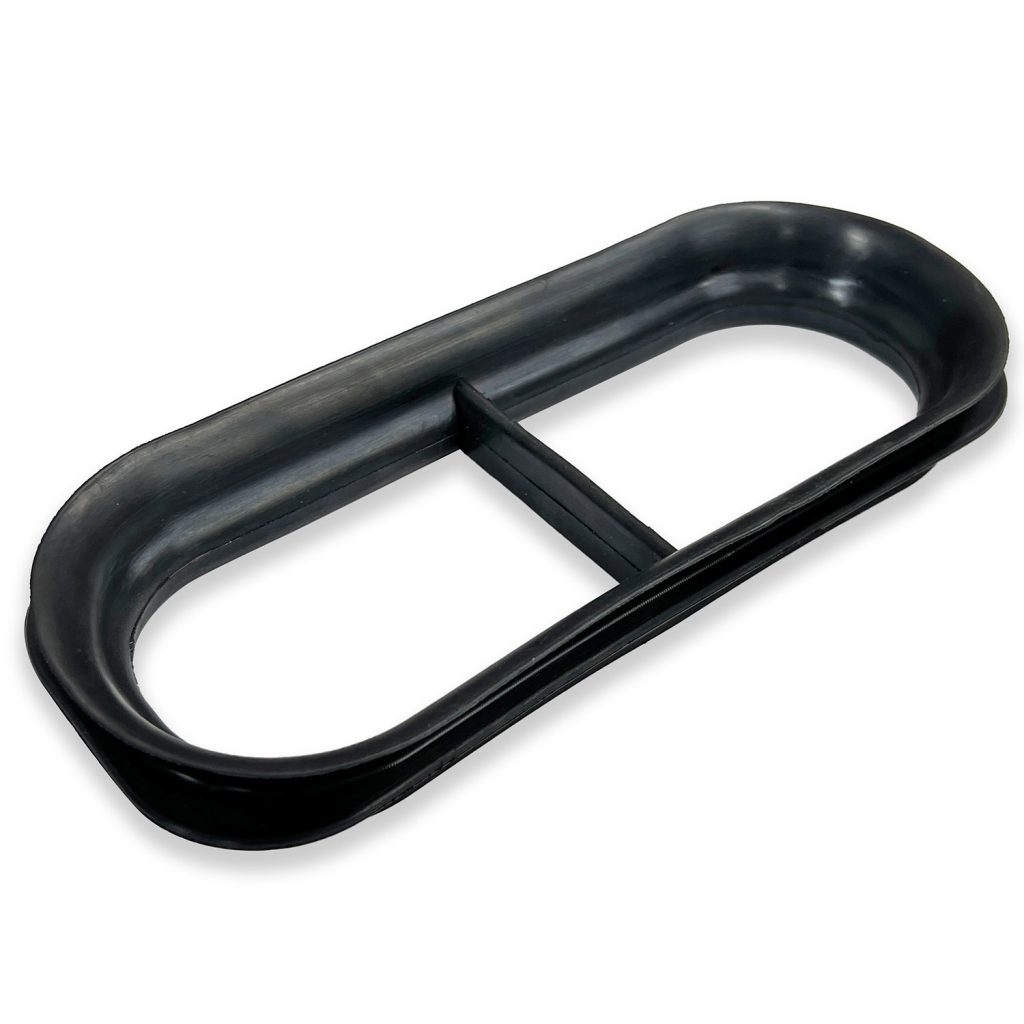
1. Using an 8mm or 5/16” nut driver loosen the clamp holding the center intake tube to the air box.
Next, loosen the clamp at the opposite end of the tube connecting it to the rubber boot. Remove the center intake tube and set it aside. See Figure 1.

2. Slide the red locking mechanism upward on the MAF (Mass Air Flow) sensor on the stock intake air box and disconnect it.
See Figure 2.

3. Disconnect the two factory ties on the air box just below where the MAF sensor was connected.
The top tie secures the MAF wiring, while the other secures a coolant line. These ties will not be needed for the Banks air box.
4. Remove the stock air box by lifting the air box up and out. The bottom of the stock air box is held in place by rubber grommets. There may be some resistance when removing the stock air box.

5. The stock air box tray needs to be removed. To do so, use a 10mm socket to remove the four bolts securing the tray then remove the tray.

6. The Banks Ram-Air can be used with or without the stock intake resonator.
The resonator will have “Duramax 6.6 HD” written on top of it and is connected to a rubber boot from which the intake tube was previously removed. If you wish to keep the silencer, disregard the next step.
NOTE: If you wish to retain the factory resonator, you will not be needing items 3 and both 4’s shown on the assembly drawing on page 5 of this manual.

7. To remove the resonator, loosen the small clamp connecting the resonator to the rubber boot.
Remove the nut located behind the resonator, which connects it to a bracket above the engine bay. Carefully pull up and out to remove the resonator. Loosen the last clamp on the rubber boot that connects the boot to the compressor inlet tube, and remove the rubber boot.
Section 2: Ram-Air Installation

1. Disconnect the two screws securing the MAF sensor to the stock air box using a T20 Torx screwdriver, and remove the sensor. NOTE: KEEP TORX SCREWS WITH FACTORY INTAKE. YOU WILL NOT USE THEM WITH BANKS INTAKE.
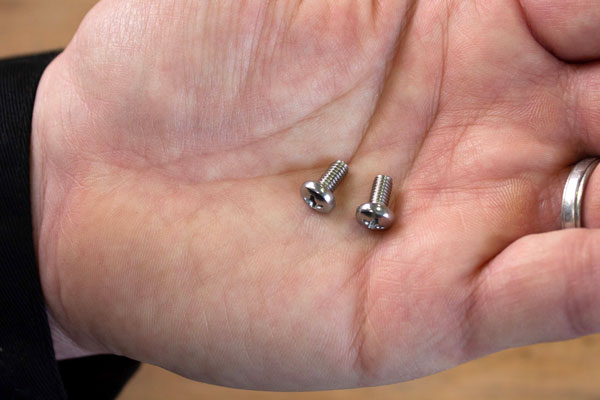
2. Install MAF sensor onto the Banks intake tube with the new Phillips screws shown here. These are supplied in the kit.
DO NOT RE-USE THE STOCK TORX SCREWS.
TIP: Put a drop of blue Locktite on each Philips screw.
CAUTION: Do not over-tighten screws.
3. Install the two EPDM Rubber seals on the top and fender side of the Banks airbox.

4. To install the Banks Intake Housing, secure the box with the outlet facing the center of the vehicle and bolt using the stock tray’s previously removed bolts.
5. Locate the Banks Ram-Air filter and the Banks Intake tube, and connect the two parts using a supplied hose clamp.

6. If you are no longer using the factory resonator, connect the intake tube elbow hose to the intake tube with the arrow pointing to the mark on the intake tube. Using two supplied hose clamps. (92872) Leave the hose clamps loose.
CAUTION: Skip this step if you are retaining the factory resonator.
7. The Banks intake housing has a slip-lock feature that allows the intake tube to move within the air-box once connected.
To connect the fully assembled intake tube to the air box, simply push the filter end of the tube into the respective hole in the air box.
8. Attach the opposite end of the tube with the elbow coupler to the turbo compressor inlet, or directly to the resonator boot (without the elbow coupler) if you are retaining the factory resonator.
9. Tighten all the hose clamps to secure the intake tube. Position the intake tube for best fit and ensure the intake tube is not touching any surrounding components.
10. Re-attach the sensor connector to the sensor in the Banks Ram-Air Intake tube. Slide the red mechanism to lock the sensor connector.
11. Your system contains a CARB EO label for emissions purposes. This label should be placed on the grill/radiator cross member inside the engine compartment so that it is easily seen by an emissions technician.
12. Re-connect the battery. Make sure to check all hose clamps for tightness and connectors for a sure fit. Make sure that the intake tube is not touching any engine components. You have successfully completed the installation!

CARB EO LABEL
Please use the following CARB-approved emissions label and EO label location guidelines. We generally use the radiator shroud location.
Section 3: Air Filter Cleaning – Oiled Filter Cleaning
NOTICE: The Banks Ram-Air Oiled Air Filter comes pre-oiled. No oiling is necessary for initial installation. Use Banks Ram-Air Filter Cleaning System, to service the air filter.
1. Pre-Cleaning
Tap the element to dislodge any large embedded dirt, then gently brush with a soft bristle brush.
NOTE: If complete cleaning is not practical at this time, re-oil the element and reinstall it in the vehicle.
2. Spray-On Cleaning
Spray air-filter cleaner liberally onto the
entire element and let soak for 10 minutes.
3. Pan Cleaning
Large air-filter elements can be rolled or soaked in a shallow pan of air-filter cleaner. Remove immediately and let soak for approximately 10 minutes.
NOTICE: NEVER use gasoline, steam, caustic solutions, strong detergents, high-pressure nozzles, or cleaning solvents to clean the filter element.
All of these can cause harm to the filter media as well as SHRINK and HARDEN the rubber end caps.
4. Rinsing
Rinse off the element with low-pressure water. Tap water is okay. Always flush from the clean side to the dirty side. This removes the dirt
and does not drive it into the filter.
5. Drying
Always dry naturally. After rinsing, shake off all excess water and let the element dry naturally.
6. Aerosol Oiling
After cleaning air filter always re-oil before using. Spray air filter oil down into each pleat with one pass per pleat. Wait 10 minutes and re-oil any white spots still showing.
7. Oiling Hints
Never use a Banks Ram-Air oiled filter without oil. The filter will not stop the dirt without the oil. Use only air filter oil. Air filter oil is a compound of mineral and animal oil blended with special polymers to form a very efficient tack barrier. Red dye is added to show just where you have applied the oil. Eventually the red color will fade but the oil will remain and filter the air. NEVER USE Automatic Transmission Fluid. NEVER USE Motor Oil. NEVER USE Diesel Fuel. NEVER USE WD40, LPS, or other light-weight oils.
8. Reinstall
Reinstall your Banks Ram-Air filter element with proper care. Make sure the element seats properly in the filter case. Install the cover making sure it’s in the right position. Tighten all the nuts, bolts, screws or clips to factory specifications.
9. DO NOT DISCARD
Affix the “Do Not Discard” sticker to the filter case (included with every Banks replacement element). Make sure you put the sticker in a highly visible place to alert your mechanic not to discard.
10. Performance Hints
Service every 50-100,000 miles on street-driven applications. Service more often in offroad or heavy-dust change the element when the air-filter restriction reaches 18”–H2O.
CAUTION:
Extremely fine dust from agriculture or off road use will pull the oil from the element. Frequent re-oiling of the element’s clean side might be required. Completely service when practicable. For extra protection use an air-filter sealing grease on rubber ends of the element. Service only with air-filter cleaner and air-filter oil.
Dry Filter Cleaning
Clean every 50-100,000 miles on street-driven applications. Clean more often in off road or heavy-dust conditions. If an air-filter restriction gauge is installed, then change the element when the air-filter restriction reaches 18”–H2O.
1. Pre-Cleaning
Carefully tap the air filter element to dislodge any large embedded dirt or debris.
2. Cleaning
Spray an appropriate DRY air-filter cleaner SOLUTION liberally onto both sides of the entire filter element with the majority applied to the dirty side. Soak for 10 minutes. Do not allow the DRY air-filter cleaner SOLUTION
to dry on the air filter.
NOTICE:
NEVER use gasoline, steam, caustic solutions, strong detergents, high-pressure nozzles, or cleaning solvents to clean the filter element. All of these can cause harm to the filter media as well as SHRINK and HARDEN the rubber end caps.
3. Rinsing
Rinse the filter element with cool or warm (not hot) water from the clean side out in order to flush the dirt out of the filter. It may be necessary to use your fingers on the hose to apply light water pressure. Repeat steps 2 and 3, until the water flowing through the media is completely clear of any dirt and debris
4. Drying
After rinsing, gently shake off excess water and allow it to air dry. Re-install the filter onto the intake system, airbox, or custom assembly once it is dry or just slightly damp. Follow all original installation instructions.
5. Reinstall
Reinstall your Banks Ram-Air filter element with proper care. Make sure the element seats properly in the filter case. Install the cover making sure it’s in the right position. Tighten all the nuts, bolts, screws, or clips to factory specifications.
6. DO NOT DISCARD
Affix the “Do Not Discard” sticker to the filter case (included with every Banks replacement element). Make sure you put the sticker in a highly visible place to alert your mechanic not to discard.
7. Performance Hints
Service every 50-100,000 miles on street-driven applications. Service more often in off road or heavy-dust conditions. If an air-filter restriction gauge is installed, then change the element when the air-filter restriction reaches 18”–H2O.