
Monitoring Data in a Pre-CAN BMW

Full Video Transcript
00:10 all right what’s going on guys welcome back to the oven garage today I’m going to be installing a Banks idh Standalone system into my uh 2003 BMW X5 this is my wife’s car and what had happened was I recently had a rapid coolant loss and overheat in this car it’s a 6-cylinder
00:27 BMW M54 engine and what happened was it overheated did and it blew the head gasket I had to replace the head gasket I also had to time seert the block which means I drilled and tapped the block itself cuz this is an aluminum block and that took me a lot of work to do all
00:43 this and it’s back on the road now and it runs fine but I don’t want this to happen again so this is why I’m installing an aftermarket gauge system so I can monitor some vital temperatures and pressures I’m going to do oil pressure coolant uh temperature and oil temperature and I’m also going to use
00:59 one of the factory sensors in this car which is a coolant level sensor this car never came wired for for it some of the cars came from the factory wired for the coolant level sensor but this one didn’t so I’m going to use the Factory location of that uh coolant level sensor and I’m
01:13 going to integrate it with the ID Dash and I’m going to show you how I install the entire system here and show you how it works there’s a couple things that I needed to do in advance uh to prepare for installing the banks idash there’s not too many locations on this engine to
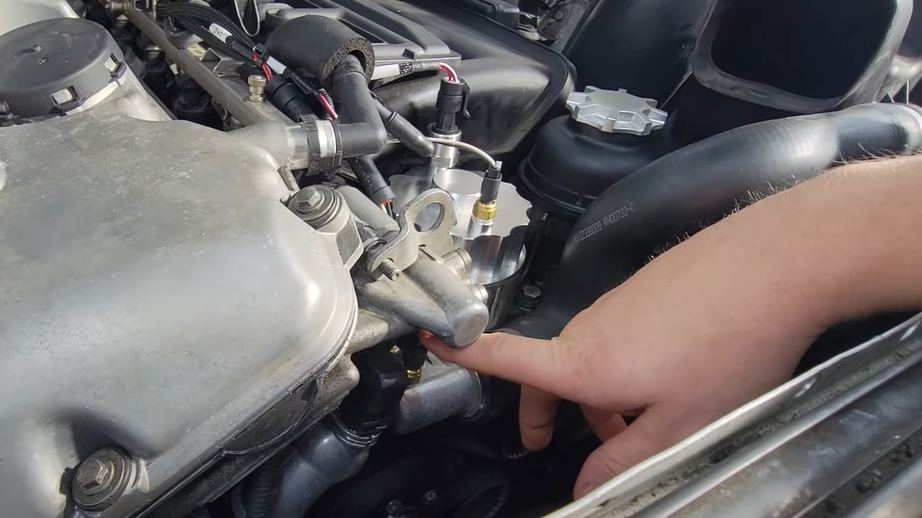
01:27 install sensors uh your own sensors for that matter so what I did one of the things I did was get this aftermarket oil filter cap that has two 8in npt ports where I can monitor uh oil pressure and oil temperature and then the third thing that I did most of these cars come with a plastic uh thermostat
01:47 housing on the front so this thermostat housing I got aftermarket it’s aluminum and I drilled and tapped it and for now I have a plug in there 8 in MPT plug and that’s where I’m going to monitor my coolant temperature with the aftermarket sensor and then the last sensor that I was
02:03 talking about this is the expansion tank here on the bottom of the expansion tank is where the sensor uh goes for the coolant level and this is the factory coolant level sensor so what I’ve done is I’ve purchased the pigtail for that and I’ll be able to wire it in with the
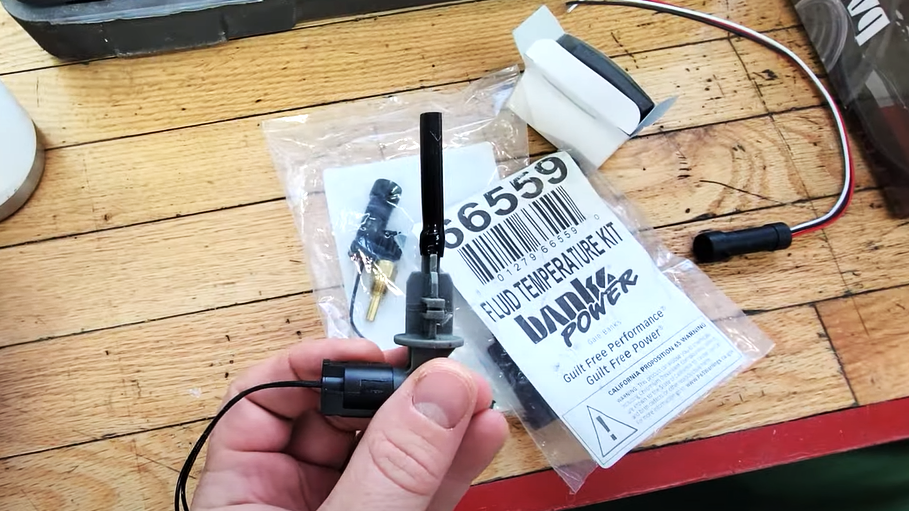
02:19 uh analog module um from the bank system so in order to run this bank’s Standalone system I just want to run through the parts real quick for what I’m going to be using so that I have the banks I itself this is the Standalone uh 12vt version without data logging I need
02:37 the 4 channel analog module kit so that way I can run up to four aftermarket sensors at the same time I have the banks bus starter kit so there that runs between the banks ID Dash and the um four Channel analog module kit this is a gauge pod for the idh that just suction cut Mount and then my
03:01 sensors I’ve got two 8 in MPT fluid uh temperature sensors I have one oil pressure sensor 0 to 100 PSI uh G and then this is my factory coolant level sensor and then I’m going to use this uh analog pigtail that’ll work and integrate with the 4 channel analog module all right so I’ve assessed things
03:27 here a little bit and I think my game plan is I’m going to take this analog module try and hide it behind here somewhere and I’ll just drill through the plastic put a rubber grommet and feed through uh these four cables that come with the analog module kit so that
03:45 way all the kind of big stuff will be back here and then all you’ll see uh coming out this hole will be the four uh four harnesses themselves that’ll run to the individual sensors so that’ll keep things a little bit neat and then all I have to do is drill a hole or find a
04:02 spot to feed this and of that cable through um somewhere so it comes out uh kind of just under the the driver side footwell all right so I wanted to give you an update I spent most of the day yesterday wiring in the banks ey Dash and it took a took me a while to get everything rded uh neatly and
04:21 properly so here you can see in the thermostat hosing that’s the 8 in MPT uh coolant temperature probe and now that just barely fit under there so I was pretty impressed that I was able to get that in there the 8in MPT probe definitely helped in size cuz I think the three 3th one was much bigger I’ve
04:42 got the oil temperature here and the oil pressure those three harnesses I kind of just uh routed them the same route as some of these other Factory uh engine harnesses where I go back zip tied it and then this is where I go through I put this rubber grommet it’s actually a
05:03 PCV uh rubber grommet that I just used for going through that part of the um firewall and then one of the harnesses comes up here and it’s going to go into the uh the coolant level sensor which I haven’t fully wired up yet because I still need to figure it out so it comes
05:22 through here and then runs into the analog module for the banks ey Dash and then it goes can’t really see it but down in here it runs through the firewall I put another rubber grommet so there you can see the rubber grommet coming from the four Channel analog module and it just runs
05:40 straight through the firewall down underneath the dash and then inside the vehicle yesterday I had to run the cable that comes from the four Channel analog module up the side all the way up to the OSH and then there’s wiring that goes from the ID Dash itself that needs to go
05:57 to a power and ground and I ran that down down in the foot well and I had to use some steel fish tape fish it up over the uh Center hump get it to the other side because the fuse box is behind the glove uh behind the glove box on this side so I used a fuse tap on that side
06:16 for power and ground and then in the meantime I or at the same time I also hardwired uh the GPS with a hardwire kit so I went and ran that cable up and down neatly in there so now we have a hardwired GPS hardwired uh dash cam front and rear and then also the ID Dash
06:35 in this vehicle okay so everything’s wired up now just turn the vehicle to the uh run position here so you can see the gauge turns on all right so I’ve already uh set up a few parameters here on the idh when you first set it up it asks you for your engine displacement and then you have to
06:54 go into the settings and uh for this one I set it as like no OBD or Standalone and then that way the next time you turn on your vehicle it uh turns on automatically by itself so here you can see I’ve set up a few things um kind of playing around with the settings this is
07:11 a this is a very uh very complex little gauge system and it’s a very well-designed um thought out gauge but essentially there’s uh you hit this button and you can can go through the menu and adjust certain parameters I’ve again like I’ve said I’ve only done a few things I’ve adjusted the the colors
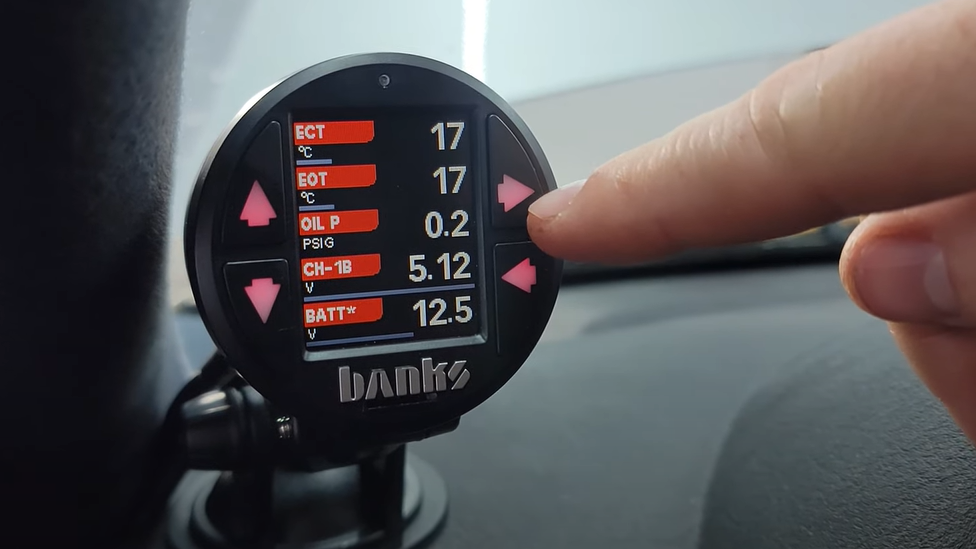
07:31 and uh kind of gotten the layout where I want it so I have all the four Channel analog uh channels on here already set up except for the um engine coolant level gauge which I still need to figure out so that first one on the top is the engine coolant temperature second one is
07:47 engine oil temperature third one’s oil pressure fourth one is the uh coolant level level which I still need to um figure out and then uh you automatically get voltage off of the idh as well when it’s hooked up to your to your uh 12vt Battery Source so it can detect what
08:06 your voltage is too so those are the five parameters that I’m going to monitor um at any given time I haven’t set up alerts high and low for these yet because I still want to figure out the coolant level sensor before I uh adjust those but essentially to uh to set up your four Channel analog
08:24 module you go to Banks modules and then four Channel analog and then you can go into each one set it up the way you want it uh if it’s temperature or pressure probe set that and then what type of sensor you have and then go down to change map parameter and you can select that and then change
08:42 it into like you know engine oil temperature for example and then when you go back and set up your gauge selection back here you just go and choose you know ECT or engine oil temperature oil pressure whatever and it’ll automatically map to the the um the four Channel analog uh
09:03 that you had just set up so one thing I wanted to show because I hadn’t seen too many videos online is the let’s go back to the banks modules if you have your own uh sensor for example and you need to map it there we go Channel 1B so you can come in here enable the
09:25 channel and then you can come in here you know choose what do you want it to be pressure temperature voltage so if I choose voltage for example and then calibration you can go volts or you can make your own custom table which I haven’t really messed around too much
09:40 with but you can make your own table and even in here if you don’t want it to work off voltage you can make it work off of resistance too so if you have a you you can pretty much make any sensor work if you mop it with your own table and set an offset I guess too if a
09:58 if there’s an offset value on whatever sensor you’re using uh but essentially yeah you can take any sensor map it to the ID Dash and then make it work and have a you know have a readout of whatever that sensor is for the only thing I haven’t figured out is if you can so for example for this
10:20 one um the coolant level sensor if I want to call it something other than CH like Channel 1B of the analog module I’d have to come in a change m param ameter and choose something that aligns with what I’m trying to read but I don’t see the ability to add any custom name and I
10:38 can’t find you know coolant level in here anywhere so I might have to contact Banks and see see what we can get set up for the ID Dash um for you know having something called coolant level sensor instead of Channel 1B so I’m going to go ahead and try and figure out this
10:55 cooling level sensor and then I’ll get back to you and show you kind of what it feel figure out to to make it work with the ID Dash okay so I just want to explain how I’m testing and hooking up um my own sensor to the banks ID Dash so in order to understand this properly you
11:12 need to First understand how your sensor works that you’re going to be installing on the vehicle so this is a resistance-based sensor um you can also have voltage based sensors that uh should be three wire that’ll have a power ground and a signal wire um this resistive base sensor just has two wires
11:32 so in this case I’m hooking up uh both the leads to the black and the white wire on the idh the red wire doesn’t get hooked up for resistive base sensors okay so the way the sensor works is it’s a normally open read switch so when your coolant level is uh in the correct spot
11:55 and that float that has the magnet passes by here it has a magnet that’s um close by to this read switch this sensor and it’ll show it’ll it’ll give you resistance on the sensor which will tell your gauge that coolant level’s fine when the coolant level drops and the
12:17 magnet comes away from this that’ll open the switch and you’ll have no resistance anymore and that’ll tell your uh the warning on the dash to turn on that says your coolant level’s low so essentially you need to understand how your sensor Works in order to hook it up to the ID Dash but that’s the way
12:36 my sensor works it’s just a switch it’s on off um when it’s in the right spot I get a resistance resistance value when it’s not in the right spot um in other words the magnet’s away from it and the coolant levels low or too high for example the uh switch will show that um
12:55 it’s an open circuit basically so then the light will pop on so you need to calibrate that like calibration curve of whatever your sensor is to the ID Dash and then you can program in you know what you want it to look like on uh on the gauge okay so on the ID Dash you can
13:13 see Channel 1B is the one that I’ve got got hooked up to the coolant level sensor so I’m going to go into my menu here go to Banks modules four Channel analog Channel 1B that’s where my coolant level sensor is want to enable it um set the type to voltage come down
13:35 here come down here set the calibration to um custom table let’s go back and then config custom table so in here this is important um for my type of sensor a resistance uh type resistance-based sensor you want to come in O you want to come in to this table set resistance or voltage so in this case I
14:00 have a resistance-based sensor I want to set the resistance for pullup you can set uh for pull-up you can set the pull-up resistor value so if you have a a range of ohms over your sensor you want to hit you want to set your pull-up resistor um to be about the middle of
14:24 whatever that range of values is in this case um when the switch was showing me a resistance it was only like I think it was like. 3 or4 uh ohms and then when it was open it was just an open circuit so I’m just setting it to 1.7k and then down here you can see so at zero ohms I have a value of one in
14:46 other words the switch is on and then when I have 1 ohm the cool level is too low then I’m setting that to zero so this will show on the face of the the gauge when the gauge is on let’s say my coolant level drops that sensor will show a reading of 4.5 ohms and then on
15:09 the gauge surface it’ll show me zero so when I have a value of zero Ohms on the sensor so in other words the sensor is or the coolant level is in the right spot then it’ll show me a value of one on uh the gaug so you can you can set up um you know if you had a a sensor that
15:29 had kind of had its own curve you can set up like I think it’s like up to 10 values with many different uh um you can set up like all the basically the calibration curve of whatever that sensor is so here uh you can see Channel 1B is showing zero right now which means
15:49 that my magnet is not in the right spot in other words the coolant level could be too low so if I um if I get that m maget and put it right onto the sensor that should pop up to one and that’ll tell me that my coolant level sensor is in the right spot so let me go uh get to
16:07 the vehicle here and I’ll place a magnet next to the sensor and you’ll see uh what happens here on the gauge okay so I’ve got my sensor here and this magnet and what I’m going to do is just uh bump up this magnet up against the sensor and I’ll show you what’s happening on the
16:21 gauge so I’ll kind of place it on and take it off a couple times and show you so when the coolant level’s in the right spot um you can see let me just get the magnet there that should bump up to one when it’s in the right spot so there’s one now let me get the magnet out of the right spot at
16:42 zero now put it back I’ll put it back in the right spot there’s one and zero so you can see that’s a pretty effective way um if I want to keep an eye on the coolant level in this vehicle what I’m going to do is I’m going to set up um an alert basically so I’ll set up an alert that when the gauge
17:06 shows zero it’ll alert the driver that the coolant level is low um and I’ll do the same thing for all the other parameters here with the engine coolant temp engine oil Tempo pressure I’ll set lows and highs alerts um so that way we can alert the driver if there’s any
17:20 issues going on um with the engine oil or the engine coolant okay so I just finished connecting up the new pigtail with the uh Banks uh analog pigtail I’m going to connect up my sensor throw it in the bottom of the expansion tank and we’ll see if we get a proper reading all
17:36 right so I’ve got my pigtail with the sensor hooked up it’s outside of the tank let’s go and take a look on the gauge I should have a reading of zero so ch1b that’s zero now if I go stick the stick the coolant sensor in the bottom of the expansion tank and go check on the gauge
18:03 I should have a reading of one cuz my coolant level is at the proper level there we go we got a a level of one all right and so with that success I will pull that sensor back out and I’ll wire it properly down this side get it all tucked in and zip tied properly and
18:23 then that’ll pretty much wrap up the install of this Bank side Dash system okay so I just want to give you a little update and review I’ve been using the idh here for probably about 2 weeks now just giving me my first impressions I’m pretty impressed overall with this
18:39 system I’ve now set the high high and low alerts you I’ve been using this gaug now for a little bit and it’s working pretty well I haven’t had any issues with it at all yet and here you can see the engine coolant temperature um is about 99 100° C engine oil temperature
18:56 about 90° that’s up to temperature have the oil pressure at 18 and you can see the uh coolant level sensor is in a normal spot and it shows that we’re charging so overall uh very impressed with the banks ey Dash and I would recommend getting one so thanks for watching and stay tuned for the next
19:15 video cheers
“I recently had a rapid coolant loss and an overheat,” explains Tyler Ovens in his latest video. After repairing a blown head gasket in his wife’s 2003 BMW X5 the do-it-yourselfer didn’t want it to happen again. “It took me a long time to repair it, and I don’t want it to happen again, so this is why I’m installing an iDash and sensors so I can monitor some vital temperatures and pressures.”
“I’m going to do oil pressure, coolant, oil temperature, and use the factory coolant level sensor. I’m going to integrate a factory sensor with the iDash. I’m going to show you how I install the entire system and show you how it works.”
Check out his comprehensive video where he takes you through his entire iDash project, and see how you too can have more information on an older vehicle.
Click here for even more information on the iDash, with examples of how you can display nearly anything data point in any vehicle regardless of age or engine type.
“I’m going to show you how I install the entire system and show you how it works.” If you’re curious what the iDash SuperGauge can do for modern trucks, here’s how one tuner calls it “a mini-computer” for your dash.