


96434 Torque Tube System for Jeep 4.0L

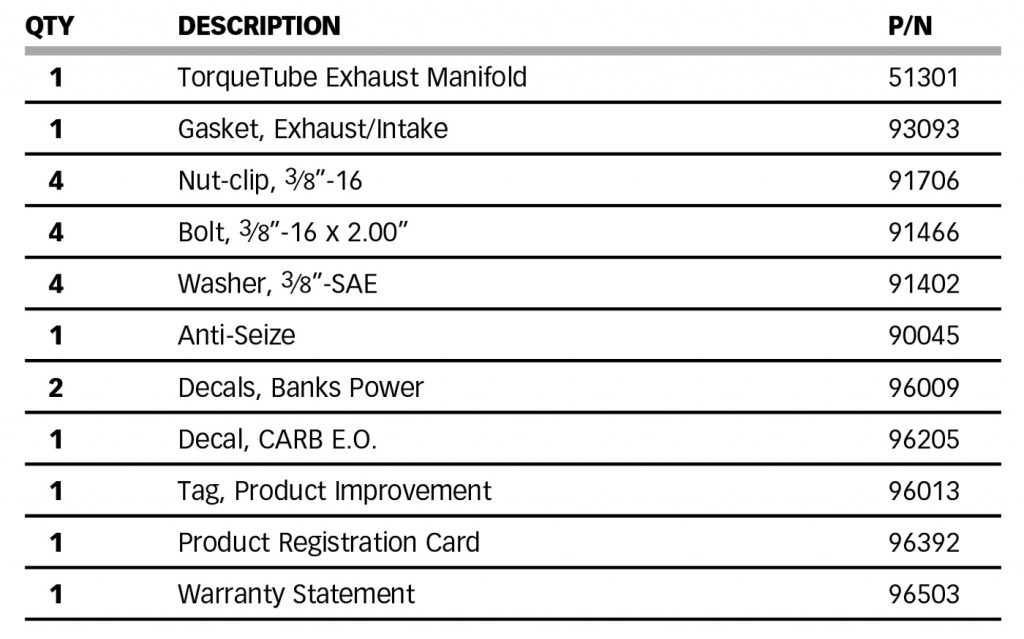
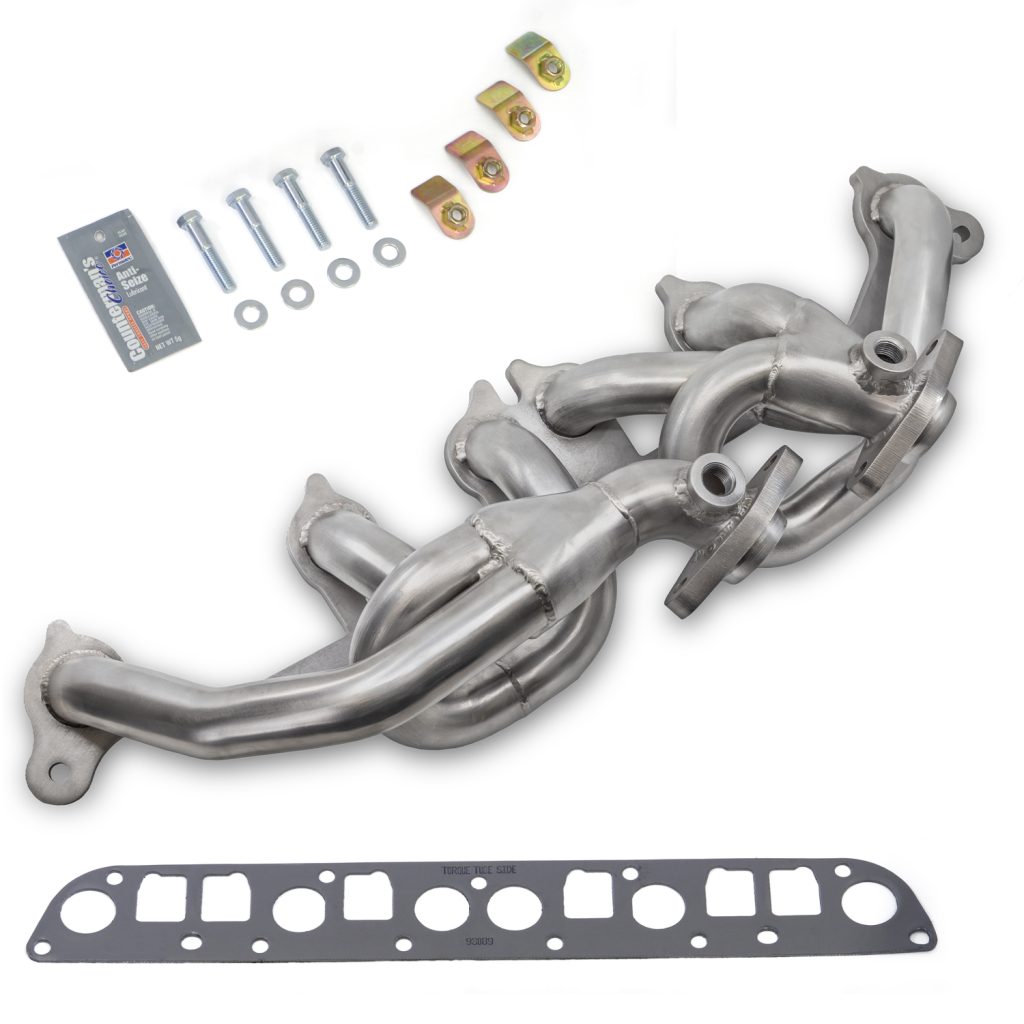
Bill of Materials
General Installation Practices
General Installation Practices
1. For ease of installation of your Banks TorqueTubes, familiarize yourself with the procedure by reading the entire manual before starting work. This instruction manual contains 8 pages of text, illustrations and parts listing.
2. Throughout this manual, the left side of the vehicle refers to the driver’s side, and the right side to the passenger’s side.
3. Disconnect the ground cable from the battery before beginning work. If there are two batteries, disconnect both.
4. Route and tie wires and hoses a minimum of 6 inches away from exhaust heat, moving parts and sharp edges. Clearance of 8 inches or more is recommended where possible.
5. When raising the vehicle, support it on properly weight-rated safety stands, ramps or a commercial hoist. Follow the manufacturer’s safety precautions. Take care to balance the vehicle to prevent it from slipping or falling. When using ramps, be sure the front wheels are centered squarely on the topsides; put the transmission in park; set the hand brake; and place blocks behind the rear wheels.
Caution! Do not use floor jacks to support the vehicle while working under it. Do not raise the vehicle onto concrete blocks, masonry or any other item not intended specifically for this use.
6. During installation, keep your work area and components clean to avoid possible dirt entry into the engine.
7. For proper performance from your Banks components and to prevent engine damage, it is essential that your engine’s fuel system be capable of delivering fuel at the factory’s specification. We have often found vehicles with inadequate low pressure side fuel delivery that isn’t apparent until performance modifications are made.
Tools Required:
• 1⁄4” and 3⁄8” drive ratchets with inch and metric sockets and 3⁄8” drive extension
• Inch and metric combination or open-end wrenches
• Standard and Phillips head screwdrivers
• Standard and needle-nose pliers
• Pocket or X-Acto knife
• Clean shop towels or rags
• Inch-pound and foot-pound torque wrenches
Highly recommended tools and supplies:
• Compressed air source and hoses
• Penetrating oil or light lubricant spray
• 9⁄16” swivel socketel-lo
TorqueTube Installation Procedure
NOTE: Do not wrap TorqueTube.
Wrapping the TorqueTube with exhaust wrap or thermo tape will void the TorqueTube warranty. Exhaust wrapping can cause the TorqueTube to crack and rust. The TorqueTube has been designed to operate efficiently and protect the engine components with out the use of wrapping.
1. Remove the air inlet tube from the throttle body and set it aside. On some models, the air box assembly may need to be removed in order to relocate the air inlet tube.
2. On the intake manifold assembly, remove the throttle cable, transmission pressure cable, and cruise control cable (if equipped) located inside the engine compartment.
3. Disconnect any electrical connectors and vacuum lines on the intake manifold and throttle body. Be sure to label the lines to ensure correct replacement.
4. Remove the fuel line from the fuel rail on the intake manifold. A fuel-line disconnect tool is needed for the fuel line release. (Disconnect tool can be purchased at a local auto parts store.) If the fuel-line disconnect tool is unobtainable, the fuel rail and fuel line assembly can be removed by disconnecting the four 8mm bolts from the intake manifold.
5. Disconnect the two (2) O2 sensors located on the exhaust manifold. Disconnect the O2 sensor from each of the headpipes. Label the O2 sensors so that they can be reinstalled in the same locations.
6. Loosen the power steering set screws located on the pump. Loosen the belt tensioner and remove the power steering belt. Next, disconnect the power-steering pump and bracket from the intake manifold.
7. To assist in the exhaust manifold removal and installation, remove the plastic pins holding the driver-side inner fender mud protector. Remove the mud-protector. Retain the pins for reassembly.
8. Remove the four (4) 10-mm bolts from the factory head pipes. Disconnect the headpipes from the exhaust manifold.
NOTE: The headpipe/pre-catalytic converter assy. may be disconnected from the main catalytic converter flange to assist #1 and #5 bolt removal and install.

9. To assist in the removal of the exhaust bolts, spray the intake/exhaust bolts with penetrating oil.
Loosen intake/exhaust bolts 3,6 and 7, but do NOT remove. These bolts act as supports for the exhaust manifold. Remove all remaining intake/exhaust manifold bolts and set aside hardware for re-assembly (a 9⁄16” swivel socket may save time).
10. Remove the intake manifold from the engine block. Remove the remaining bolts (bolts 3,6 and 7) and remove the exhaust manifolds.
11. Inspect the exhaust and intake mounting surfaces of the cylinder head and remove any rust or carbon that might prevent the TorqueTube or intake manifold from sealing. Be careful debris does not enter the engine ports.
12. Install the supplied gasket onto the cylinder head dowels. Place a small amount of anti-seize on the threads of each of the eleven (11) factory intake and exhaust bolts.
13. Install TorqueTube manifold onto the cylinder head and support with loosely installed bolts in locations 3,6 and 7.
Note: The heat shield over the motor mount may be pushed down to allow for TorqueTube clearance.
14. Install bolts 1, 2, 4, and 5 about three turns into the engine block. Guide the intake manifold onto the cylinder head dowels. Loosely install all remaining intake/exhaust factory bolts.
Be sure TorqueTube and intake manifold seats flush as bolts are tightened. (Verify dowel pins are properly aligned in the intake manifold.)
15. Torque all exhaust and intake manifold bolts to 25 ft-lbs in the sequence shown.
NOTE: Reinstall the head pipe to the main catalytic converter flange if previously removed.
16. Connect the head pipes to the TorqueTube collectors. Place the four (4) nut-clips on top of the TorqueTube collectors. Place a small amount of anti-seize onto the four (4) supplied bolts. Install the four (4) supplied 3⁄8” washers and bolts to the TorqueTube. Torque hardware to 35 ft-lbs.
17. Reinstall the two (2) O2 sensors onto the TorqueTube collectors and onto each of the head pipes.
18. Reinstall the power steering pump and mount bracket to the intake manifold. Reinstall the belt and adjust the belt tensioner to the vehicle specification.
19. Reconnect all vacuum and electrical connections on the intake manifold. Reinstall the throttle cable, transmission pressure line cable, and cruise control (if applicable).
20. Reinstall the fuel line to the fuel rail. If applicable, re-assemble the fuel rail to the intake manifold by reinstalling the four (4) 8mm bolts.
21. Reinstall the air inlet tube onto the throttle body. Reinstall the air cleaner assembly if removed.

CARB EO
Note: Your System contains two (2) Banks Power decals. These decals can be placed on top of the Wrangler 4.0L factory emblem or wherever aesthetically pleasing. Your system also contains a CARB EO label for emissions purposes. This label should be placed on the grill/radiator cross member inside the engine compartment so that it is easily seen by an emissions technician.
22. Reconnect the battery. Start the engine and listen for exhaust leaks. Check the fuel line for any leaks. Once normal operating temperatures have been reached, drive the vehicle and listen for any leaks or rattles. Correct as necessary.