iDash Stealth Pod Install in Gladiator EcoDiesel
After searching YouTube for a Banks iDash and Stealth Pod Mount review on a 2022 Jeep Gladiator EcoDiesel and not finding one, Ben TheJeepGuy decided to create his own. While the iDash Stealth Pod Mount is offered in both an upper and lower grab handle version, Ben decided to choose the lower position. “I like it being closer to where my actual gauge cluster is so that when I’m looking at stuff on the factory gauges, I can quickly glance up to see any information that I want to on the iDash.”

Full Video Transcript
00:01 what’s up y’all welcome back to the channel i’m your host Ben the Jeep Guy uh today’s video we’re going to make it real quick and short and simple it’s going to be a little bit informal uh but I saw that there is no information online uh about doing the Banks Idash or
00:17 Data Monster installation in a JL or JT um with their custom pod mount so I want to show that to you guys um and do a quick little kind of informal install over it so um let’s take a look at what all the things that we’re going to be installing today all right here’s everything that
00:35 we got uh we got the banks data monster i went with the data monster because it stores data i don’t know if I would ever need that but it seemed like something that would be smart if you do not care about like storing data and looking at it later uh save your money and go with
00:49 just the plain old eye dash this one has a U little memory card slot the Dash as far as I understand it does not have one um so if you want to log data get this get the data monster if you don’t care then just get save the money and get the eye dash now this is the bank’s uh gauge
01:07 pod mount this is and you can see on there it says lower A-pillar mount this mounts on the A-pillar at the bottom of the grab handle they also have one that goes at the top of the grab handle but I didn’t like that location as much as where this one’s going to be i’ll go
01:22 into a little bit more of why I think this is a better location for daily driving and stuff like that but you know you may find that you prefer it in at the upper location so this is this is the one that I went with and I’ll explain why here in a little bit but it
01:35 also comes with several different bits of tools and it has a step bit um to drill out for the wire that you got to run through here um and then we got the data monster over here and I’ll actually turn this over so that’s the that’s the model number the 66760 that’s the one that works with the
01:55 Jeeps if you don’t have the Daringer or the Pedal Monster um and then the gauge pod mount that is 63377 that’s the one for the lower A-pillar mount so that’s it i mean there’s not a whole lot left in the box there’s just a few little odds and ends you know this is just the cable that
02:18 runs down to the O OBD2 port and plugs in down there it does have It does actually come with a memory card and a little uh thing to help you um upload the data into it so it’s very cool let’s get this installed all right so you can see here’s your A-pillar and basically behind these little caps
02:39 you pull those off and inside of there is some bolt a bolt so that you can uh pull the grab handle and the A-pillar um trim here off uh so you can either put it up here this is where the upper mount goes or you pop off the lower one and I believe that’ll actually come out but uh
02:59 it goes up in here so I kind of mocked it up a little bit so that’s where it ends up sitting and I I like that location better than up top uh I like it being down closer to where my actual gauge cluster is so that you know when I’m looking at stuff on the gauges uh the factory gauges I can
03:19 just quickly glance up and see any information that I want on the banks uh where up here I feel like it’s just going to be a little bit more in the way so I like this location so that’s why I went with that one and uh yeah so let’s uh let’s try to get this thing installed
03:33 all right so we’ve already popped the little caps off we’re going to work on getting the bolts out of the upper and lower mounts they’re 10 mm bolts so I’m just using regular old ratchet and we’re going to get this guy out and this one too oh I do want to say something real
03:55 quick normally a lot of these instructions will say like “Hey you need to disconnect the battery.” I mean they say you got to disconnect the battery and instructions for just about everything under the sun and I’ve always kind of chocked that up to the lawyers for these companies just make them say
04:08 that so nobody accidentally crosses a wire what i don’t know you know you could be doing a lift kit and they’re like “Hey you know make sure to disconnect your why why i’m changing shocks why?” But anyways that’s me ranting a little bit but with this one these instructions do
04:26 tell you to disconnect the negative battery cables uh from the um battery and the reason for that is there is actually a airbag right in here there’s a curtain airbag in here and that’s the one thing that I don’t I try not to mess around with is when it comes to airbags
04:42 cuz you set off an airbag accidentally first off it’ll have your ears ringing may hit you in the face who knows what else is going to go happen uh and on top of that those airbags are very expensive uh to replace especially on something newer like this where you can’t just run
04:57 to a junkyard um like you can with older Jeeps so because of that I did disconnect the negative battery cables for this one just because we’re working with airbags all right the instructions also said to move this uh remove this grate and they said just grab a plastic pry tool so we’re going to do
05:37 that all right removed so now we’re going to yank this off right so uh apparently my Jeep didn’t come with the airbag right here supposed to be right there i don’t know why but I didn’t need to disconnect the battery now this is a Sport S model so that probably is why that’s not the the
06:07 airbag isn’t right there i kind of figured it would be or maybe it’s because it’s a 22 maybe the 24s have it now i don’t know but anyways I was just following the instructions instructions said there’s an airbag here disconnect your battery so depending on what year
06:21 you have you might not have to do that as importantly because you may not have an airbag there so check and make sure you got airbags or not but I don’t want anybody coming back and blaming me so I’m just going to follow along with everybody else and and do what the
06:35 lawyers say disconnect your battery all right so now that we’ve got that out uh we need to start getting ready to uh route the wires but before I do that I’m going to go ahead and try to uh drill out this hole for the wire to pass through um so I’m going to go over that
06:55 here in just a second once I kind of figure it out all right so in the instructions to get the little cap off it said to pinch this little Christmas tree kind of looking thing pinch that and it’ll go through that slot so let’s see we can do this it’s not easy onehanded
07:29 see let’s go ahead and shove it on there yep that work so they also say in the instructions to hang on to it you know you never know if you’re going to go back to stock so I’m going to put this in my little uh save pile of Jeep parts you never know i might end up deciding
07:44 that I don’t like the lower mount and I want to do the upper mount and I’m going to want this guy back so I’m going to hang on to that now I’m going to mark my hole right here and get that drilled but I need two hands so we’ll see you back here in a second all right you can see
07:59 I’ve made my mark they say to use like a silver Sharpie i didn’t have one so I used black one and it marked fine you can see I already started to drill in and then I was like “Nope I need to show this.” So uh we marked our hole and everything and the way you do that is
08:12 you slide the mount in place right there make sure it’s nice and snugly fit and then if you look down in there I don’t know if you if it’s showing up on the camera very well you cut there it is you can see you can take the Sharpie and go down a hole through the back side of it
08:29 and mark your hole so that one obviously looks real good so I’m going to keep drilling where I’m at that should end up with my hole in the right place so yeah I’m going to get back to drilling this and I’ll show you guys what it looks like in when I’m done all right got my hole drilled uh
08:47 the step big worked pretty good um they do tell you in the instructions to mark it off at the 16 mm spot uh cuz that’s as big as you want the hole to go to so we marked it off at 16 mm i think it’s Yeah see the You can see the 14’s exposed and then we are overlapping the
09:06 tape over the 16 so we are actually drilling it out to the 16 size that’s one thing I had to kind of check the instructions back and forth and see how they worded it but anyways um the step bit worked out really well there was like a a lot of leftover material on the
09:23 other side that where the step bit couldn’t drill all the way through um so all I did was take a razor knife and I just cut it out from the backside and now it’s a nice clean looking hole now the next thing that we got to do is we got to actually run the wire from the
09:38 OBD2 port up through the dash and get it up here so that we can pull it through as we try to mount the uh A-pillar trim back so we’re going to have to pop this off we’re going to use the plastic pry tool and pop that off and try to see if we can fish that wire down get the OBD2
09:55 port plugged in and then we’ll have our wire coming out up here and then uh get it all put back on and get our gauge uh put in the mount connected up we’ll connect the battery back and we’ll be good to go so let’s get the rest of this done all right so I’ve done some wire
10:11 fishing we’ve got the OBD2 port plugged in wire runs up that way and then it comes through it might not show up in the camera very well but there’s a little gap right down in there right down in there you can see um I’ve got a little I guess it’s a quality control mark or
10:30 something and then there’s this little lower cutout and then right back there right back in there there’s a little bit of a gap that you can fish the wire through it’s a little tight i actually had to push on the plastic dash a little bit right here to get some plastic to
10:45 move out of the way just enough to fish it through but I got it up and I got back through there and then it’s going to pop out right here and then I’ve already fished it through the hole in the A-pillar mount so I’m going to mount this and then uh I’m going to get the
10:60 gauge uh on wherever it ran off to and uh that way I can go ahead and kind of gauge how much length that I need and then I can pull the wire back through here a little bit coil it up zip tie it together leave it right back there and put my panel back on so I’ll show you
11:16 guys what that looks like here in just a second all right so we’ve got this back in place um you can see there’s a lot of slack here so I’m going to end up you know pulling it back so just like that and then I’m going to coil it up down here and then I’m going to take this guy
11:35 and I’m going to go ahead and fish the wire through that hole that we made our mark through in the back and slip it up into here now the instructions made sure to really keep Leave that there for a second there’s a little washer that comes with this bolt they’re going to
11:52 We’re going to replace the 10 mm bolt factory bolt with this bolt uh because it’s easier to get this tool this Allen tool with the little ball head on it see um it’s easier to get that up in through the mount than to try to get the factory bolt back in there it won’t It won’t fit
12:09 so we’re going to uh try to get this bolt in there and then we’re going to tighten it with the tool provided uh however the bolt does come with a washer now they said it needs the you need to move the washer all the way up against the head if it’s out here somewhere then
12:24 it as you’re tightening it it they said it could bind and you know get sideways and get and bind and cause you know maybe this breaks or something doesn’t get or whatever so just they made a point of it i’m making a point of it so now we’re going to try to get this
12:40 slipped up into there through the mount which is challenging in itself i’m going to try start by actually fishing the bolt through and see if maybe that helps a little bit so I’ve got my bolt fished through now I’m fishing the wire through and I’m going to take my tool
13:01 and go ahead and stick it in the Allen bolt and now we’ve got our Allen bolt in the threaded nutert that’s in the A-pillar so now we are just tightening down all right so yeah uh I will say don’t don’t do what I did and tighten that thing tight but even still that lower
13:35 one it was a lot tighter going back in it’s not like these upper bolts were just free moving in this did not want to tighten it was very difficult i don’t know why but it was so now you can see even with it tightened I can move this back and forth so I can now adjust this
13:57 and uh and get it all taken care of um now one thing that they did note in the instructions cuz the instructions for doing the lower P mount is the same instead of instructions for the upper mount they do note the differences in the instructions so when one needs
14:12 something different from the other they make sure to like make note of that um if you’re doing the upper mount see these little studs you have to take a Dremel and and and cut them off but since we went with the lower ones here or lower one we don’t have to cut it off
14:28 apparently this is a little tighter fit to try to get it up here and so there’s not a lot of room for the studs and the actual gauge but down here we got more room so again another plus for the lower A-pillar mount if you’re uh on the fence so we’re going to go ahead and plug this guy
14:49 in like that now there’s no bolts like these studs don’t do anything for the Jeep installation um they’ve got little uh pressure things that are cast into the mount itself that put enough pressure on it that uh keep it from actually coming out so that’s it that that’s mounted so you can even kind of
15:09 adjust it so if you want to get it just where you you know the angle just right you can get in there and and adjust it a little bit more so that’s going to be good now for now uh now I’m going to coil up the wire down here and the side and I’ll show you guys what that looks
15:25 like before I put the panel back on but we’re going to get to that now all right got our wire bundled up you see I zip tied it in two places kind of tightened it up super tight and I left a little bit of extra slack so that if we have to pull this out we have a little extra
15:40 slack that’ll slide up through there and back and so we uh we can tuck it around back there but it’s kind of a and it will fit and the trim panel will fit just fine uh but it’s a little bit of a challenge to get it in there you kind of got to do it multi-handed uh cuz this trim piece best
15:58 suits as it rolls in cuz you can see the trim actually goes behind this little lip on the body and uh so we’ve got to actually roll it in and so you have to kind of like tuck it in the back and then like slip it in as you fold that piece so it’s a it’s an interesting way
16:17 of doing it but it does fit and it will hide it um so if you’re working on this this is possible right here uh so we’re going to get that put away and I’ll show you guys that it does in fact fit and not bulge out or show or anything like that all right guys i don’t know let’s
16:35 see if we can zoom in a little bit yeah see it’ll fit back there okay and see how I got it it’s already behind that little lip and then you just line up your little push tabs like I said you got to kind of roll it in a little bit as you’re working at it and then just like that
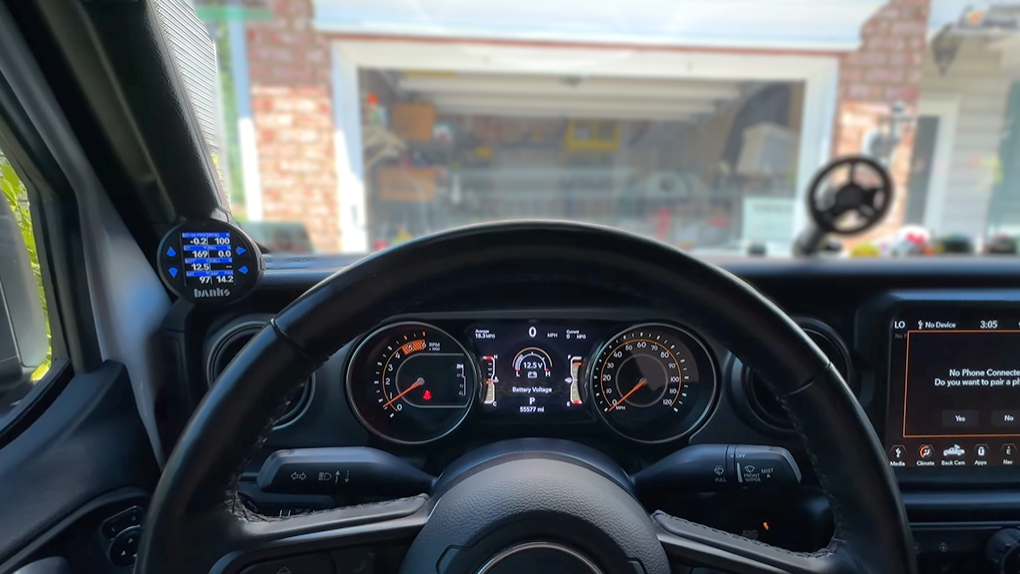
16:58 see disappear so it does fit it’s not a big deal it all lines up and it looks great now I’m going to go hook up the uh battery cables and see if this thing will turn on all right that’s it fully installed so you can see I like that location it’s a short distance to look up to that if I was
17:24 already looking down here at the gauge cluster where if I wanted to look at the upper Apillar mount it’s all the way up here so this seems like a safer way to view that information but again that might not work for everybody’s setup that’s just what feels comfortable to me
17:40 and I did figure out that you have to fully turn the vehicle on before this thing will do anything i tried hitting the button the start stop button accessory nothing on still nothing and then I have to actually start it and that’s when we will get the uh eye dash to kick on so that’s what the
18:05 whole thing looks like everything lit up i’m really liking the way this looks and I can’t wait to start monitoring data and being able to watch like exhaust gas temperatures and DPF level and and soot load and all those different things can be viewed right here on this eye dash so
18:23 I’m I haven’t really decided what all I’m going to put up here just yet i haven’t decided my layout so I’m going to be uh working on that uh here soon and just trying to play around with it decide what I want to see what I like seeing um but I love the way it looks it
18:39 just feels like it belongs there i I’m stoked guys this is awesome so uh with that being said I think we’re going to wrap up the video for today so thanks for watching guys i really appreciate it um from the bottom of my heart um you know I’m not a big YouTube star or anything like that uh so
18:57 you know I truly appreciate all the views and the likes and the comments and stuff like that so I really appreciate it a lot so much um and then speaking of comments got the comment section down below if you got any questions um or if you didn’t like today’s video you want
19:11 to tell me why please be nice i But I do accept constructive criticism i appreciate that um and uh yeah just uh give me a thumbs up if you like today’s video and make sure to hit the subscribe button down below um I don’t put out too much um it’s not as often as I would
19:27 have preferred certainly not as often as I had intended to start in this channel but I do try to get something out every now and then when I can and uh and I like to make sure that they’re like really helpful videos like today’s video there wasn’t really a video out there
19:41 for how to install Bank’s eye dash and gauge mount um in a Jeep so that’s what I wanted to do anyways thanks for watching guys i really appreciate it and until next time keep Jeeping
With the task completed, Ben sits back and appreciates the view of everything being in its right spot. “I can’t wait to start monitoring data and being able to watch exhaust gas temperatures, DPF soot levels, and all the things that can be viewed on the iDash. I love the way it looks. It looks like it belongs there. I’m totally stoked!”
The iDash Stealth Pod isn’t just about looks—it’s about visibility, functionality, and real-world usability. Ben’s choice of the lower grab handle position keeps the iDash close to the factory gauge cluster, so a glance up shows critical readings like EGT, DPF soot, coolant temps, and more—all while retaining a clean, OE appearance.
The iDash Stealth Pod mount hides cables and maintains airflow around the vent, offering a slip-in, friction-fit design with no screws or adhesive. Whether you’re monitoring highway boost or off-road performance, this Gladiator iDash Stealth Pod provides the clarity and placement you need.
For Jeep owners seeking a clean, factory-style install, this setup offers unmatched value and function. With the right positioning and installation, it feels integrated—like it belongs there. Ben’s install shows how Banks solutions deliver intuitive performance upgrades that don’t compromise stock aesthetics.
Related articles
Read more Jeep upgrade features on the Insider News blog