RAM 1500 EcoDiesel Derringer, iDash & PedalMonster Power
Blue Collar Garage chronicled his installation of the Derringer Tuner, the iDash, and PedalMonster on a customer’s vehicle. “This is plug-in power for the 2015 Ram 1500 EcoDiesel. It’s clean, quick, and reversible.”
The Banks benefit:
- Why both modules? “Selectable pedal feel + power = the full package.”
- iDash displays temps, pressures, speeds and info your dashboard doesn’t
- Built-in safety features safeguard your engine and transmission while adding power
- 50-state emissions compliant

Full Video Transcript
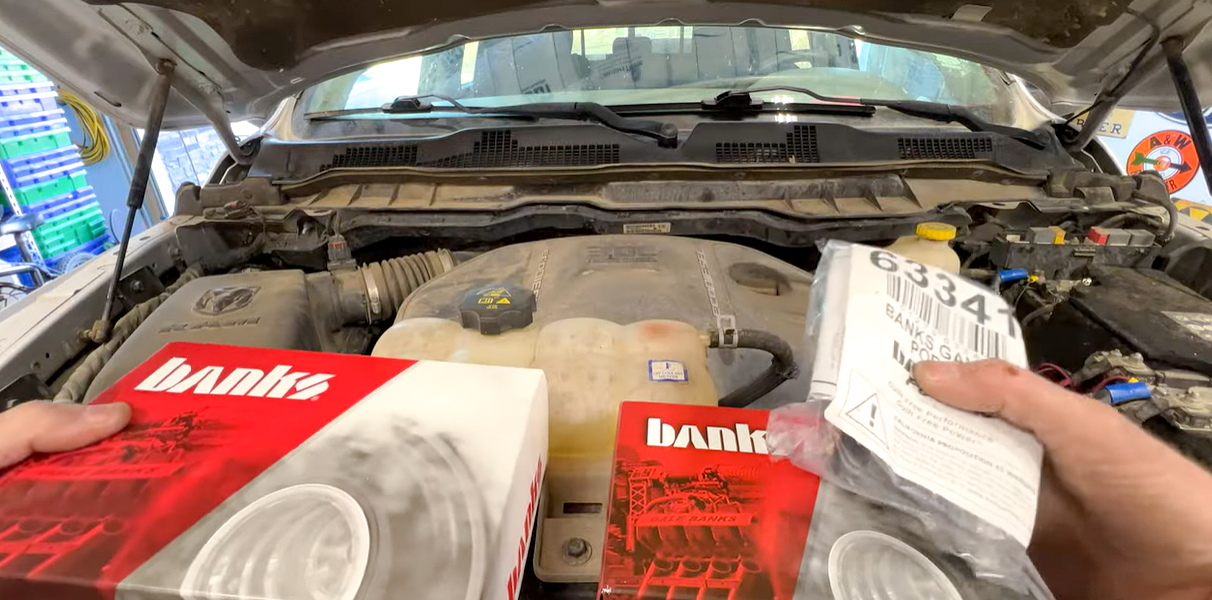
00:00 hey what’s up guys working on a 2015 Ram 1500 Eco diesel going to be installing the banks power daringer along with the banks power pedal monster so go ahead and uh pop your hood so this is what I’m going to be installing so this is the banks power daringer I think is how you say it you
00:20 can see right there 66681 um and then also the banks power pedal monster that’s going to be 64 311 and then I also pick up the uh Banks pod uh kit so this is the windshield mount one so we’ll Mount the uh gauge to the uh windshield I’ll put uh links in the description for all this stuff as [Applause]
00:49 well so first thing I’m going to do is go ahead and disconnect the negative battery cable here terminal that’s going to be a 10 mm Go and pull that off just loosen that up you should be able to pull that off and I’m just going to stick a rag in between there so it doesn’t
01:09 Arc next we can go and pop off our engine cover here this should just pop right up just like that you can see you got these uh little rubber things here that attach onto there you got one there and then this one right here and then it kind of you see those
01:27 hooks on the back there scoop into those two hooks hooks so next we need to remove the air intake here uh so we can get this foam pad out of the way give us a little more room back down in there is where we need to go so I’m going to try and disconnect the hose clamp here and then uh that one
01:45 there and let’s see if that’s going to be enough those are just going to be uh 8 mm let’s connect this one here same with this one right here next I’m going to try and pull this off of here kind like that and actually let me get this whole air
02:17 filter uh housing out of the way so to make that a little easier go ahead and this red locking tab go and push up on that and then you can push with your thumb right here and un plug that that just unplugs like that then you got your latches going
02:39 around your air filter looks like those were already detached one back here you just pull this out of the way now let’s see if this will come off a little easier so pull that off like that you can get this foam pad out of
02:60 out of here just kind of lifts off of here so I’m going to try to get you guys the best camera angles and light here but we need to tap into our fuel pressure rail right here so that’s going to be right here and the sensor is going
03:14 to be right back in there and then also our map sensor so if you take a look the map sensor here plugins right there and the map Center is going to be right there so let me see if I can get my camera back in here to get you guys a little uh better angles so first we’ll start out with the uh map
03:33 sensor so you can see it this is going to be your map sensor right here and then our plugin is going to be right here and if you notice there’s this yellow uh like locking Tab and if you can get it with your fingernail and pull that out you’re
03:46 going to pull that towards the passenger side or you can get a like a pick or a little Flathead in here and we’ll go ahead and just kind of push that unlocking that tab there we go go so you can see it’s kind of sitting outward now and then
04:04 what you’re going to do is take this uh black tab here you’re going to just kind of push down on that and that’s going to release the plug and then just unplug it like that so you can see right here so there’s that yellow locking Tab
04:23 and then if you just press down on this you can see it releases it right there so now we’ll go ahead and do our fuel rail pressure sensor there as you can see the fuel rail pressure sensor it’s going to be right there so pretty close to the map sensor there let me see if I can get
04:44 you guys a better angle here so this one’s going to be a little bit harder um just cuz the way that’s facing so I’m going to take my screwdriver again and just try to this time you’re going to press that yellow locking tab towards the firewall
05:03 me see if I can press on it from right here see if that’ll work so there you go so you can see I was able to press that out a little from there see if I can get it anymore try not to block the camera [Music] here okay that might be enough there so same thing I’m going to press down on this tab here
05:37 and actually let me just see if I can press down with my screwdriver here so if I press down on it you can see it releases right there so as you’re pressing down on that see if you can let me grab another screwdriver so as you’re pressing down on that see if I can come in from back here
06:06 press down on that and then just kind of use a another screwdriver to push just be careful you don’t want to break this so lightly push on each side just like that and then you can grab this still not the easiest but try and grab your plug and bring
06:38 it somewhat up here it’s hard cuz it’s connected to these other wire looms so there we go so there’s that one and then like I said here’s your map sensor one so the fuel rail one looks like it’s going to be three connectors
06:60 and then your map sensor is going to be four connectors so next you’re going to take the wiring harness that was included in the uh Banks power system here and if you notice Let Me undo this here you can see we got our fuel rail
07:19 pressure and then our map sensor so we’re going to tap into those plugs there so you can see there’s a female side so these two are the female female sides so this is what we’re going to plug into the original connectors there
07:35 and then these male ones we’re going to plug into the uh fuel rail down there and then the uh map sensor that we unplugged earlier okay so I’m going to start out
07:48 with the female plug for the fuel pressure rail sensor so you can see that’s going to be the top and then the bottom is going to be right there you can see the bigger Notch for the bottom so go ahead and plug this in to your factory sensor here you may need to push down on this to get that over
08:07 that and go ahead and get this locked into place and then just double check make sure that ain’t going to come out of there so to give it a little pull so we’re good there so now um we’ll go ahead and plug in this one here to the uh fuel rail there so trying to figure out what’s the best bet
08:48 here so if you can get this kind of push back down in there and then this this part here is going to click in on on the notch there towards the passenger side so me need to lift up on that this intake here get this shoved down in
09:20 there it’s hard for you guys to see here what I’m doing there not a lot of room so I’m going to get this turned so I can plug it in on the fuel rail there I said guys it’s really hard to get your hands in here and then just make sure you don’t bend any of the prongs on the plug
10:12 either so if you can get this kind of set back in there kind of like that I know you guys are hard for me to see see so then you’re going to just push that on there we go and make sure that clicks let see if I can get you guys a little better light here so you can see right there we are
10:44 on it and the tab clicked so now our fuel rail pressure sensor is done and we’ll just kind of set that other one just lay it down in here like this cuz there is that heat shield there that help protect it so now we can do our map sensor I’ll do the female side of that one as well
11:09 first so let’s get this plugged into here kind of the same thing got your uh bigger side there smaller one there let’s go ahead and plug this in may need to push up on that get that clicked into place push your locking tab there like that and now we’ll feed this other end
11:39 here um go underneath these two here let me move my camera for you guys so get that fed through and again the uh push down it’s going to be on top cuz you can see that little latch there let’s keep that slid in in there and go ahead and slide that on came off of
12:11 there oops pulling the whole thing off here now get this back in the spot here there we go slide that on and again make sure that clicks cuz you don’t want that coming off there we go so you can see that tab went downward so give it a pull just to make sure you’re on there good
12:40 enough and let me just stuff this one back in here as well kind of like that and there we go so now we can go ahead and Route our wire um I think what I’m going to do is take this end here just gonna try to get up under because I’m gonna get on that
13:02 side of it so if you can feed this through I should have did this in the first place so get that through there feed this through so something kind of like that so those wires are kind of tucked away back there and then we’ll come up and feed this along here so just go ahead and make sure your
13:45 connectors are all good on there let me get this back around here cuz that’s where it was make sure everything’s locked so just like that now we can go ahead and get the uh sound foam piece back on here so now you
14:05 go ahead and get this uh sound Ed or foam or whatever they call it back in here so the easiest way is you see this Notch here that’s going to go around this uh sensor right here so if you get this into place see kind of just forms into place right there like that next grab your air intake tube here
14:31 and if you notice on this one here so there is this little uh ball here where this is going to sit on to so make sure you get that on there but before I press that totally on there I’m going to go ahead and get this piece on first because it makes it kind of tight so if you get this on there
15:03 this piece is kind of hard to get on here try loosening this a little bit just does not want to go on there there go okay so get that kind of pushed on there and then I’m just going to get this a little snug here just so that doesn’t come off and then go ahead and get that pushed on down
16:22 there kind of like that grab your air filter housing cover here get that slid into there and then you got your notches right here so you got to bring this kind of over slide it towards the passenger side there get this on all the way tighten that up
17:00 make sure that stayed on there and then you can tighten that up the rest of the way here take your Cliffs here go and get those brought up these can be the challenge sure if you’re down all the way there we go you got your two over here be sure that make it easy for these
18:04 there we go go and plug in your sensor here make sure that clicks P down your red locking tab so you should be good like that so now I can take some of the zip ties they Supply with and I’m just going to kind of kind of go along this here so if we get our first one and you come up through here like
18:41 that so if we do something kind of like that I think we’ll be all right let me go and pull this one tight I’ll leave a little slack there though so just give yourself a little slack here it’s kind of maybe something like that
19:02 you can see there’s actually this this will help too keep it from wearing right there so pull that one tight then we’ll just go along do another one here so kind of like that and cut these off and then we’ll get our uh engine cover back on get your engine cover back on again you
19:32 got these here that are going to lock into there so you got to kind of go out and angle here get those two locked in and then press down and they snaps into place there so then just continue along um I think it’s going to be hard to get a zip tie up through here because it’s going to go straight
19:57 into the cow so if you get this kind of tight enough here you should be able to get one back through here and then I think I’ll just put one around this connector here holding these two
20:22 together all right guys so before we go ahead and start plugging everything in we need to Route our wires into the cab through the firewall and if you notice there’s a plate not sure if you guys can see that
20:34 but there’s that black plate right there trying to shine my light on it so that plate right there was for a clutchmaster cylinder um if this truck came in a manual uh they kept the plate there just in case let see if I can zoom in so you
20:49 guys can maybe see a better look at it here see if I can get it to focus so yeah that plate right there so what I’m going to do is I’m going to pull that plate off from the inside underneath the Dash there and then we’ll drill a hole
21:01 so we can get our wires ran so let me show you underneath real quick here so if you crawl underneath the dash here you’ll see right there that’s going to be uh where that plate goes and you can see you got two nuts right there those are going to be a 15 mm so I’m going to
21:18 go ahead and remove both of those and see if we can get that plate out of there it’s not much room to uh work down under here to get these off so let me get a little more room under here guys it’s really hard um let
21:44 me get these nuts taken off really quick and I’ll be right back okay guys so as you saw I was able to get that all those two nuts off so now I’m going to reach down below kind of below the battery here and uh brake booster see if I can pull that off of there without dropping
22:11 it so there we go like that okay so here’s the plate and you can see there’s foam on the back here but we need to just drill through it’s almost pretty much like a plastic so what I’m going to do is we’ll drill through the center cuz what we need to fit through there is
22:31 this cord here cuz this is going to plug into the daringer and then uh this will run up to the uh ID Dash there so something that’ll fit around this so just going to start out with a small uh bit here we’ll go just directly right into the center and I’ll actually
22:52 go on this side here so we get right in the center of this just watch back side your fingers there or your hand you can see now we’re through and then what I think I’m going to use is a step bit so I’ll take this step bit here and let’s just go ahead and start drilling through
23:18 here till we know about what size we need let’s do on this side here so I don’t want to go too big so let’s just see if this is going to work let me undo this here this is going to run down through there so it looks like it need to go a little bit bigger so let’s try that yeah maybe little bit bigger
24:12 here so there we go so just like that that’ll work fine all right guys so I I showed you the wrong cable it’s actually the round one not that other one but it’s pretty much the same size that’s going to get shoved through there so I think what I’m going to do is I got these this isn’t
24:31 included or anything but I have these laying around and I’m going to try one of these plugs here just to see if we can give it a more of a weathertight seal so I’m going to stick this through here if this is going to fit or not see if I can get this over that
25:12 so if you can get that kind of over that like that stick this through here and let’s see if this is going to fit in here so kind of like that you can see gives it a little bit more of a tighter fit through there so go ahead and feed most of this through leave a little slack maybe half
25:40 slack let’s go and get this through now and then just so you guys know the way I’m going through this is I’m uh taking my arm and I’m going up uh through that way to stick that plate through start with getting the wire kind of through there then we get our bracket so get that into
26:21 place just like that now I’ll go back down below there let me get those uh tight really quick those notes okay so I got that all tightened down below so now let me see if I can feed this plug in for the daringer uh up through
26:43 here said it’s really hard to get your hands especially down in here see if I can just pull this up see I barely got a hold of it here let’s see there we go let’s get that fed up through there so now we should be able to connect this this kind out of the way here
27:29 so this is going to connect to our Dar Ranger of course this one’s going to connect at the bottom there that’s going from your sensors so go and plug that one in so now what you want to do is so you can see there’s a lock and
27:53 then an unlock so you’re going off of this t here so if you bring this back up that one aligns with this tab here and what we’re going to do is plug this into the back of here now this already had the
28:08 cap on it um if you running like a EGT sensor you would take this off and you have to buy extra stuff for that but just for this one and then if you notice there so you can see those two indent indentations right there so you want to
28:21 line that up with those two right there on top so go ahead and plug this in and again make sure you’re in the in loock position right there so go ahead and plug these two in make sure that lines up there it’s hard to see without the light
28:50 here because you don’t want to do damage to these pins so get it pushed in there like that you don’t have to force it in but then what you’re going to do is just bring this down and this kind of sucks this plug into it right there like that so now we are locked into place so what I’m going to
29:11 do probably uh pull this down or through some underneath there and then we can stuff this uh back behind here and it should be protected from the weather so I kind of pulled that through and then like I said what I’m going to do get this on the back side of this right
29:46 here and I’m just going to go ahead and stuff this back behind this fuse panel right here put this set in there where it’s just kind of sitting uh back in there like that that should be perfect so next come back in the cab here you’re going to take your
30:13 OBD2 port plug in here along with this and uh you can go ahead and plug this in that’s going to plug in down there and now we need to run this along uh the side here so what I’m going to do is just kind of pull off this weather stripping right here so just go ahead and pull out on
30:40 that so we can run our wires up to our gauge that’s going to mount on the window there so next I’m going to go ahead and just uh kind of zip tie this wire out of the way probably to this existing harness right here and the hood
30:55 latch um cuz I’m going to run this over probably over the parking brake here and then back through here your other wire here will run up to your ID Dash as well um but since I’m going to be running the pedal monster on this this is actually going to plug into that unit and then
31:13 from that unit there’s a separate wire that runs up to the uh ID Dash so let me go ahead and get this zip tied up for now I need to let my camera charge really quick here and then I’ll come back all right guys I went ahead and R
31:25 my wire here so there’s a slot right back uh behind uh your OBD2 port here so I went through there and then just kind of zip tied it up here and then I went over top of the parking brake lever over top of that and I’ll zip tie it to um
31:44 probably this right here as well just to keep it out of the way and then it goes on the back side of here let me turn my camera so you can see it’s I fed it through here so now um I’m going to go ahead and uh get the uh pedal monster installed so we can run that wire um up to our gauge
32:05 as well so again I’m going to try to get you guys the best camera angle here uh hopefully I can do this it’s kind of tight up in here but this is going to be your uh your pedal plugin right here so you see that tab right there we’re going to press in on that and uh unplug that
32:25 see if I can get my hand up here so go ahead and press that and unplug that trying to do this one handed without blocking the camera let see if I get my other hand in here there we go so get that unplugged so you can see that’s what that looks like so just squeeze that tab
32:56 there grab your pedal monster unit here and just like our sensors under the hood there you’ll have your female end here so that’s going to plug in right here just make sure go and stick that on make sure that clicks then you’re going to take your
33:21 other end here of course that’s going to plug in where the factory one was was and you can see there is a red locking tab on this one so make sure that’s up before you plug that in and see if I can get my hand up here so get that on there push down and get your red locking clip into
33:56 place so you see now we’re locked onto there like that so go ahead and grab your pedal monster here and if you turn it on the side here you can see you got two plugins so grab the provided cable they give you with the pedal monster and this is the one that’s going
34:14 to go up to the uh ID Dash so what you want to do is uh they say in the instructions any one of these plugs will work so you can use either one I’m just going to choose the left one here so go and plug that in and then grab your so this is going to be the wire
34:34 from the daringer you’re going to plug this in to here on the other side just like that and now I’m going to go ahead and run this wire along um with my other one here on the side so let me do that real quick okay so you can see I got my two
34:56 wires ran right here so I’m going to just kind of follow these up get these fed and then you may need to just kind of push in on the pillar here get that fed up through there and run the other one here kind of the same way
35:48 and we can take out some of the slack here once we get our gauge mounted so let’s see where we’re going to mount our gauge first so what you’re going to do is take your gauge pod here and grab your two wires you’re going to stick those
36:01 through the bottom here that little hole come through grab your uh gauge and then you’re going to have a six prong and a four prong so of course the six prong is going to go there it’s from your pedal monster and then this one’s going to be from your OBD2 so plug
36:22 that one into the four prong make sure that clicks and then what you’re going to do is get this kind of centered onto the Pod there you’re going to just go in there like that and see it’s a little off the bangs logo so pull
36:43 it out a little bit here then just turn it so there we go we should be good right there so then go ahead and take this piece here this is going to clamp on through there like that grab your nut and you’re gonna drop this down in there so it’s sitting there like that go ahead and take your screw here
37:09 that’s going to go through and then you’re Allen you’re going to tighten this up and it should go into that nut there it’s kind of like that I’m not going to get it super tight yet but what that does is it holds this
37:36 gauge so when this is tight IT squeezes on this and it holds the gauge from coming out of here so that’s what holds your gauge in so like I said I’m just going to get this snug to where I can still maneuver it if I have to you can see that comes in clicks then take your window mount of
37:57 course it’s pretty basic it’s just going to go through here stick that through there let’s kind of get it snug for now until we figure out where we’re mounting it okay guys so I got this all mounted um I
38:44 went ahead and cleaned the windshield uh with the alcohol wipe got that on there and what I ended up doing was flipping this around and then that loosened this up and what I did was actually turn this gauge upside down from where I’m at
38:57 mounted it when you guys saw me mount it um cuz when it was the other way around it was sitting up here and it was kind of pointing downward this way so I went ahead and just rigged it up like this this should be fine you can see he’ll be
39:11 able to see that just fine like that so now I’m going to go ahead and get my uh wires kind of tucked in here and then we can get our weather stripping back on all right guys so I just kind of Tuck
39:22 that in there like that got them laid on top of each other just to give it a nice clean look and then went ahead and ran them down so now I’ll go ahead and get this uh weather stripping put back on
39:34 here and then we’ll go down below there and zip tie all that up all right guys so as you can see uh kind of got this all cleaned up underneath here just uh routed however you want to just to um
39:46 make sure this is uh nice and clean under here and then make sure your pedal monster over on that side the wire isn’t going to get caught on your steering or any of that um so I think we’re good there and then if I have to I left this
39:59 kind of loose so if you want to use the app you’re going to have to get on the back side of this pedal monster here and there’s a button right back here you’ll use to push in um but the guy I’m doing this for I’m sure he’s not going to use the mobile app um since he does have the
40:16 ID Dash but I just kind of left this loose in case he does decide to download the app and needs to uh send out that signal for the Bluetooth on this so now let’s go ahead and uh connect our battery and we should be ready to fire up so go ahead and connect your battery back up here your negative cable
40:41 there and grab your 10 mm go ahead and all right guys so now let’s go ahead and calibrate the pedal monster and fire this up now I did just get done uh calibrating this but I didn’t realize my camera uh I must have forgot to hit the record button I thought it was recording
40:58 but it wasn’t but we can go ahead and do it again so go ahead and uh start it up here and your gauge should fire up [Music] there and I don’t know all the um what all this has on it you know there’s all
41:23 kinds of stuff you can do with this gauge and set it up and everything um since this isn’t my truck this is just the customers um I’ll let him set it up to the way he wants to but I know right off the bat here these up and down arrows can control the power so like if
41:37 you go up you can see you got your different levels I think if you go to six that’s the highest you can go so that’s going to be your highest power level um I’ll just take this back down to stock for now and then you got these
41:49 two arrows over here so if you hit the top one that brings you to this menu go down to Banks modules down there and then hit the arrow and then pedal monster and then if you go down to calibrate so when I did this the first time when my camera wasn’t recording
42:09 this said incomplete so if you guys are doing this for the first time uh it’ll say incomplete so we’ll just go ahead and do it again it doesn’t really matter so hit the arrow here preced the calibration yes so now you’re going to depress the gas pedal all the way to the floor hit okay release gas
42:29 pedal now go ahead and do it again to press gas pedal okay release you can see right there now our pedal monster is calibrated um so like I said you can go through a lot of this stuff on here um let’s see what it says for daringer that just shows the power level go back um
42:52 you got a bunch of you can do logs shift the light uh gauge selection gauge layout I mean there’s all kinds of stuff on here alerts so like I said um I’ll let the customer do this the way he wants to um you can see right now it’s just set on RPMs so if I raise the RPMs and then uh engine coolant temp
43:19 97° so um probably just put this on let’s just try power level two or three when I go to take this out for test test drive and um really that’s about it so one last thing you want to do is grab your uh carb sticker here I’m just going to put it right
43:37 here place it somewhere where it’s not going to get worn off and like I said I’ll just go probably right here be fine it’s kind of like that and then also they give you this Bypass Plug so um
44:04 that’s just for you can see for Diagnostics purposes only and it says store in a glove box so don’t throw this out make sure you put that in your glove box all right so that’s going to wrap up the video again this was a 2015 Ram 1500
44:16 ECO diesel went ahead and installed the banks power daringer along with the banks power pedal Monster uh really simple install actually the hardest part is those electrical connectors as especially on that fuel rail but really it’s not that bad um when I ordered this for the customer uh from
44:34 Banks I was originally just going to go with the daringer but uh the banks rep called me and said to get the full benefit of the daringer you want to get the pedal monster on top of that and then you get the full benefit out of the
44:46 whole package so that’s why I went ahead and installed the uh pedal monster as well um I’ll go ahead and take this for a test drive we’ll see how it does of course this isn’t my vehicle so I don’t know how it did before I’ll have to wait wait and see what the customer says on
44:58 it but hopefully he likes it and uh gets a little more power out of this so like I said hopefully this video helps you out if it does why don’t you uh hit that subscribe button check out all my other videos and I’ll see you in the next one thanks for watching