Maximize Ford’s Triton V-10 Output with Banks’ PowerPack System
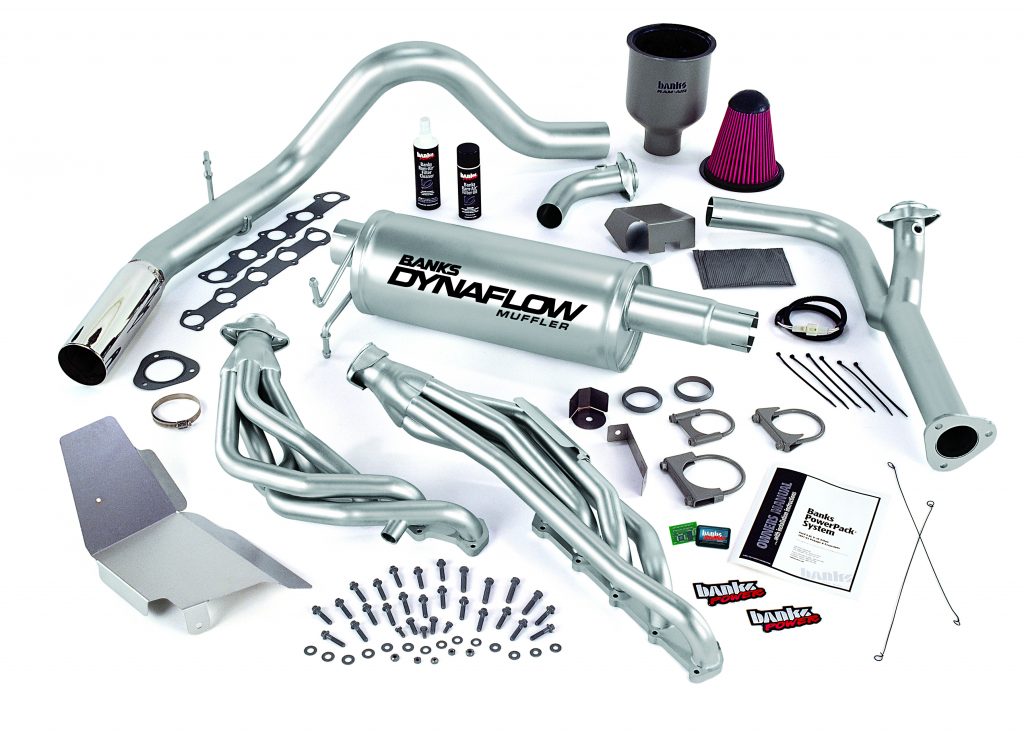
This shot of Gale Banks’ PowerPack® kit shows the non-electronic components included in the system. The torque Tube exhaust manifolds (tubular headers) flow through a special Y-connector, which flows through a 3.5-inch exhaust pipe and on through Banks’ DynaFlow muffler. Also included is a high-flow K&N FilterCharger with a special airflow-enhancing housing and a complete array of gaskets, clamps, heatshields, and related installation accessories.
By now, every enthusiast in the world recognizes that the performance and efficiently of an internal combustion engine draws a direct link to the airflow, into and through an engine. However, it’s not only about quantity; the quality of airflow is of equal importance. Managing and improving an engine’s airflow is a complex task, requiring intense engineering and testing, lest the airflow be reduced or its velocity disturbed. In the aftermarket, the exhaust side of the airflow equation garners the most attention, probably because power gains are readily apparent.
As with most late-model powerplants, the Triton V-10 engine in Ford’s popular Super Duty can use some help in regards to exhaust gas flow. During a period of research and development, Gale Banks Engineering uncovered numerous segments of the stock V-10 exhaust system that required changes in order to enhance and improve airflow. Naturally, increased power from the V-10 was the goal, but a throaty exhaust note wasn’t ignored by the Banks crew, nor was durability. The result was the Torque Tube headers, the DynaFlow muffler, and the 3.5-inch diameter Monster exhaust pipe, all of which are built from stainless steel.
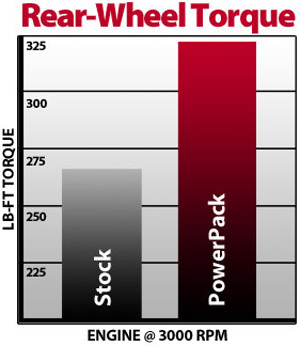
With overall performance improvements credited to enhanced exhaust flow a given, Gale Banks looked toward additional components that work together to further improve the Triton V-10’s overall response. Among the accessories developed by the Banks team are the OttoMind, an engine calibration computer module that tailors the factory fuel curve into one that provides the proper amount of fuel for the airflow improvements produced by the Ram Air filter element, the High Rise filter housing, and the exhaust system. The exhaust system and the OttoMind are collectively known as the Banks PowerPack system.
Although many aftermarket components lay claim to an increased level of power, installation can be a chore for all except the most mechanically adept. Gale Banks’ V-10 system is designed and manufactured with a straightforward installation in mind; enthusiasts who enjoy installing performance components will find the Banks kit fits well and is supplied with detailed instructions. Keep in mind that the header installation is fairly involved, and it will require the better part of a day to complete. Installing the Banks headers isn’t a technically challenging affair, it’s just that there are wires, hoses, and related components that need to be removed and then reinstalled with the new headers, so it’s a time-consuming process.
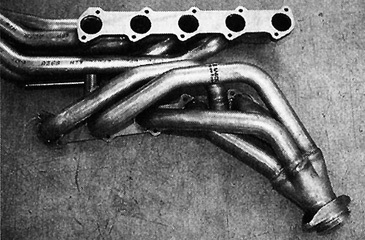
In addition to the Banks PowerPack components, we chose to install Banks’ TransCommand kit which serves to further fine-tune the PowerPack kit by adjusting the transmission’s shift points (firmer) as well as recalibrating the E4OD/4R100 transmissions to performance-spec style.
With the overview of the PowerPack’s components complete, let’s watch as Team Banks illustrates the installation process on an ’02 Ford SuperDuty 4×4.
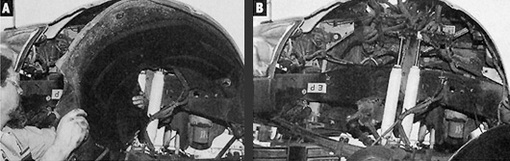
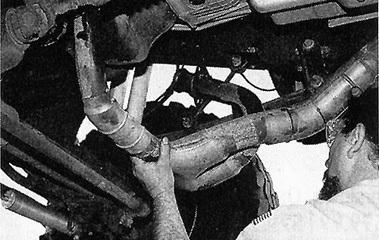
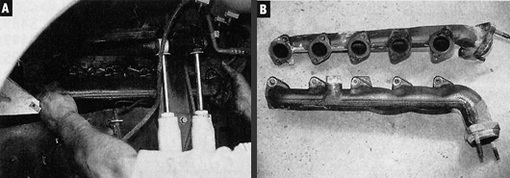
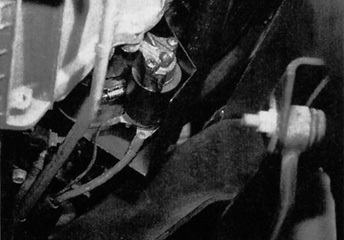
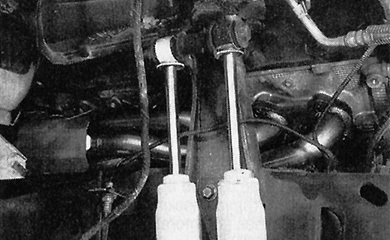
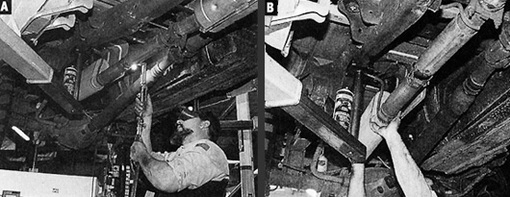
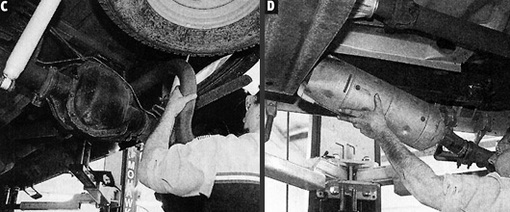
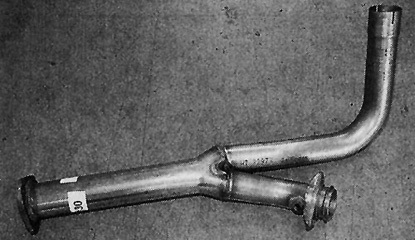
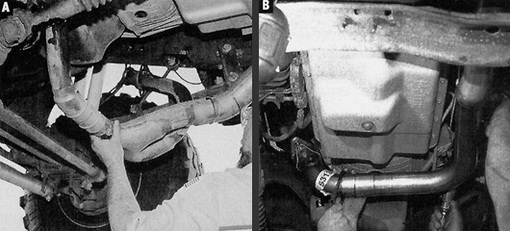
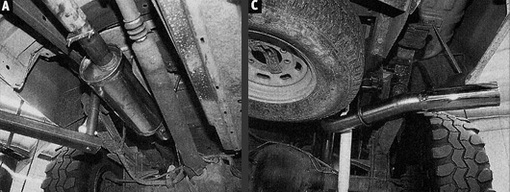
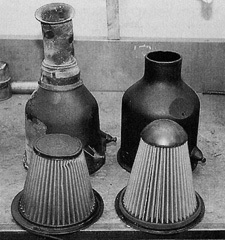
2. A&B. With the SuperDuty up on a lift and its battery disconnected, the Banks’ crew started the install by removing the plastic inner fenders from the front fenders. This step is required for access to the IE exhaust manifolds and the installation of the new Banks headers. You’ll find vacuum and electrical accessories attached to the inner fenders; carefully route them up and away from the general area and secure with tie wraps or tape.3. Locate the 02 (oxygen) sensors in each head pipe (downstream of the factory exhaust manifolds), unplug the electrical connectors, then remove the sensors, taking care to mark the sensors as driver and passenger. Unbolt the head pipe (Y-pipe) assembly from the OE exhaust manifolds and remove the pipes from the truck.4. A&B. Remove the stock cast-iron exhaust manifolds by unthreading the nuts and studs, then remove the manifolds, or you can remove the nuts and studs together, which may be the best method, as the fasteners may be rusted in place. Remove the OE manifolds, and then completely remove the manifold studs from the cylinder heads. You can see that the OE exhaust manifolds are of a log-type design, which is good for manifold-to-frame clearance, but it doesn’t do much for gas flow, as the exhaust isn’t efficiently routed through the system.5. Banks provides a starter heatshield to reduce starting problems associated with heat soak. The shield must be used to keep the starter and solenoid at an operational temperature. Attach the shield with the supplied hose clamp.6. The banks TorqueTubes are built in a quality manner, using stainless steel flanges and tubing. The flanges are a full 5/8-inch thick, providing excellent resistance against warpage. The headers’ primary tubes are 1.75-inches in diameter, perfectly sized to the flow rate of the V-10. the 3.5-inch collectors include a captured, floating flange.7. Clean and inspect the exhaust flange-mating surface; be careful, the cylinder heads are aluminum. Using the supplied bolts, install the header gasket and the Banks TorqueTubes. Continue installing the new fasteners, making sure not to cross-thread the bolts into the soft aluminum cylinder heads.8. A,B,C&D. Separate the factory muffler and tailpipe from the catalytic converter and intermediate pipe using a torch or a saw. Be careful with the catalytic converter’s flange, as the cat will be re-installed at a later point. Remove the exhaust pipe. Measure according to Banks’ instructions, then cut the pipe leading to the catalytic converter, and remove the converter. Save all the exhaust system hardware and pipe hangers because some of them will be used with the new exhaust system.8. A,B,C&D. Separate the factory muffler and tailpipe from the catalytic converter and intermediate pipe using a torch or a saw. Be careful with the catalytic converter’s flange, as the cat will be re-installed at a later point. Remove the exhaust pipe. Measure according to Banks’ instructions, then cut the pipe leading to the catalytic converter, and remove the converter. Save all the exhaust system hardware and pipe hangers because some of them will be used with the new exhaust system.9. Here’s the new Banks Y-pipe, which is installed aft of the new headers and is designed to smoothly blend the exhaust gases from the two cylinder banks into a single exhaust pipe. The header flanges are thick steel for leak free performance; the exhaust pipe flange is positioned when Banks builds the Y-pipe.10. A&B. Slip a clamp over the end of the Y-pipe, then slip the catalytic converter onto the end of the pipe. Place the Y-pipe and catalytic converter assembly up in the vehicle with the converter’s mounting pin installed inside its rubber hanger. Install the conical seals, and then attach the extension pipe extension.11. A,B&C. After repositioning the OE exhaust system hangers, install the DynaFlow muffler and the tailpipe. Note the stainless-steel construction of the muffler and the tailpipe. The DynaFlow muffler is simply clamped into place on the pipe exiting the catalytic converter as well as on the entry to the tailpipe; the tailpipe is equipped with a stub for easy installation onto the OE hanger, and there’s even a large, polished exhaust tip in place.11. A,B&C. After repositioning the OE exhaust system hangers, install the DynaFlow muffler and the tailpipe. Note the stainless-steel construction of the muffler and the tailpipe. The DynaFlow muffler is simply clamped into place on the pipe exiting the catalytic converter as well as on the entry to the tailpipe; the tailpipe is equipped with a stub for easy installation onto the OE hanger, and there’s even a large, polished exhaust tip in place.12. Shown is a comparison of the OE-style filter (left) and the new Banks Ram-Air intake. The Ram-Air system on the right replaces the forward half of the stock air filter housing, generating increased airflow.