
97654 iDash 1.8 DataMonster and Super Gauge: Section 4: Layout
INSTALL INSTRUCTIONS
Part #s
66560, 66561, 66562, 66563, 61410, 66760
iDash 1.8 DataMonster® & Super Gauge Stand alone instrument for ALL 2008+ OBDII CAN bus vehicles
Please read through the following instructions thoroughly before starting your installation. If you have any questions please visit our Support Page.

Section 4: Layout
The “Layout” menu allows you to select various gauge layouts for the Gauge Screen. Some special layouts become available when connected to a module.
1. Layout Selection
To modify the number of gauges displayed:
- Go to “MENU” and select “Layout.”
- Select the desired layout and you will automatically be returned to the Gauge Screen.
Note: The “Layout” menu can also be accessed in the “Settings.”
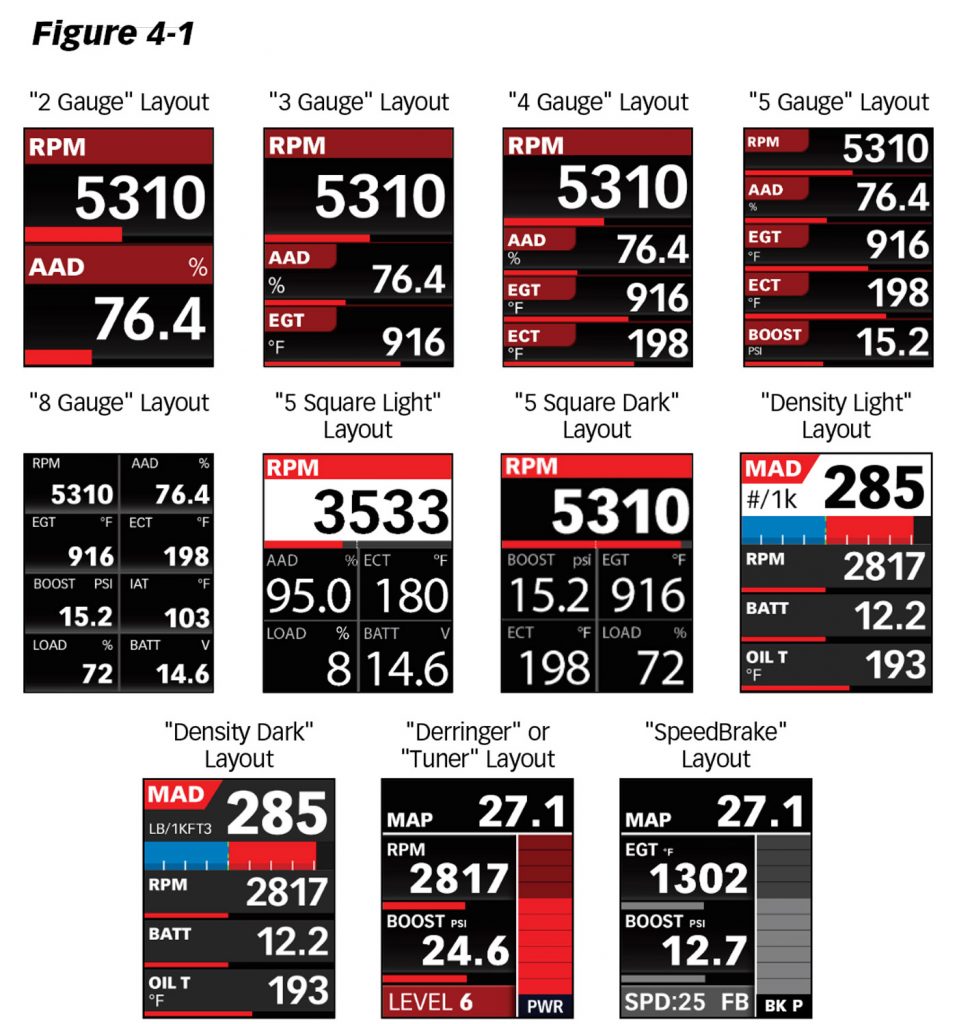
2. Density Layout
A detailed explanation of the Banks Density System is available in the glossary.
NOTE: Density is calculated from various vehicle sensors and will only be available if your vehicle is equipped with the proper sensors. See sensors available from Banks here.
To select the Density layout follow the instructions in “4.1 Layout Selection” and select the “Density Dark” or “Density Light” layout. You will automatically be returned to the Gauge Screen.
3. Field 1 Parameter Selection
In this layout, only “Field 2“ through “Field 4” can be changed with user-selectable parameters. “Field 1” of this layout is configured to only display “MAD“ (Manifold Air Density) or “BAD” (Boost Air Density).
To change, press the “Select” button on “Field 1” to switch between these options.

4. Density Bar Graph
When displaying “MAD,” the green dashed line indicates your current “AAD” (Ambient Air Density). The red and blue section of the bar graph represents “MAD” (considering 0 to be the same baseline for “AAD” and “MAD“).
If the MAD bar graph is only blue, your MAD is less than AAD. If the Bar graph is blue and red, the red portion of the bar graph represents your current boost air density (BAD).
When displaying “BAD,” only the blue bar graph will be displayed.
To adjust the scaling on the bar graph shown in “Field 1” of the Density layout:
- Select “Gauge Selection” from the main menu.
- Press select on “Density Scale:” to change the scaling of the bar graph. Options are 125, 200, 300, 400 and 500.
5. Banks Module Specific Layouts
If your vehicle is equipped with the Banks Derringer B-Bus tuner, Six-Gun, EconoMind, and/or SpeedBrake there are special layouts that appear in the “Layouts” menu when a module is connected.
6. Custom Pages
A page consists of a layout and the parameters within it. Once you’ve changed the layout to your liking, it will automatically be saved as Page 1.
To create a new page:
- Go to “Menu” and select “Gauge Selection.”
- Select “Load Custom Page.”
- Select “Page 2” and any change to your configuration on that page will be automatically saved.
- To switch between pages, hold the “Left” button for two seconds.
- To disable a custom page:
Go to “Menu” and select “Settings.”
Select “Custom Page Enable” to choose which pages turn off or on.
NOTE: The iDash can hold up to five different page configurations at once.