
97654 iDash 1.8 DataMonster with Super Gauge or Banks Modules (If Connected)
INSTALL INSTRUCTIONS
Part #s
66560, 66561, 66562, 66563, 61410, 66760
iDash 1.8 DataMonster® & Super Gauge Stand alone instrument for ALL 2008+ OBDII CAN bus vehicles
Please read through the following instructions thoroughly before starting your installation. If you have any questions please visit our Support Page.

Section 11: Banks Modules (If Connected)
The “Banks Modules” menu allows you to configure and/or control modules that are connected to the iDash. Only connected Banks Modules (Derringer, Six-Gun, EconoMind, SpeedBrake) will show up in this section.
To access the menu:
- Select “Banks Modules” from the main “MENU.”
- Scroll through the list and select the module you would like to configure.
What can I do with the sensor?
- Measure air density of ambient air around your vehicle.
- Measure air density of the airbox inlet to evaluate how effective your “cold air” intake really is.
- Measure the “Ram-Air” effect of an airbox duct location.
- Data log ambient conditions at the racetrack to compare data between different days.
- Ambient relative humidity can be used to evaluate if air will condense out during the intercooling stage.
New Parameters with the AAD Module
• Ambient Air Density Mass (lb/1kft3)
• Ambient Air Density %
• Ambient Air Pressure (psi, kpa)
• Ambient Air Pressure (in Hg)
• Ambient Air Temperature (C, F)
• Relative Humidity (%)
• Grains H2O (grain/lb air)
• Density Altitude (ft)
• Pressure Altitude (ft)
• SAE J607 Correction Factor
• SAE J1349 Correction Factor
NOTE: If your vehicle possesses OEM temperature and pressure sensors, this data will be overwritten by the more accurate and faster-responding AAD Module data.
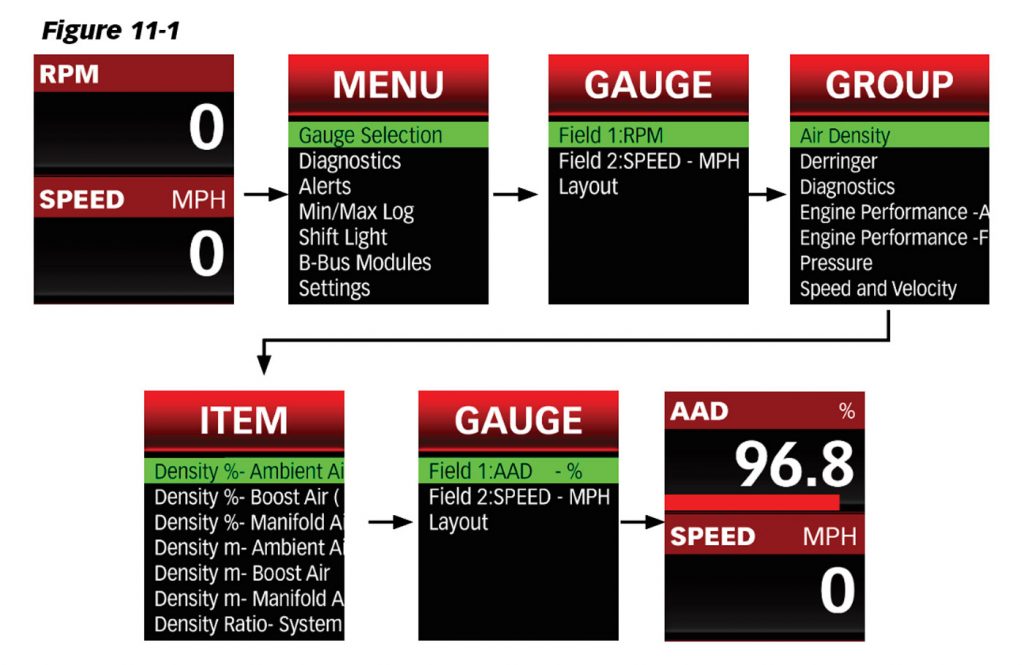
To change iDash 1.8’s displayed parameters:
- Go to “Menu“and select “Gauge Selection.”
- Select a “Field #” to change the parameter.
- Select a “Group”
- Select an “Item” to display the parameters.
- Hold the BACK button to return to the gauge screen and your new parameter will be displayed.
NOTE: Gauge units can be changed in “Settings.”
Derringer Tuner
The Derringer is equipped with multiple power levels. You can set the desired power level while the engine is running but it is recommended that you do not switch the power level under high load applications.
SPORT MODE/LEVEL 6
This mode is to be used when peak engine performance is required. This mode has been optimized for maximum power output along with improved turbo response by tuning fuel delivery and boost.
PLUS MODE/LEVEL 3
The plus calibration is designed for use in everyday driving. This power level adds a noticeable punch under high load acceleration by improving turbo response and power. Power in this mode can be sustained for a prolonged duration.
STOCK MODE
Stock mode turns OFF your Derringer tuner. Throttle response and power return to stock levels
Banks Derringer Gauge Layout
Once the Derringer is connected to the iDash, a new gauge layout called “Derringer” will be available for selection.
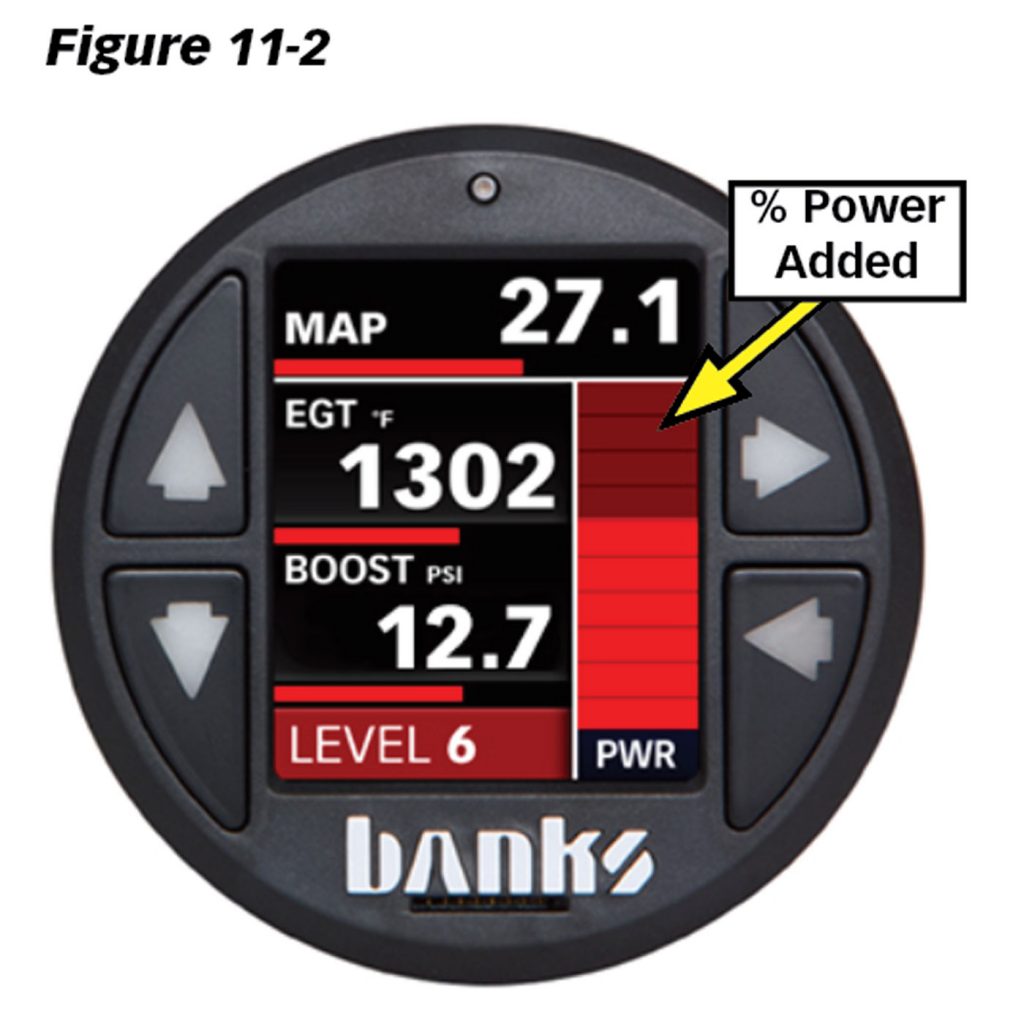
Power Added (%):
If connected to an iDash while displaying the “Derringer” layout, the vertical bar graph on the right-hand side represents, in real-time, how much power the Derringer is adding (See Figure 11-2). In Stock Mode, there will be no change to the bar graph and in Sport Mode/Level 6 the bar graph will reach 100% under proper operating conditions.
Changing Derringer Settings on the Derringer Layout Screen
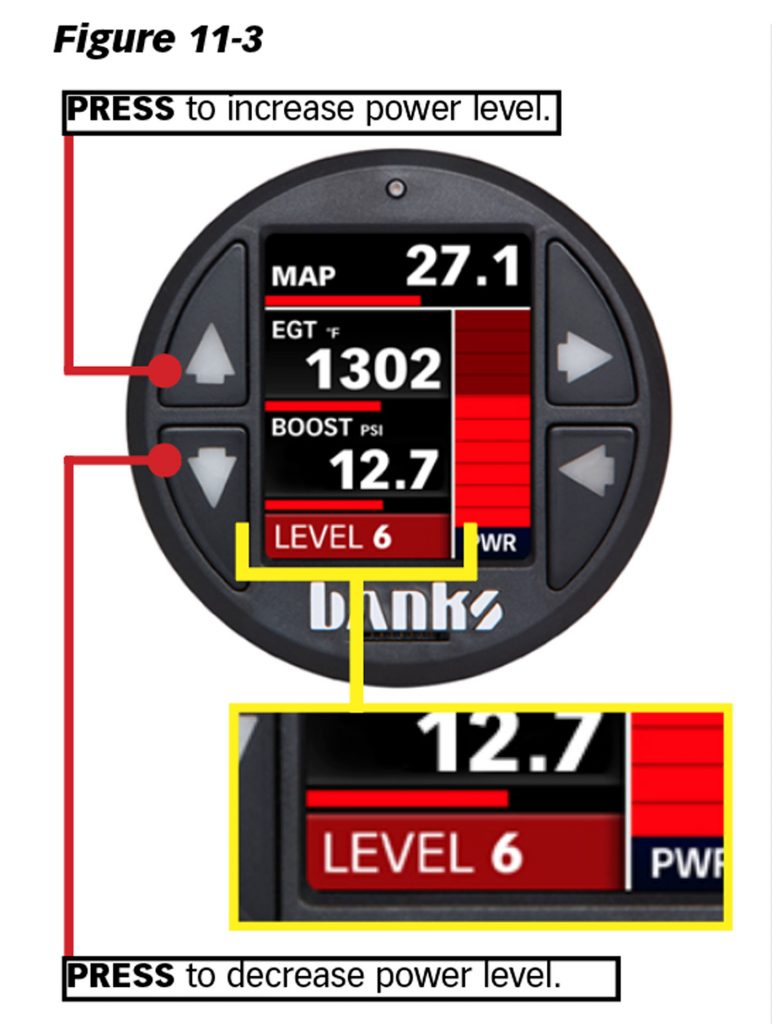
To adjust the tuner power level, press the UP or DOWN button. The current power level will be displayed on the bottom left of the “Tuner” layout.
If you are displaying a different layout and change power level with the same buttons, a message box will appear to notify you of the new power level.
Changing Derringer Settings in the Menu
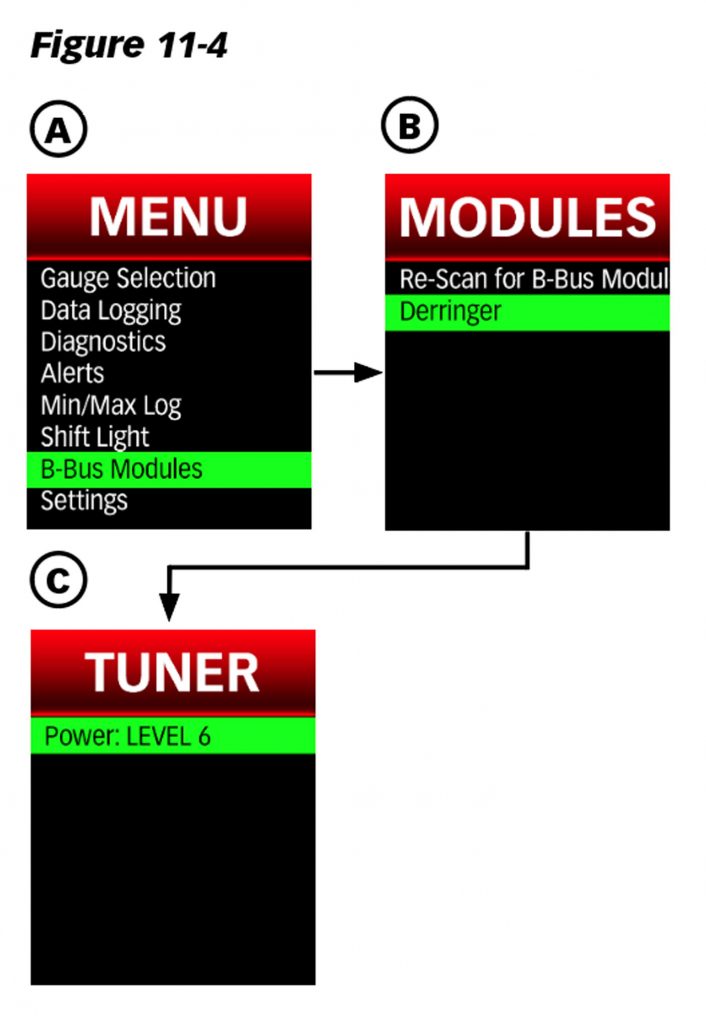
- Select “Banks Modules” from the main “MENU.” See Figure 11-4, A.
- Select the module “Derringer” for the Derringer Banks Module. See Figure 11-4, B.
- Select “Power:” to change the Derringer power level (“STOCK” to “LEVEL 6“). See Figure 11-4, C.
Six-Gun & EconoMind Tuner
The Six-Gun and EconoMind are equipped with multiple power levels. You can set the desired power level while the engine is running but it is recommended that you do not switch the power level under high load applications.
If your Six-Gun has the Speed Loader add-on, then the iDash will additionally have the Speed Loader power level available.
Banks Tuner Gauge Layout
Once the Banks Six-Gun or EconoMind is connected to the iDash, a new gauge layout called “Tuner” will be available for selection. To access the menu selection, go to “Layout Selection.”
Power Added
When displaying the “Tuner” layout, the vertical bar graph on the right-hand side represents, in real-time, how much power the tuner is adding (See Figure 11-2). In Stock Mode, there will be no change to the bar graph and in Level 6 the bar graph will reach 100% under proper operating conditions.
The “Power Added” data can also be displayed on ANY layout as a numeric value by selecting it from the “Tuner” parameter group.
Changing Tuner Settings on the Tuner Layout Screen
To adjust the tuner power level, press the UP or DOWN button. The current power level will be displayed on the bottom left of the “Tuner” layout.
Changing Tuner Settings in the Menu
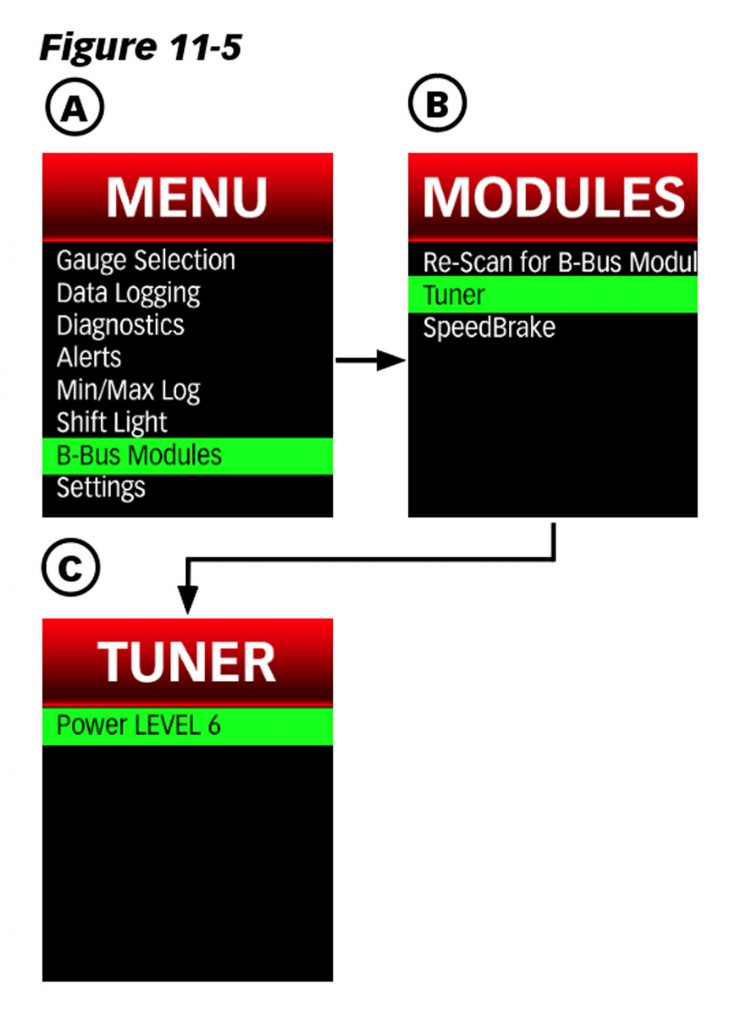
- Select “Banks Modules” from the main “MENU.” See Figure 11-5, A.
- Select the module “Tuner” for the EconoMind or Six-Gun. See Figure 11-5, B.
- Select “Power:” to change the tuner power level (“STOCK” to “LEVEL 6“). See Figure 11-5, C.
IF the Speed Loader is connected, the power level “Level SL” will be available for selection.
Banks SpeedBrake
The SpeedBrake has three operating modes; MANUAL, AUTO, and OFF. In AUTO mode, the SpeedBrake varies the position of the turbocharger vanes and selects an appropriate gear in order to maintain a pre-selected target speed. Choosing the OFF mode allows the vehicle to behave as if the SpeedBrake is not present.
Safety Features
Wheel Slip Detection – If slippage caused by breaking occurs, the Banks Speedbrake will shut off until 30 seconds after traction is regained.
Cruise Control
When utilizing the Banks SpeedBrake while your vehicle’s cruise control is enabled, cruise control will deactivate once the SpeedBrake activates.
Manual Mode
In MANUAL Mode, the SpeedBrake will activate, downshift the transmission, and adjust the turbocharger vanes, resulting in a braking effect that attempts to slow your vehicle to 15 mph (24 km/h). MANUAL Mode has three strength selections available: “HIGH“, “MED” (medium) and “LOW.”
“HIGH” strength achieves the highest level of braking force by aggressively downshifting the transmission and closing the turbocharger vanes. This setting is recommended for heavily loaded vehicles or whenever aggressive braking is desired.
“MED” (medium) strength achieves a moderate level of braking force by slightly delaying transmission downshifts. This setting is recommended for moderately loaded vehicles.
“LOW” strength setting achieves a lower level of braking force and is recommended for lightly loaded or unloaded vehicles. The “LOW” setting may also be used for daily driving.
Auto Mode
When AUTO Mode is active and the vehicle is above the driver’s targeted speed, the Banks SpeedBrake will slow the vehicle to the targeted speed and maintain it. The Banks SpeedBrake will become inactive as soon as the vehicle drops below the target speed.
Foot Brake Activation
The SpeedBrake’s Foot Brake feature provides additional braking while using your vehicle’s brakes at vehicle speeds greater than 15 mph (24 km/h).
When switching between different modes, the Foot Brake feature will remain in the setting last implemented.
When in MANUAL Mode, the Foot Brake feature allows you to limit SpeedBrake activation to ONLY when you press the brake pedal at vehicle speeds greater than 15 mph (24 km/h).
If the Foot Brake feature is disabled, while in Manual Mode, the SpeedBrake will activate after releasing the accel pedal at vehicle speeds above 15 mph (24 km/h), regardless of whether or not the brake pedal is used.
When in AUTO Mode, the Foot Brake feature will not affect the automatic braking above the set speed. Below AUTO Mode’s set speed, the Foot Brake feature provides additional braking at vehicle speeds greater than 15 mph (24 km/h)
To Activate/Deactivate the Foot Brake feature:
- Select “Banks Modules” from the main “MENU.” Then select “SpeedBrake.” See Figure 11-9, A.
- Select “FootBrake: ” to activate/deactivate the Foot Brake feature. See Figure 11-9, B.
Banks SpeedBrake Gauge Layout
Once the Banks SpeedBrake is connected to the iDash, a new gauge layout called “SpeedBrake” will be available for selection.
SpeedBrake Braking Strength (%)
When displaying the “SpeedBrake” layout on the iDash, the vertical bar graph on the right-hand side represents, in real-time, how much additional braking the SpeedBrake is applying.
Changing SpeedBrake settings on SpeedBrake Screen
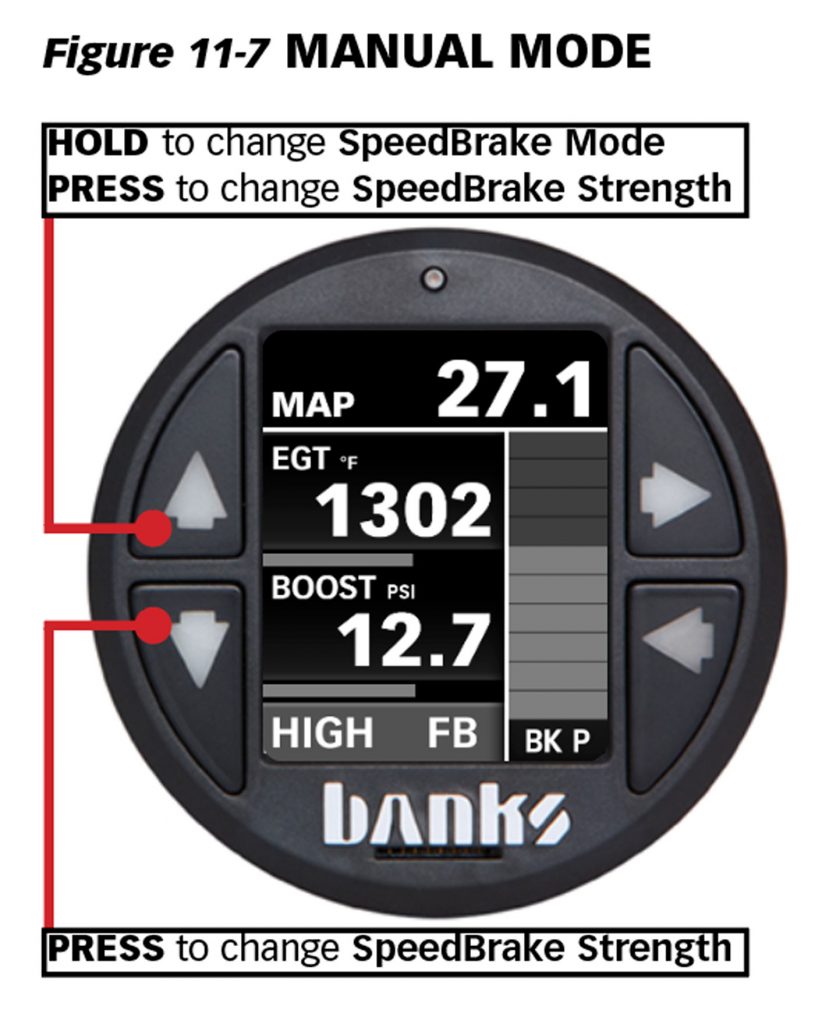
To adjust the SpeedBrake mode, hold the UP button until the mode changes. The current mode will not be shown but can be determined from the information displayed on the bottom left text of the SpeedBrake layout. If it states:
- “HI“, “MED” or “LOW“, then it is in Manual Mode (See Figure 11-7).
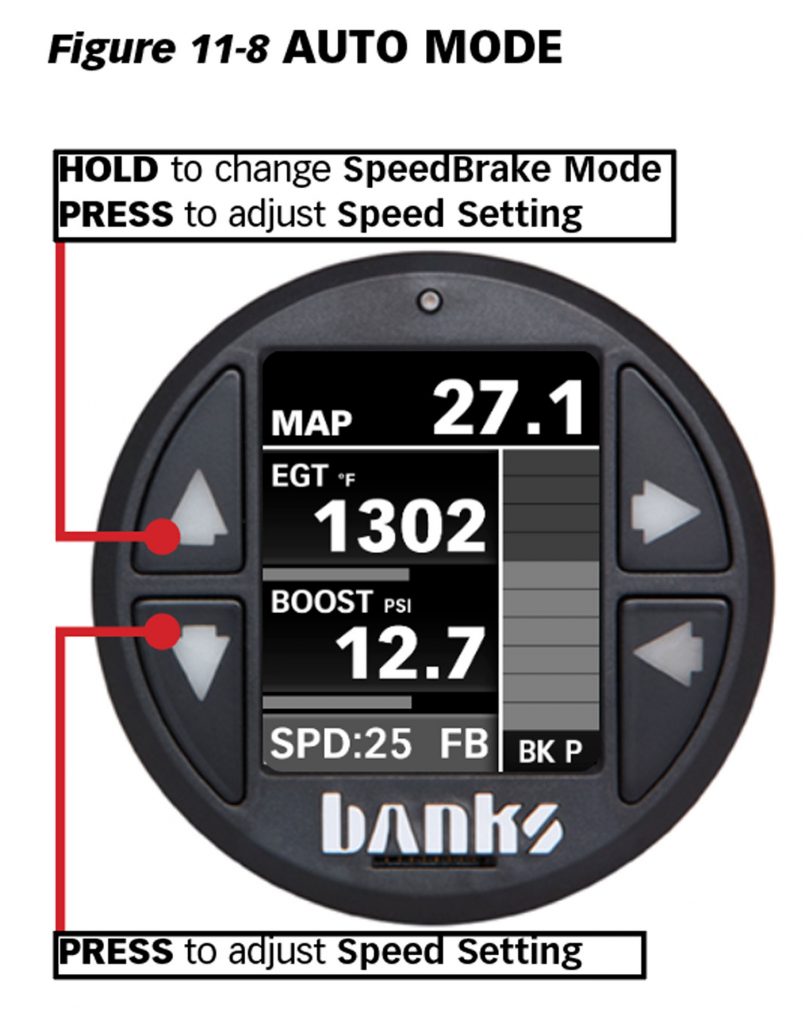
- “SPD: ##“, then it is in AUTO Mode (See Figure 11-8).
- “OFF,” then the SpeedBrake is disabled.
When in MANUAL Mode, pressing the UP button will adjust the braking strength (“HI“, “MED“, “LOW“), and pressing the DOWN button will enable/disable the Foot Brake feature, as shown in Figure 11-7.
When in AUTO Mode, pressing the UP or DOWN button will adjust the speed setting (from “25” to “75” mph or from “40” to “121” km/h) that the SpeedBrake will attempt to maintain.
See Figure 11-8.
Changing SpeedBrake Settings in the Menu
- Select “Banks Modules” from the main “MENU.” Then select the module “SpeedBrake.” See Figure 11-9, A.
- Select “Brake State:” to change the SpeedBrake mode. “MAN” for MANUAL Mode, “SPD” for AUTO Mode, and “OFF” to disable the SpeedBrake. See Figure 11-9.
- Select “Brake Speed:” to adjust the speed (“25” to “75” mph or “40” to “121” km/h) to be maintained by the SpeedBrake. See Figure 11-9, B.
- Select “Brake Strength:” to change the braking strength between “HI“, “MED“, or “LOW.” See Figure 11-9, B.
- Select “FootBrake:” to enable/disable the Foot Brake feature. See Figure 11-9, B.
NOTE: The Foot Brake feature can only be enabled/disabled in this menu.
SpeedBrake & Tuner Auto-Switching
NOTE: You must have a Banks Tuner and the Banks SpeedBrake connected to the iDash to use this feature.
The “Tuner Auto Switch” feature allows you to have the “Tuner” layout and “SpeedBrake” layout switch automatically while driving.